background image

Seat Bolt | Bolt Mount

There are four different mounting options that can be 

utilized for securing the mount to a vehicle bolt. There 

are a few things to consider when choosing the best 

location for the bolt mount. When possible the arm at the 

base of the mount should run perpendicular to the 

vehicle floor. This provides ultimate support of the 

mount. Included are three bolt brackets along with a 

base that should be utilized to accomplish this. 
Choose the best option based on the hardware in the 

vehicle while ensuring configuration provides optimal 

mount stability. 

Flat Horizontal Surface: Follow 

Mounting Option 1 on page 2.

Flat Vertical Surface: Follow Mount-

ing Option 3 on page 3.

Flat Horizontal Surface Obstructed 

Bolt: Follow Mounting Option 2 on 

page 2.

Choose a location

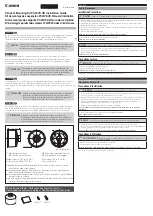
(a) 90º raiser bracket x1 

(b) 90º bracket x1 

(c) 180º bracket x1 

(d) support bracket x1 

(e) washer x1 

(f) screw x1 

 (a)

 (e)

 (i)

 (j)

 (f)

 (g)

 (h)

 (b)

 (c)

 (d)

Package Contents:

(g) screw nuts x2 

(h) support foot x1 

(i) support foot cap x1 

(j) base x1 

Angeled Surface: Follow Mounting 

Option 4 on page 3.

1

INSTALLATION GUIDE MagConnect  HD Seat Bolt | Bolt Mount

Support

For questions or concerns please contact us at:
Customer Service Support

Toll Free: +1.877.JOY.FACT (877.569.3228)

[email protected]

Summary of Contents for MagConnect

Page 1: ...ng configuration provides optimal mount stability Flat Horizontal Surface Follow Mounting Option 1 on page 2 Flat Vertical Surface Follow Mount ing Option 3 on page 3 Flat Horizontal Surface Obstructed Bolt Follow Mounting Option 2 on page 2 Choose a location a 90º raiser bracket x1 b 90º bracket x1 c 180º bracket x1 d support bracket x1 e washer x1 f screw x1 a e i j f g h b c d Package Contents ...

Page 2: ... bracket Place mount over base and secure by turning latch j i g h d Remove Vehicle Bolt Remove the bolt from the vehicle Mounting Option 1 Secure Base to 180º Bracket Assemble bracket according to diagram above The extended bracket d i g h can be utilized to add additional support Ensure connection is tight e j f g c Mounting Option 2 Remove Vehicle Bolt Remove the bolt from the vehicle 2 MOUNT I...

Page 3: ... Attach Bracket with Bolt Attach Mount to Base Replace the bolt while securing the bracket Place mount over base and secure by turning latch Secure Base Support Bracket to 45º Bracket Assemble bracket according to diagram above The extended bracket d i g h can be utilized to add additional support Ensure connection is tight i h e j f g a d Mounting Option 4 Attach Bracket with Bolt Attach Mount to...

Page 4: ...ay Step 1 Attach rubber pads to bracket tip Step 2 Attach brackets to tray Secure Device to Tray Extend brackets fully and place device onto tray Secure brackets tightly to edge of device ensuring a tight connection Extending Rotate Attach Brackets to Tray Secure Keyboard on Tray Step 1 Place tray in a flat position Fully expand brackets Step 2 Place keyboard on top of tray Secure brackets tightly...

Reviews: