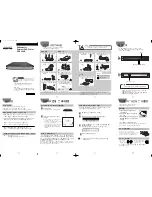
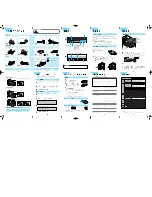
manualshive.com logo in svg
background image

Compact drive with specific attachments for a wide spectrum of applications

Air Pen Drive

Instructions for Use

Содержание DePuy Synthes Electric Pen Drive

Страница 1: ...Compact drive with specific attachments for a wide spectrum of applications Air Pen Drive Instructions for Use...

Страница 2: ......

Страница 3: ...ngular Coupling 05 001 085 8 Hand Switch 05 001 082 9 Foot Switch 05 001 081 10 Attachments General Information 11 Drill Attachments 12 Screw Attachments 14 Kirschner Wire Attachment 15 Saw Attachment...

Страница 4: ...rior to Reprocessing 26 Manual Cleaning Instructions 27 Automated Cleaning Instructions with Manual Pre cleaning 29 Maintenance and Lubrication 33 Function Control 36 Packaging Sterilization and Stora...

Страница 5: ...o run through the complete reprocessing procedure Protective covers and foils must be fully removed before sterilization Check instruments for correct adjustment and function ing prior to every use Al...

Страница 6: ...ned Synthes Vario Cases and of the specifically designed Washing Basket 68 001 800 to sterilize and store the system For care and maintenance special tools are available such as cleaning brushes Synth...

Страница 7: ...tion may compromise the struc tural integrity of the device and or lead to de vice failure which may result in patient injury illness or death Furthermore reuse or repro cessing of single use devices...

Страница 8: ...e coupling geometry of the air hose is compatible with the geometry of the wall coupling If the operating room does not have an exhaust air system then use the Air Diffusor 519 950 to diffuse the air...

Страница 9: ...nd Switch In the foot switch position only the Foot Switch shall be used If the foot switch position is set and no Foot Switch is attached the handpiece will run with full speed Either a Hand Switch o...

Страница 10: ...Mounting the Angular Coupling The Angular Coupling is coupled to the handpiece by fit ting the pins into the grooves on the coupling for hoses on the handpiece and turning the Angular Coupling clockw...

Страница 11: ...g To remove the Hand Switch grasp the lever and pull it away upwards Operation The adjustment sleeve on the pen must be set on the hand switch position for working with the Hand Switch The length of t...

Страница 12: ...3 and connect it to the air outlet socket Then connect the Double Air Hose for Air Pen Drive 05 001 083 or 05 001 084 to the female plug for Dou ble Air Hoses 5 To remove the air hoses simply slide t...

Страница 13: ...clockwise while applying slight pressure against the handpiece until it engages without holding the release sleeve in place or repeat the entire connection process Check secure holding of the attachme...

Страница 14: ...and cone technique Mounting and removing tools Lock unit Pull back the release sleeve and insert remove the tool Drill Attachment 45 cannulated with Jacobs Chuck 05 001 120 Speed approx 1 800 rpm at...

Страница 15: ...wing the arrow on the slide and insert remove the tool To secure the tool push the slide back again Oscillating Drill Attachment 05 001 033 Frequency approx 3 200 osc min at 6 5 bar The oscillating dr...

Страница 16: ...ith AO ASIF coupling hexagonal and mini quick coupling Mounting and removing tools Lock unit Pull back the release sleeve and insert remove the tool Precautions Only use the attachment with 6 5 bar to...

Страница 17: ...ten sioned The tensioning lever 1 can be rotated by 300 permitting individual adjustment suitable for left and right handed users Mounting and removing Kirschner Wires Lock unit To insert and remove...

Страница 18: ...optimally sharpened and clean Used saw blades present the following risks Necrosis due to excess heat Infections due to residues Longer cutting time due to reduced sawing performance Sagittal Saw Att...

Страница 19: ...ing the Guide as far as possible over the at tachment from the front so that it engages in the shape of the Oscillating Saw Then mount the attachment on the handpiece Note No irrigation nozzle is avai...

Страница 20: ...until it engages The burr is correctly clamped when the marking S M or L on the burr shank is no longer visible Information on handling burrs Synthes recommends using a new sterile burr for each oper...

Страница 21: ...ct appli cation of the Synthes Power Tool including the attachment and the cutting tools In particular consider the following points maximum speed of the Drill Burr Attachment for round shafts with 2...

Страница 22: ...001 103 enables the use of dental handpieces mucotomes and dermatomes designed according to ISO 3964 EN 23 964 in combina tion with the Electric Pen Drive 05 001 010 and Air Pen Drive 05 001 080 Warra...

Страница 23: ...n the grooves in the protective sleeve 4 Place the new trepan burr together with the protec tive sleeve on the perforator 5 Turn the release sleeve for trepan burrs 1 until the locking pin 2 engages i...

Страница 24: ...n fully inserted release the coupling sleeve Check that the tool is properly locked in the attachment by gently pulling on it 2 Removing the cranial perforator First move the coupling sleeve 1 towards...

Страница 25: ...he arrows for the correct inserting posi tion 2 Then turn the release sleeve of the Cranio tome Attachment into the LOCK position until it engages to clamp the burr and the Dura Guard 6 Check that the...

Страница 26: ...acked The manufacturer cannot guarantee sterility if the pack age seal is broken or if the package is improperly opened and assumes no liability in such instances Dimension Cutting tool dimension is e...

Страница 27: ...ts will contact the following materials stainless steel aluminum plastic and rubber seals Do not immerse any system component in aqueous solutions or in an ultrasonic bath Do not use pressurized water...

Страница 28: ...turer of the disinfectant The foot switch may be cleaned under running water if necessary Make sure that no water enters the ventilation hole on the bottom plate and into the 3 plugs in the back Do no...

Страница 29: ...or missing bristles 2 Manipulate moving parts Manipulate all moving parts such as the triggers sleeves and switches under running tap water to loosen and remove gross debris 3 Spray and wipe Spray an...

Страница 30: ...ughly under running water 7 Wipe Spray disinfection Wipe off or spray the surfaces of the devices with a minimum of 70 alcohol based disinfectant 8 Visually inspect device Inspect the cannulations cou...

Страница 31: ...free cloth or soft bristled brush to assist in removing gross soil For cannulations of the handpiece and attachments the cleaning brush 05 001 075 shown below should be used Note Do not use pointed ob...

Страница 32: ...ure water quality and concentration dilution 6 Rinse with tap water Rinse the device thoroughly using cool to lukewarm running water for a mini mum of 2 minutes Use a syringe pipette or water jet to f...

Страница 33: ...or 05 001 055 XXL Burr Attachment 20 or 05 001 036 Drill Attachment 90 long Loading Plan for Air Pen Drive APD Washing Basket 68 001 800 Washing Basket size 1 1 for Electric Pen Drive EPD and Air Pen...

Страница 34: ...nutes 90 C 10 Inspect the device Remove all the devices from the washing basket Inspect the cannulations coupling sleeves etc for visible soil If necessary repeat the manual pre clean automated cleani...

Страница 35: ...ts With the Maintenance Unit an optimal maintenance of the system over the entire service life can be ensured The operation of the Maintenance Unit is explained in the related Instructions for Use DSE...

Страница 36: ...ove the excess oil with a cloth after spraying It is recommended to apply Synthes Maintenance Oil 05 001 095 for Electric and Air Pen Drive after each use or when needed on movable parts on the handpi...

Страница 37: ...of oil on the valve and connect the Hand Switch to the handpiece Operate the Hand Switch by moving it up and down Make sure that the valve opens and closes and that oil get into the valve If necessar...

Страница 38: ...to the Synthes service center Check the handpiece controls for smooth operation and function Check the coupling sleeves of the handpiece and attachments for smooth operation and check for func tion to...

Страница 39: ...es recommendations for packed devices and cases are as follows Cycle type Sterilization exposure time Sterilization exposure temperature Drying time Saturated steam forced air removal pre vacuum minim...

Страница 40: ...wing chapter Disposal Besides the above mentioned care and maintenance steps no further maintenance work must be carried out independently or by third parties This system requires regular maintenance...

Страница 41: ...on Contaminated products have to run through the complete reprocessing procedure so that there is no danger of infection in case of disposal Please send tools that are no longer used to the local Synt...

Страница 42: ...r use the Foot Switch Adjustment sleeve is in the position HAND or LOCK while trying to work with the Foot Switch Set adjustment sleeve to position FOOT Safety switch on Hand Switch is in LOCK positio...

Страница 43: ...Attention When removing objects set unit to OFF Attachment or tool saw blade drill burr etc cannot be coupled or only with difficulty Movable parts have not been maintained Oil the movable parts Tool...

Страница 44: ...d 0 80 000 rpm at 12 bar only with 05 001 045 05 001 050 05 001 054 05 001 059 05 001 055 Note In regards to the operating pressure bar it is important to follow the instructions provided by the respe...

Страница 45: ...C 50 F 40 C 104 F 10 C 50 F Relative humidity 90 30 90 30 Atmospheric pressure 1060hPa 1 06 bar 700hPa 0 7 bar 1060hPa 1 06 bar 700hPa 0 7 bar Altitude 0 3000m 0 3000m Transportation Temperature Durat...

Страница 46: ...g of the surgical inter vention Generally systems can heat up if in constant use For this reason the handpiece and the attachment should be al lowed to cool down for the above recommended peri ods of...

Страница 47: ...x daily exposure time without hearing protection APD 05 001 080 78 no limitation Drill Attachment AO ASIF 05 001 032 76 no limitation Oscillating Saw Attachment 05 001 038 Saw blade 03 000 313 79 89 n...

Страница 48: ...ill Attachment AO ASIF 05 001 032 2 5 8h Oscillating Saw Attachment 05 001 038 Saw blade 03 000 313 7 8 49min Saw blade 03 000 316 9 7 31min Sagittal Saw Attachments 05 001 039 05 001 182 05 001 183 S...

Страница 49: ...le Air Hose length 5 m for System BOC Schrader 519 591 Seal Nipple for BOC Schrader Double Air Hoses silver 519 592 Seal Nipple for BOC Schrader Double Air Hoses beige 519 596 Seal Nipple for Compact...

Страница 50: ...Burr Attachment XXL No 05 001 055 05 001 111 Irrigation nozzle for Drill Attachments Nos 05 001 030 05 001 031 05 001 032 and 05 001 110 05 001 070 Irrigation Nozzle for Sagittal Saw Attachment No 05...

Страница 51: ......

Страница 52: ...ights reserved 036 000 503 SE_793255 AA 2019 12 Not all products are currently available in all markets Please contact your Depuy Synthes sales representative for more information All Synthes implant...

Отзывы: