background image


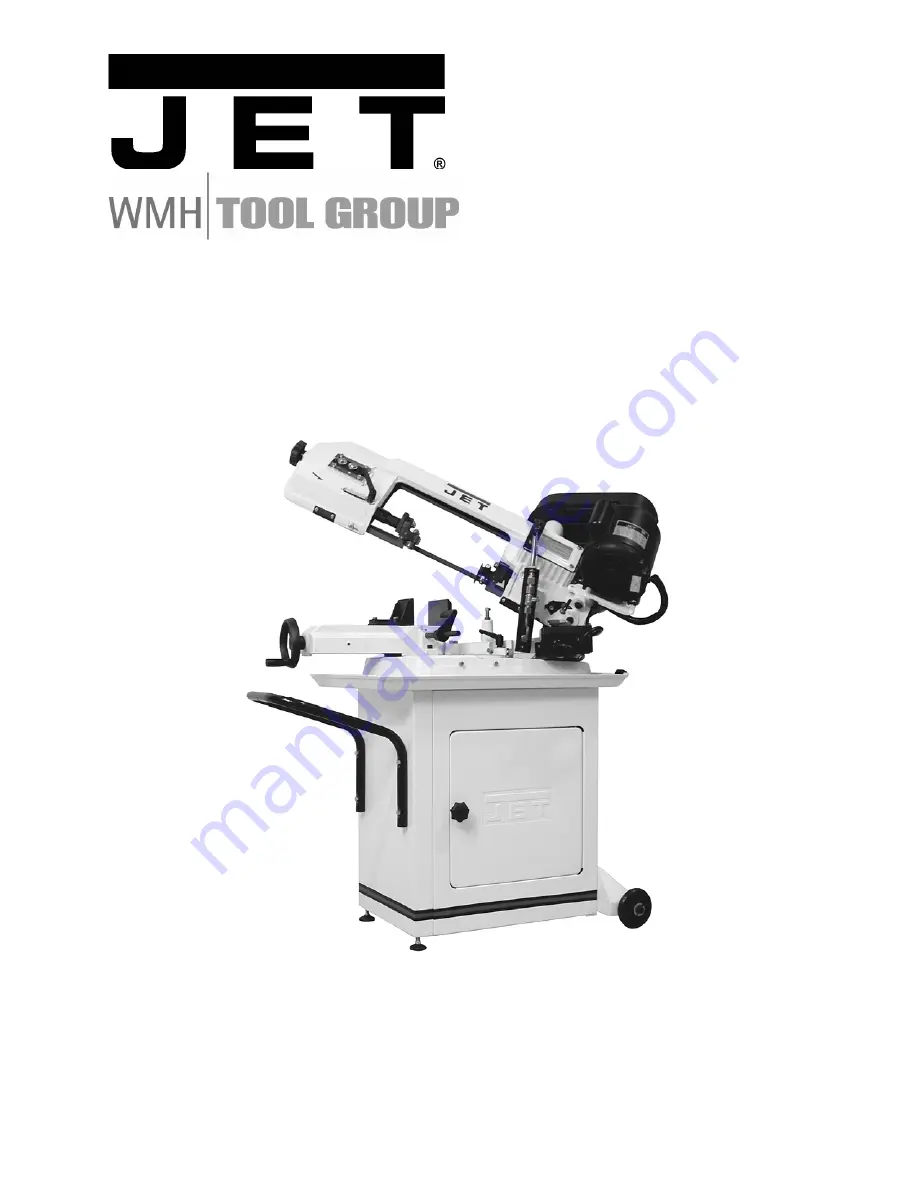
Operating Instructions and Parts Manual 

5 x 6-inch Horizontal Band Saw 

Model HBS-56S 

For use with machines with Serial Numbers 06080307 and higher 


WMH TOOL GROUP 

2420 Vantage Drive 
Elgin, Illinois 60124 

Part No. M-414457A


Ph.: 800-274-6848 

Revision B  9/06 

www.wmhtoolgroup.com 

Copyright © WMH Tool Group 

Summary of Contents for HBS-56S

Page 1: ...ch Horizontal Band Saw Model HBS 56S For use with machines with Serial Numbers 06080307 and higher WMH TOOL GROUP 2420 Vantage Drive Elgin Illinois 60124 Part No M 414457A Ph 800 274 6848 Revision B 9 06 www wmhtoolgroup com Copyright WMH Tool Group ...

Page 2: ...postage prepaid to a location designated by us For the name of the location nearest you please call 1 800 274 6848 You must provide proof of initial purchase date and an explanation of the complaint must accompany the merchandise If our inspection discloses a defect we will repair or replace the product or refund the purchase price at our option We will return the repaired product or replacement a...

Page 3: ...cords 12 Adjustments 12 Squaring Vise to Blade 90 Stop 12 Setting 45 Stop 13 Setting Downfeed Rate 13 Positioning the Vise 13 Miter Cuts 14 Blade Tension 15 Blade Tracking 15 Setting Blade Speed 15 Belt Tension 16 Blade Guide Assembly 16 Guide Bearings 16 Blade Replacement 17 Automatic Shut Off 17 Switch Lock Out 17 Vertical Bow Position 18 Operation 18 Maintenance 19 Troubleshooting 20 Parts 20 R...

Page 4: ...bricks cement and other masonry products Arsenic and chromium from chemically treated lumber Your risk of exposure varies depending on how often you do this type of work To reduce your exposure to these chemicals work in a well ventilated area and work with approved safety equipment such as face or dust masks that are specifically designed to filter out microscopic particles 10 Do not operate this...

Page 5: ...d clean for the best and safest performance Follow instructions for lubricating and changing accessories 26 Make sure the work piece is securely clamped in the vise Never use your hand to hold the work piece 27 Turn off the machine before cleaning Use a brush or compressed air to remove chips or debris do not use your hands 28 Do not stand on the machine Serious injury could occur if the machine t...

Page 6: ... also be reached at our web site www wmhtoolgroup com Specifications Model Number HBS 56S Stock Number 414457 Round Capacity at 90 in 5 Round Capacity at 45 in 2 3 4 Rectangle Capacity at 90 in 5 x 6 Rectangle Capacity at 45 in 2 3 4 x 4 Throat Depth in 5 Vise Swivels deg 0 to 60 Blade Size in 1 2 Blade Wheel Diameter in 7 1 2 Blade Speeds SFPM 80 120 and 200 Bed Height in 29 3 4 Motor TEFC 1 2HP ...

Page 7: ...01 Work Stop Assembly N 01 Axle O 01 Owner s Manual not shown 01 Warranty Card not shown Hardware Actual Size Compare the contents of your container with the following parts list to make sure all parts are intact Missing parts if any should be reported to your distributor Read the instruction manual thoroughly for assembly maintenance and safety instructions Contents of the Carton Hardware 02 1 4 ...

Page 8: ...ttom of the left plate A 4 Turn the assembly upside down and install the wheel base H with four 5 16 x3 4 hex cap screws C2 eight 5 16 flat washers D2 and four 5 16 hex nuts E2 5 Insert the axle J through the holes of the wheel base H 6 Install a wheel K and two 5 8 x30 flat washers L on each end of the axle Insert cotter pins M through holes on each end of the axle and bend the ends of the cotter...

Page 9: ...holes in the stand Make sure the front of the band saw faces the same direction as the JET logo on the stand see photo on cover of this manual 4 Install a 3 4 x1 1 4 hex cap screw A with 10 x 23 x t2 flat washer B in each of the four holes Tighten the hex cap screws with a 1 2 wrench Remove the bracket and two screws not shown which secured the bow during shipment Retain these items in case they a...

Page 10: ...ved along the rod by loosening the socket set screw C Figure 5 with a 4mm hex wrench The stock stop can be reversed on the rod to accept slightly longer lengths of workpieces Tighten the socket set screw C Figure 5 when the stock stop is positioned as desired The stock stop will mount into the hole at the front or the back of the band saw depending upon the angle of cut being made explained more f...

Page 11: ...only three wire extension cords that have three prong grounding plugs and three pole receptacles that accept the machine s plug 115 Volt Operation As received from the factory your band saw is ready to operate at 115 volt power using an outlet and a plug that look similar to those illustrated in Figure 6 A temporary adapter which looks like the adapter illustrated in Figure 7 may be used to connec...

Page 12: ...eneral guide in choosing the correct size cord If in doubt use the next heavier gauge The smaller the gauge number the heavier the cord Adjustments Squaring Vise to Blade 90 Stop For accurate cutting the vise jaws should be square to the blade Inspect as follows 1 Loosen the handle A Figure 10 and make sure the bow is swiveled enough that the stop screw B Figure 10 is contacting the fixed screw C ...

Page 13: ...kpiece may break the blade or stall the saw In contrast insufficient pressure rapidly dulls the blade Turn the valve lever F Figure 11 parallel to the hydraulic cylinder K Figure 11 to lower the bow The rate of downfeed is adjusted by the dial G Figure 11 The stop screw H Figure 11 prevents the blade from contacting the base after the cut It has been adjusted at the factory If future adjustment is...

Page 14: ...closed valve lever perpendicular to cylinder so the bow remains stationary 3 Remove the two socket head cap screws and lock washers which secure the vise and lift off the vise See Figure 13 4 Move the bushings from the first set of holes to the other set of holes as shown 5 Mount the vise to the new set of holes tightening the two socket head cap screws and lock washers 6 Remove the socket head ca...

Page 15: ...y when the back of the blade lightly touches the wheel shoulder NOTE Over tracking allowing blade back to rub hard against wheel shoulder will damage the blade wheels and blade Setting Blade Speed 1 Disconnect band saw from power source 2 Open the pulley cover 3 Loosen the knob see A Figure 3 and lift up on the motor Move the belt to the desired pulley grooves A chart is affixed to the inside of t...

Page 16: ...pecially after changing blades The blade should have already been tensioned and tracked properly before adjusting the blade guides 1 Disconnect band saw from power source 2 Loosen slightly the hex cap screw B Figure 18 with a 12mm wrench 3 Slide the guide block C Figure 18 down until the thrust bearing D Figure 18 just contacts the back edge of the blade 4 Tighten the hex cap screw B Figure 18 5 T...

Page 17: ...e workpiece Figure 20 An arrow on the the body of the bow indicates blade direction shown in Figure 15 6 The blade should be tensioned and tracked properly before operating See Blade Tension and Blade Tracking above Automatic Shut Off At the end of a cut the screw A Figure 21 contacts the paddle switch shutting off the machine The screw has been set at the factory If future adjustment is needed lo...

Page 18: ...lleys to achieve desired speed Close pulley guard when finished 3 Place workpiece in vise and tighten vise The workpiece should be fitted directly between the jaws without adding other objects When the workpiece to be cut is a profiled section flat piece or special shape refer to the examples shown in Figure 24 for proper clamping positions The top row shows acceptable clamping positions the botto...

Page 19: ...oing maintenance on the machine disconnect it from the electrical supply by pulling out the plug or switching off the main switch Failure to comply may cause serious injury Clean the machine of chips shavings etc with a rag or brush Do not use your hands If the power cord is worn cut or damaged in any way have it replaced immediately The ball bearings on the blade guide assemblies are self contain...

Page 20: ...blade size and tooth for that particular workpiece Incorrect adjustment of bearing guides and guide assembly Re adjust these See page 16 Workpiece incorrectly positioned in vise Check positioning and clamping in the vise See Figure 24 Cuts not square Poor blade tension Check and correct if needed See page 14 Blade is dull or its parameters are not right for thickness of piece being cut Sharpen or ...

Page 21: ...6000ZZ Ball Bearing 6000ZZ 6 62 HVBS462 062 Guide Pivot 2 62 1 HVBS462 062 1 Centrifugal Guide Pivot 2 62 1A HVBS462 062 1A Eccentric Shaft Assembly Includes 60 61 62 1 1 62A HVBS462 062A Center Shaft Assembly Includes 60 62 1 63 HVBS462 063 Bearing Shaft Pin 2 64 1 HVBS462 064 1 Blade Seat Left 1 64 2 HVBS462 064 2 Blade Seat Right 1 65 HVBS56M 065 Adjustable Bracket RH 1 65A HVBS56M 065A Adjusta...

Page 22: ...117 TS 0090061 Hex Screw 3 8 x1 1 4 1 120 HVBS462 120 Bushing 2 123 TS 0050031 Hex Cap Screw 1 4 x3 4 1 124 HVBS463 124 Machine Screw 3 16 x3 4 1 125 TS 0051031 Hex Cap Bolt 5 16 x3 4 1 126 HVBS462 126 Bushing 1 132 HVBS462 132 Blade Guard Right 1 132 1 HVBS462 132A Blade Guard Left 1 141 TS 0561021 Hex Nut 5 16 1 142 HBS56S 142 Switch Cut Off Trip 1 143 TS 0050011 Hex Cap Screw 1 4 x1 2 L 1 144 T...

Page 23: ...und Head Screw 1 4 20x3 8 2 380 HVBS56M 380 Blade Back Safety Cover 1 382 HBS56S 382 Movable vise plate 1 383 HBS56S 383 Bracket 1 384 HBS56S 384 Stand Complete Assembly 1 384 1 HBS56S 384 1 Side Plate left 1 384 2 HBS56S 384 2 Side Plate Right 1 384 3 HBS56S 384 3 Chip Pan 1 384 4 HBS56S 384 4 Front Door 1 384 5 HBS56S 384 5 Knob 1 384 6 HBS56S 384 6 Wheel Base 1 384 7 HBS56S 384 7 Hand Rod 1 384...

Page 24: ... Description Size Qty 393 HBS56S 393 Wire Ring 1 394 TS 081C032 Cross Round Head Screw 10 24x1 2 1 395 TS 0560071 Hex Nut 10 24 1 NS 1 HVBS463 085 01 Capacitor Cover not shown 1 NS 2 HVBS462 085 02 Capacitor not shown 1 Bow Assembly ...

Page 25: ...25 Bow Assembly Page 2 of 3 97 1 2 ...

Page 26: ...26 Bow Assembly Page 3 of 3 ...

Page 27: ...27 Base and Cabinet Assembly ...

Page 28: ...28 Electrical Connections WMH Tool Group 2420 Vantage Drive Elgin Illinois 60124 Phone 800 274 6848 www wmhtoolgroup com ...

Reviews: