Intellisystem ThermalTronix TT-1060MD-FTM Series, Руководство пользователя
Электротермическая система Intellisystem ThermalTronix TT-1060MD-FTM Series обеспечивает надежное и эффективное регулирование температуры. Для получения подробной информации о настройке и использовании устройства, загрузите бесплатное руководство пользователя с нашего сайта. Главное упор делается на продукт, а не на сайте для загрузки.
Поделиться
Скачать


Отзывы:
Нет отзывов
Похожие инструкции для ThermalTronix TT-1060MD-FTM Series

Z3
Бренд: Z-EDGE Страницы: 4

322GW
Бренд: NextBase Страницы: 12

CarDVR-70
Бренд: Rollei Страницы: 27

M500
Бренд: 70mai Страницы: 10
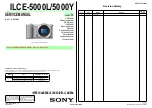
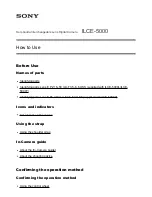
ILCE-5000L
Бренд: Sony Страницы: 51
ILCE-5000L
Бренд: Sony Страницы: 181

MNCD42
Бренд: Minolta Страницы: 22

Prestige100
Бренд: Curve Страницы: 49

2.0
Бренд: SAFARI Страницы: 8

ELITE
Бренд: Snap-On Страницы: 84

EV-7010MWHD
Бренд: Evervox Страницы: 4

Nano
Бренд: RSC Страницы: 40

Action cameras
Бренд: 21PRO Страницы: 54

KPT-590GPS
Бренд: Kapture Страницы: 40

ACP1150
Бренд: Salora Страницы: 39

ST-839
Бренд: NAC Image Technology Страницы: 370

OnDash N2S
Бренд: Vantrue Страницы: 31

OnDash T2
Бренд: Vantrue Страницы: 67


