

2 3 4
5
6
ii.
Click “Install Device Driver” to install the driver.
iii. Wait for a few seconds, the setup program is running.
iv. On the first screen of the program, click Next to continue.
v.
On the following screen, select “I accept the terms of the license agreement”, and then
click Next.
vi. After the necessary files are copied, click Finish to exit the setup program.
vii. Now you can connect the external drive to PC. Make sure the USB cable and external
power are connected as described in Hardware Installation. Connect the USB cable to
the USB port of your PC. The “Power Status LED” on the front panel should have now lit
up.
Note: if the LED does not light-up, un-plug
the USB cable from PC, push the Power
Switch of the drive to ON position, and
then plug the USB cable back to PC.
viii. Windows will detect the external drive and
install the device driver automatically. You will
find a new drive letter assigned to the drive in
“My Computer” after the automatic
installation.
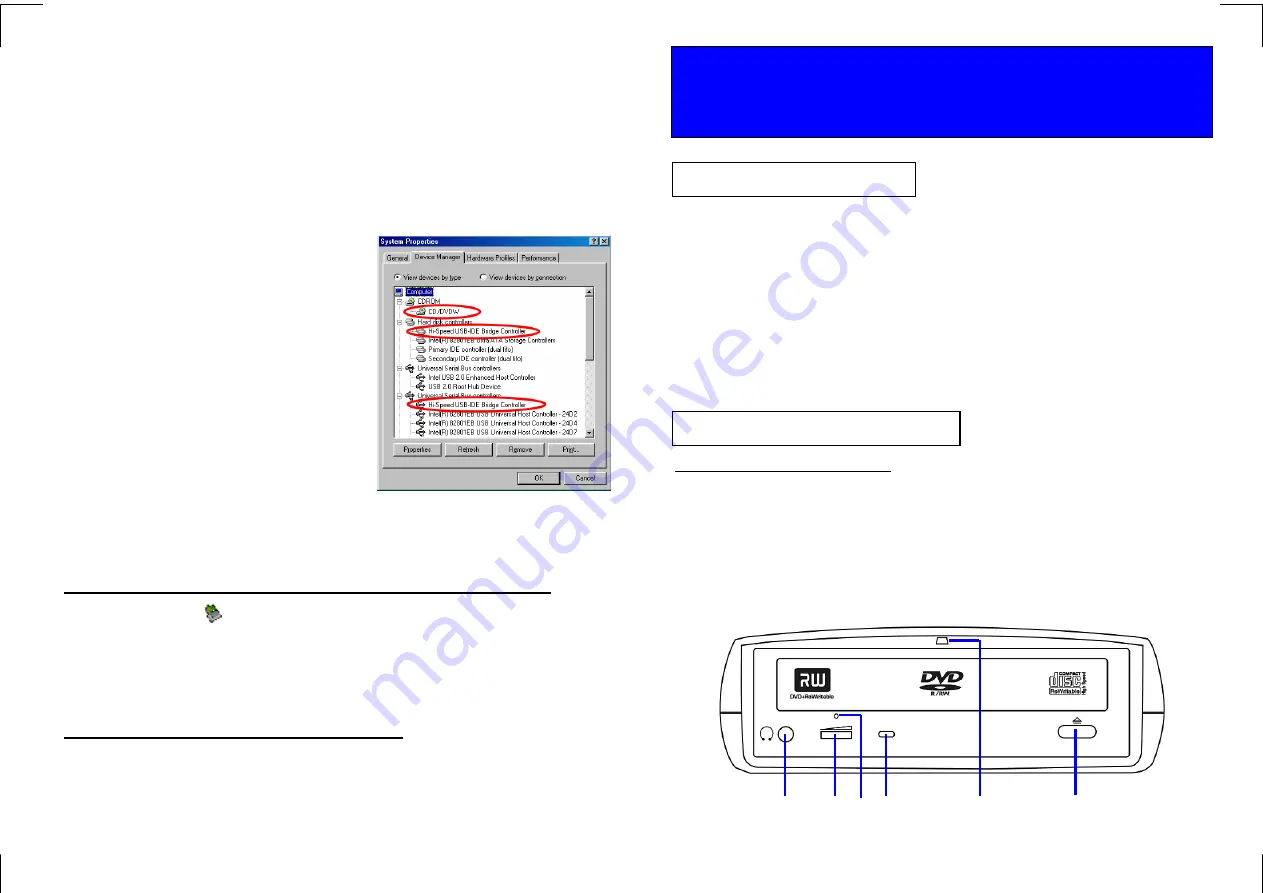
ix. If the external drive doesn’t appear in “My
Computer” or doesn’t work properly, please
go into “Device Manager” to check whether
the device is installed as the following status:
z
Hi-Speed USB-IDE Bridge Controller:
Installed under “Universal Serial Bus
Controller”
z
Hi-Speed USB-IDE Bridge Controller:
Installed under “Hard Disk Controller”.
z
The name of the DVD writer:
Installed under “CDROM”.
How to Disconnect the External Drive from PC Under Windows 98SE
1.
Click on the icon on system tray and a dialog box will appear beside this icon.
2.
Click “Safely remove DVD-RW Drive – Drive (D:)” (The name and the drive letter may
differ from yours, depending on the drive model you are using.) in the dialog box.
3.
Wait for a few seconds until system prompts, “The DVD-RW Drive storage device can
now be safely removed from the system”. Click OK, and then remove the USB cable
from computer.
Removing the USB Driver under Windows 98SE
Stop the external drive, and disconnect the power plug. Go to “Add/Remove Programs” in
“Control Panel”, select “Hi-Speed USB-to-IDE Win98 Driver”, click “Remove” and then
follow the on-screen instruction. The driver will be removed from the Win98 system.
♦
Notebook or Desktop PC with USB2.0 or USB1.1 port, or IEEE1394 port.
♦
Windows 98SE/Me/2000, or Windows XP (Make sure the device driver for USB Host
controller or IEEE1394 Host controller has been installed and is available).
NOTE:
♦
When using IEEE1394 interface under Win98SE, the Windows system must be
updated with “Storage Supplement Update” from “Windows Update” website.
♦
The transfer speed of the external drive depends on the USB host it is
connected to. USB2.0 host supports 480Mbps (maximum) data transfer rate,
and USB1.1 host supports ONLY 12Mbps (maximum) data transfer rate. Check
your system to make sure you have the right hardware to gain maximum
performance.
FRONT PANEL OF THE DRIVE
1.
Headphone Jack
2.
Wheel Knob:
Headphone Volume Control
3.
Emergency Eject Hole:
Poke a rod through it to eject the disc tray emergently.
4.
Disc Ready/Read/Write LED:
Intermittent light indicates disc access status.
5.
Power status LED:
Indicate Power on (stable light) / off (no light) and disc access
(intermittent light) status.
6.
Eject Button:
Press to eject or close the disc tray.
7450767-00
USB 2.0 / IEEE 1394
External DVD Dual Writer Drive
Quick Installation Guide
System Requirements
Part Names and Functions
* Note: Front Panel may be different for various models.
1
1
4


