Ingersoll-Rand Schlage LiNK FE599, Installation Instructions Manual
The Ingersoll-Rand Schlage LiNK FE599 is a versatile smart lock system with advanced features. For hassle-free installation, refer to our comprehensive Installation Instructions Manual available for free download at manualshive.com. Get instant access to the manual and unlock the full potential of this cutting-edge smart lock.
Share
Download


Reviews:
No comments
Related manuals for Schlage LiNK FE599
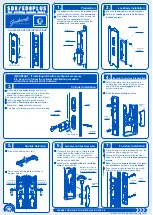
SD8
Brand: Gainsborough Pages: 2
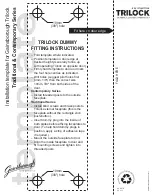
Contemporary Series
Brand: Gainsborough Pages: 2

LYEX203BD4
Brand: Gate House Pages: 2

LA9-3
Brand: Adel Pages: 17

KeyGuard
Brand: babyDan Pages: 2

SUPERLOCK DIGITAL SINGLE SIDED
Brand: GATEMASTER Pages: 2

046-5688-6
Brand: Garrison Pages: 2

secuENTRY pro 7116 Duo
Brand: BURG-WACHTER Pages: 17

SecuTronic Series
Brand: Burg Wächter Pages: 5

TSE PRIME SET 5013 E-KEY
Brand: Burg Wächter Pages: 78

3441ZN-GKAG
Brand: Pauli + Sohn Pages: 12

LIBRA
Brand: Iseo Pages: 24

C8732
Brand: Stock Loks Pages: 1

C8755
Brand: Stock Loks Pages: 1

C8754
Brand: Stock Loks Pages: 1

MORTISE 8800 SERIES
Brand: Yale Pages: 8

SE-APB1-1T
Brand: MAASLAND Pages: 4

Lockmaster AutoEngage
Brand: Yale Pages: 9


