RoIP GATEWAY
Easy configuration guide
VE-PG2
MODE
DC
LAN
TRX1
TRX2
TRX3
IN
+
+
+
OUT
SW
ABC
MODE
DC
LAN
TRX1
TRX2
TRX3
IN
+
+
+
OUT
SW
ABC
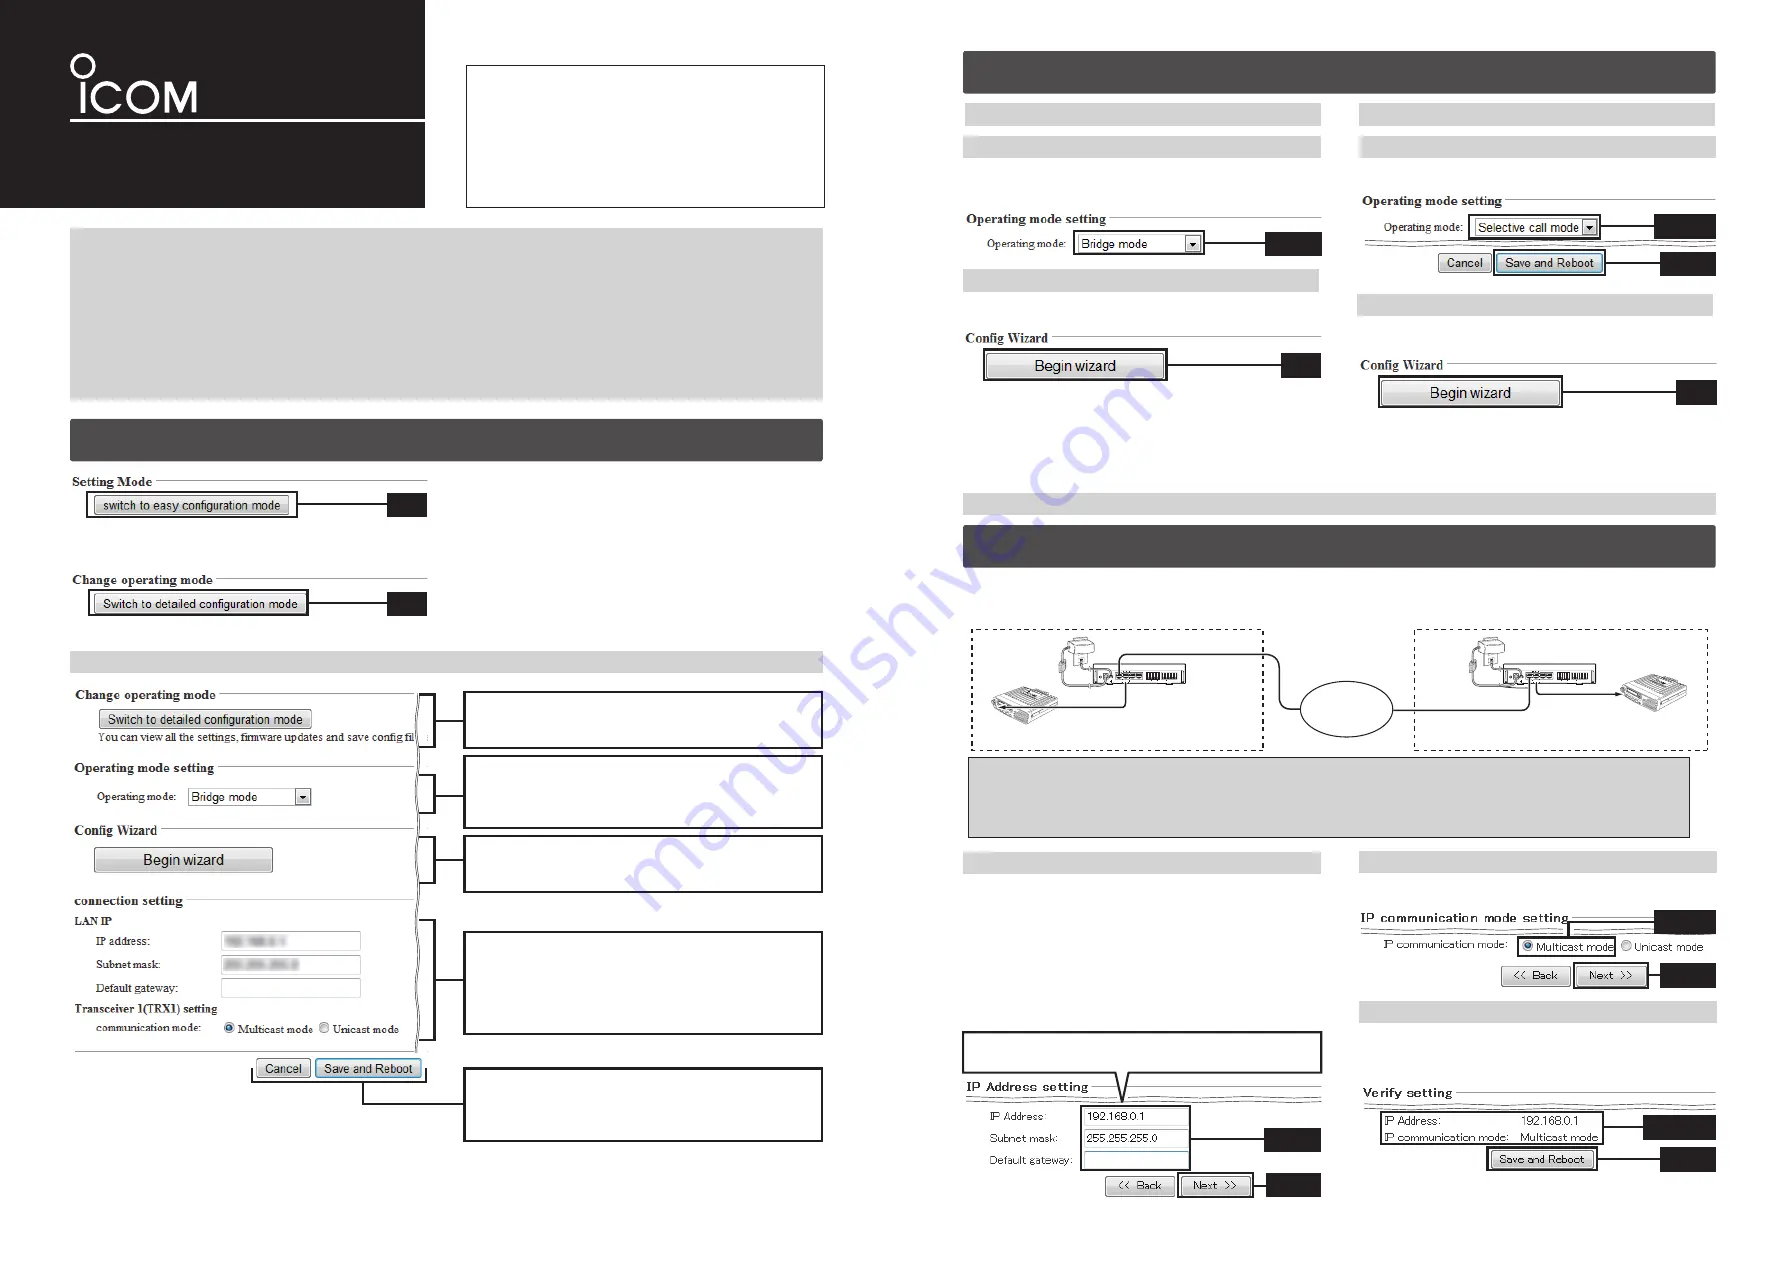
Multicast mode connection example
[Area A]
[Area B]
IP
network
VE-PG2
192.168.0.1
VE-PG2
192.168.0.2
Connect the transceiver to the
VE-PG2’s [TRX1] port.
Connect the transceiver to the
VE-PG2’s [TRX1] port.
CAUTION:
To connect the transceivers or repeaters, use only the following cables: OPC-2073 (For the transceivers) or
OPC-2074 (For the repeaters).
Using another cable, like an Ethernet cable, may damage the VE-PG2, transceivers or repeaters.
Click “Next>>” when “Start the Easy Setup Wizard for
Bridge mode configuration” is displayed on the web
browser.
Enter the VE-PG2’s IP address and subnet mask in “IP
address” and “Subnet mask.”
• Set the default gateway when your VE-PG2 communicates with a
network device which has a different network IP address.
Click “Next>>”after you finish entering the VE-PG2’s IP
address and subnet mask.
Select “Multicast mode” in “IP communication mode setting,”
then click “Next>>.”
Confirm the VE-PG2 settings at “Verify setting,” then Click
“Save and Reboot” to set the settings to the VE-PG2.
• If you want to change the VE-PG2’s settings, click “<<Back.”
Confirm that the VE-PG2’s “Operating mode” is set to
“Bridge mode” in “Operating mode setting.”
• Default setting is “Bridge mode.”
When you click “Begin wizard,” the VE-PG2 starts the
setting wizard.
Set the VE-PG2’s “Operating mode” to “Selective call mode”
in “Operating mode setting,” then click “Save and Reboot.”
• To set the VE-PG2 to the multicast mode, see “When you
set the VE-PG2 to the bridge mode (multicast mode),” as
shown below.
• To set the VE-PG2 to the unicast mode, see “When you
set the VE-PG2 to the bridge mode (Unicast mode),” as
shown on the reverse side.
To set the VE-PG2 to the selective call mode, see “When
you set the VE-PG2 to the selective call mode,” as shown
on the reverse side.
Click “switch to the easy configuration mode” in the “Setting
mode,” then the VE-PG2 is set to the easy configuration
wizard.
This explanation describes how you set the VE-PG2 to the bridge mode (multicast mode) using the easy configuration wizard
with the connection shown below.
“Change operating mode”
When you click “Switch to detailed configuration mode,”
the VE-PG2 is set to the detailed configuration mode.
“Operating mode setting”
You can change or confirm the VE-PG2’s operating mode.
Select the operating mode, and then click “Save and
Reboot,” to change the operating mode.
“Config Wizard”
When you click “Begin wizard,” the VE-PG2 starts the
easy configuration wizard.
“Connection setting”
You can change or confirm the VE-PG2’s settings. If
you click “Save and Reboot,” the VE-PG2 registers the
settings after the reboot is completed.
• You can change the VE-PG2’s settings in both the bridge mode
and the converter mode.
“Cancel”/“Save and Reboot” buttons
You can cancel the VE-PG2’s setting by clicking “Cancel.”
When you click “Save and Reboot,” the VE-PG2 registers
the settings after the reboot is completed.
• The setting screen is the VE-PG2’s setting display in Area A.
This guide describes the easy configuration wizard of
“Bridge mode” and “Selective call mode,” and includes a
connection example.
When you use only the [TRX1] port, you can easily setup
the VE-PG2 using the easy configuration wizard.
Read
“
PRECAUTIONS
”
first, if you have not read it.
Read this guide after reading “Installation guide
q
” for the
transceiver settings.
NOTE:
•
To set the VE-PG2 to “Converter mode,” see “Converter mode guide” for that mode’s explanation and setting details after
reading below “1. Select the VE-PG2 to the easy configuration wizard” for the easy configuration wizard screen explanation.
• Connect the transceiver to only the VE-PG2’s [TRX1] port.
You cannot set the VE-PG2’s [TRX2] and [TRX3] ports using the easy configuration wizard.
• Set the SIP server’s setting first when you set the VE-PG2 to the converter mode.
The easy configuration can set the VE-PG2 only to SIP server sending.
To set the VE-PG2 to Peer to Peer sending, use the detail setting mode.
• To connect the transceiver to VE-PG2’s [TRX2] and [TRX3] ports, use the detail setting mode.
To set the VE-PG2’s external input or external output to ON, use the detail setting mode.
1. Select the VE-PG2 to the easy configuration wizard
If you click “Switch to detailed configuration mode,” the
VE-PG2 is set to the detail setting mode.
When you switch from the VE-PG2’s “Easy configu-
ration mode.”
About the easy configuration wizard screen
2. Start the easy configuration wizard
Sets the VE-PG2 to the Bridge mode
Sets the VE-PG2 to the Selective call mode
1. Confirm the VE-PG2’s “Operating mode”
2. Start the configuration wizard
1. Set the VE-PG2’s “Operating mode”
When you click “Begin wizard,” the VE-PG2 starts the
setting wizard.
2. Start the configuration wizard
NOTE: When you set the VE-PG2 to the Converter mode, see “Converter mode guide” for details.
‘
When you set the VE-PG2 to the bridge mode (multicast mode)
1. “IP Address setting” setting
2. “IP communication mode setting” setting
3. Confirm the VE-PG2 settings
• The setting screen is the VE-PG2’s setting display in Area A.
Click
Click
Confirm
Click
q
Select
w
Click
Click
q
Enter
(Example) Enter “192.168.0.1” into the VE-PG2 in Area A, and
“192.168.0.2” into the VE-PG2 in Area B in the illustration above.
w
Click
q
Select
w
Click
q
Confirm
w
Click