Icom IC-F3032S, Instruction Manual
The Icom IC-F3032S is a reliable two-way radio with advanced features and exceptional performance. To make the most out of this device, grab its comprehensive Instruction Manual. Available for free download, this manual provides detailed information on operating and maximizing the capabilities of the IC-F3032S from manualshive.com.
Share
Download


Reviews:
No comments
Related manuals for IC-F3032S
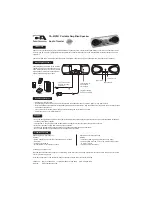
MP301
Brand: CA Pages: 6

DIGITRADIO 600
Brand: TechniSat Pages: 267

Dotadot100
Brand: Ozaki Pages: 2

Gen9500DF
Brand: Westinghouse Pages: 100

Evoke D2
Brand: PURE Pages: 120

MT-983NB
Brand: Denver Pages: 60

TwinTop 400
Brand: Swissvoice Pages: 104

MT-783NB
Brand: Denver Pages: 6

PM0535000
Brand: Powermate Pages: 12

CA002AB6-DAB
Brand: Clas Ohlson Pages: 28

QMF 6M
Brand: Nanni Pages: 26

RRT 3B
Brand: SAL Pages: 16

KK-522
Brand: kchibo Pages: 2

Senta
Brand: C. Crane Pages: 13

ISM BAND XYR 5000 LINE
Brand: Honeywell Pages: 49

KTR 2280A
Brand: Honeywell Pages: 100

Peha D 20.485.02 Radio
Brand: Honeywell Pages: 120

GALE FORCE PT8500E
Brand: PENTAGON Pages: 25


