Honeywell Tuxedo Touch Series, Руководство пользователя
Honeywell Tuxedo Touch Series - современная система безопасности и автоматизации дома. Для получения подробной информации, загрузите бесплатное руководство пользователя на нашем сайте. manualshive.com. Надежный качественный продукт для вашего дома.
Поделиться
Скачать


Отзывы:
Нет отзывов
Похожие инструкции для Tuxedo Touch Series

OMUARK KEY BOX K12
Бренд: Omconnect Страницы: 18
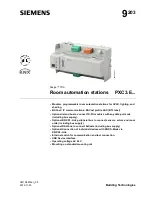
PXC3.E16A100A
Бренд: Siemens Страницы: 12

RDF Series
Бренд: Siemens Страницы: 28

OZW772 Series
Бренд: Siemens Страницы: 176

QAW740
Бренд: Siemens Страницы: 184

Desigo RXB
Бренд: Siemens Страницы: 476

TRV
Бренд: Curv Страницы: 21

WIFILRF10C37
Бренд: nedis Страницы: 68

VMB1DM
Бренд: Velleman Страницы: 15

RFDAC-71B
Бренд: Elko Страницы: 8

ZW96
Бренд: EVA Logik Страницы: 3

PA0261
Бренд: GILBARCO VEEDER-ROOT Страницы: 20

TYDOM 3.0
Бренд: DELTA DORE Страницы: 224


