

Installation and Setup Guide
Ref: LKP500-EN / LKP500-ENC
FEATURES & NOTES
•
Wireless alpha keypad serves as a secondary keypad for controlling the Lyric
Smart Controller’s security functions.
•
Uses SiX™ technology protocol for secure, bidirectional communication.
•
Use up to eight (8) keypads with the Lyric Smart Controller
.
•
Easy enrollment in the Controller.
•
Mounts to a wall or desk stand.
•
Supervised
•
Locate the keypad within 300 feet of the Lyric Smart Controller.
•
Powered by an external 110VAC input/9VDC output power pack (supplied).
•
Battery pack (7.2VDC) provides 24-hour backup power (supplied).
Keypad Supervision
•
•
Keypad supervision signals are sent every 60 seconds
(cannot be changed). Supervision fault occurs if the
controller fails to receive a keypad supervision signal
within 200 seconds.
•
When a trouble condition is detected, the keypad
displays a trouble message and begins to beep.
•
Press any key to stop the beeping.
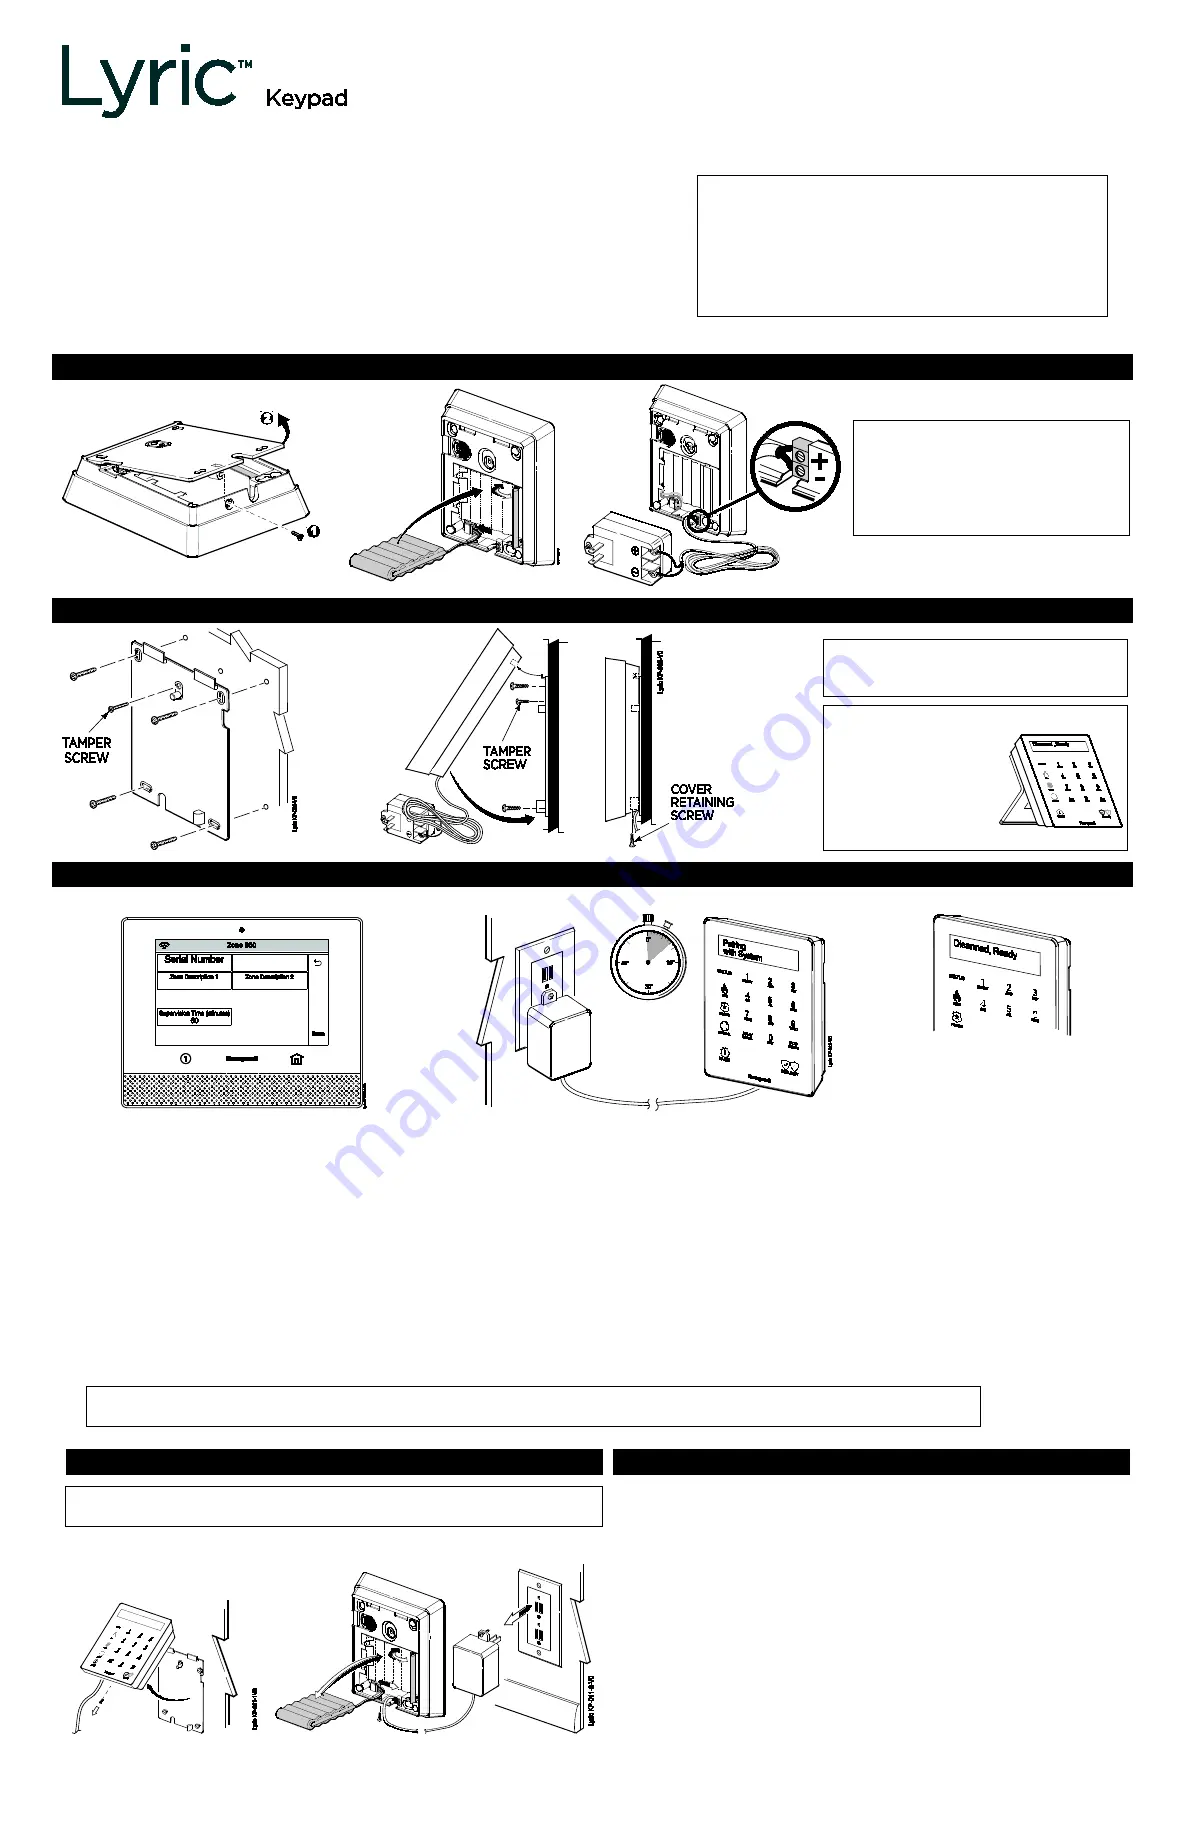
INSTALL THE BATTERY AND CONNECT THE POWER SUPPLY WIRES TO THE KEYPAD
IMPORTANT:
DO NOT connect the power
supply to an AC outlet until ready
to enroll the keypad in the
Controller. See “Enroll the
Keypad” section.
MOUNT THE KEYPAD (Wall Mounting Shown)
NOTE: The keypad should not be
mounted within line of sight of
motion sensors.
Desk Stand Mounting Option
If desired, the
optional desk stand
kit can be used. See
instructions
included with kit
LKP500-DK.
ENROLL THE KEYPAD
The keypad must be enrolled in the Lyric Smart Controller before it can be used.
1.
At the Smart Controller, enter Programming
mode and follow the control’s instructions to
enter keypad enrollment mode
Security > Tools > Installer Code > Program > [V] > RF
Keypad > Add New (or select desired zone number and
press Edit) > Serial Number
.
•
RF keypads are assigned zone numbers,
starting with zone 850. Selecting “Add New”
automatically assigns the next available RF
keypad zone number.
2.
While the Controller is in enrollment mode, plug
the keypad’s power pack into a 24hr, non-
switchable 110VAC, 60Hz outlet.
•
The keypad automatically attempts to pair with the
Controller.
•
If enrollment is not successful, press any of the keys
on the keypad to restart the pairing process or
disconnect and reconnect power.
3.
After successful pairing,
keypad beeps and display
goes blank until exit of
program mode. System then
displays Disarmed, Ready.
•
When enrolled, the keypad’s
ID number appears on the
Controller’s screen.
4.
After enrollment, program and save the keypad’s zone options (zone descriptor, etc.) at the Smart Controller.
NOTES:
•
Make sure to assign a descriptor be assigned to the keypad for easy identification when keypad events occur.
•
After enrollment, update the Keypad firmware (via the Controller or AlarmNet 360) to ensure the latest version is used. See
Controller’s instructions.
IMPORTANT: Once enrolled, the keypad cannot be used with another control panel until it is un-enrolled (deleted)
from the current controller. See the Smart Controller’s Programming Guide for details on removing devices.
BATTERY REPLACEMENT
IMPORTANT: Unplug the keypad power supply BEFORE starting.
Reconnect power after the keypad is re-mounted.
SPECIFICATIONS
Physical:
3.75
”
W x 4.625
”
H x 1.125
”
D
(95mm x 118mm x 29mm)
Frequency:
2.4 GHz
Battery
Pack:
LKP500-24B: Battery part number 300-06868-GP:
7.2V, 6xAAA, 6x600mAH, NiMH
Transformer:
Part number 300-07332US: 110VAC, 60Hz
input/9VDC, output 1A, 2-prong
Canada use: 300-07332CAN
LCD Display:
2x16
Sounder:
Speaker/Codec
Approvals
UL985/UL1023; ULC-S545 & ULC/ORD-C1023


