HOBO
®
U30 Remote Communication
Quick Start Guide
Follow the steps in this Quick Start Guide to configure a HOBO U30
Station with Remote Communication.
U30/GSM, U30/Wi-Fi, U30/Ethernet
Step 2
-
Register the HOBO U30 Station
Click the
Register a Device
link and follow the instructions on the screen. Give the
device a nickname, then enter both the serial number (SN) and Device Key (located on
a label inside the HOBO U30 Station). Click the name of the device to go to the
Device
window and configure the device.
Step 1
-
Setup HOBOlink Account
If you have not already done so, set up a HOBOlink™ account. Go to
https://www.hobolink.com and follow the instructions to create and activate a user
account.
Step 3 -
Change Time Zone (if necessary)
Click
Device Configuration
in the Task Bar.
Step 4 -
Configure the Logging Interval
Step 5 -
Configure the Connection Interval
Initial HOBOlink Setup
Part# MAN-U30-RC Document # 12268-D
NOTE
: This guide does not cover the following: configuration of the Analog Sensor
Port or TRMS modules, configuring a static IP address.
For more information, see the
HOBO U30 Station/Remote Communication User
Guide
available as a printable file at www.onsetcomp.com/rms-outdoor (under
Documentation). Note: This guide is the same for cellular, Wi-Fi, and Ethernet models.
For more information on HOBOlink, see the HOBOlink Help available
in the HOBOlink application at hobolink.com.
a. Click
Launch Configuration
.
b. Enter a
Launch Description
. This will also be used as the filename for data readouts.
c. Select a
Logging Interval
. For an initial test, configure a fast logging interval.
b. Enter a
Connection Interval
(how frequently the HOBO U30 Station will
connect to HOBOlink). For an initial test, configure a fast
Connection Interval.
a. Click
Readout Configuration
.
NOTE
: For the U30/GSM, the Connection Interval is limited by the Fastest Connection
Allowed by your Communication Plan. For testing, you can bypass your GSM
Communication Plan restrictions by manually connecting to HOBOlink using
HOBOware (direct connection using a USB cable). From the main menu select
Status
, and then click the
Contact HOBOlink
button.
Page 1
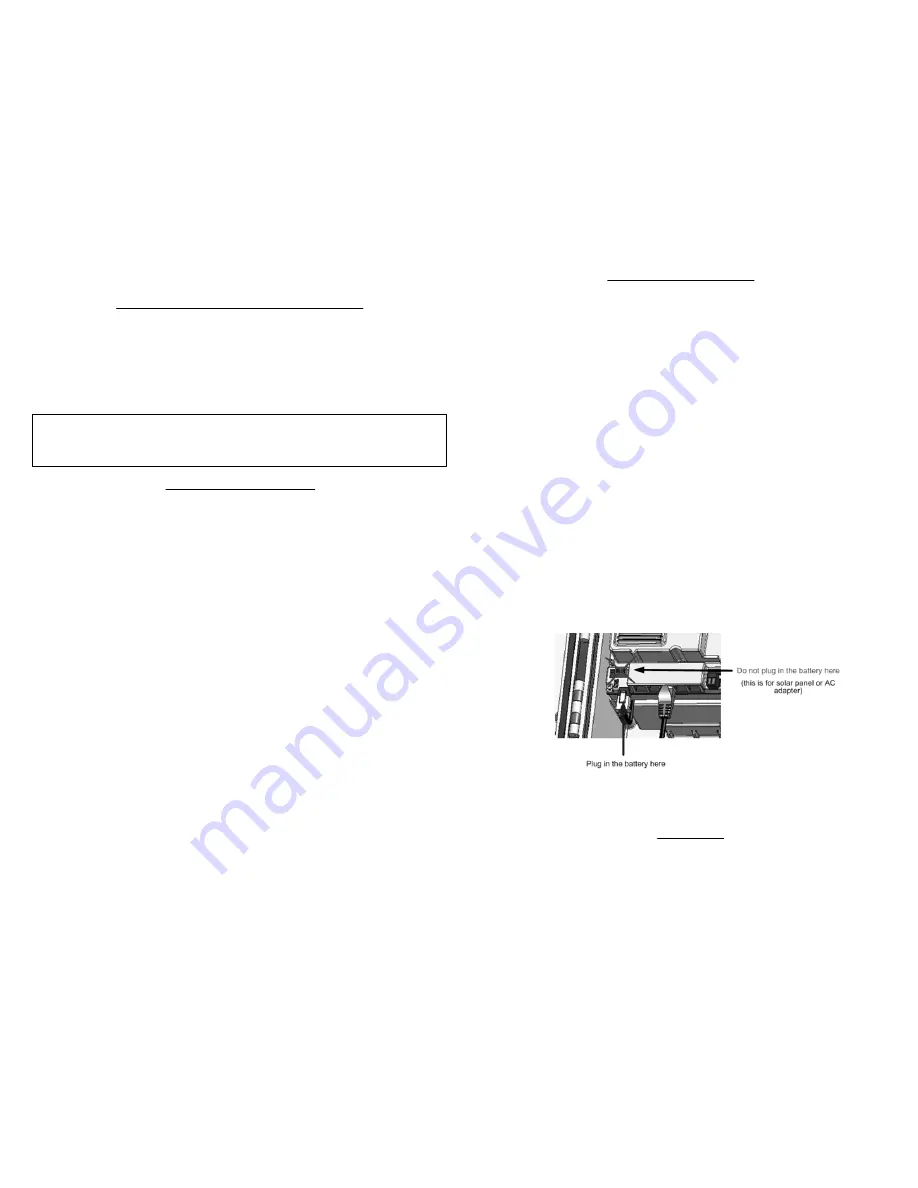
Step 4 -
Connect the Battery
Power up the HOBO U30 Station by plugging in the built-in battery cable into the
battery connector.
Initial Hardware Setup
Step 2 -
Plug in Smart Sensors
Insert the Smart Sensor cables through the cable access opening in the bottom of
HOBO U30 Station and plug them into the Smart Sensor jacks.
Step 1 -
Install Mounting Plates
Screw the mounting plates onto the back of the HOBO U30 Station case using a
Phillips-head screwdriver. Be careful to orient the plates so that the screw heads are
sunk into the screw holes.
Step 3
Connect the U30 to a Computer (Optional)
If you need to configure Network Setup for a U30/Wi-Fi or U30/Ethernet, or you
are using the Analog Sensor Port, you must connect the U30 to a computer
before you connect the battery. Use the USB cable supplied by Onset.
U30/GSM - go to
Final HOBOlink Setup and Test
.
U30/Wi-Fi - go to
Configuring WLAN Settings for the U30/Wi-Fi.
U30/Ethernet - if you have a static IP address, see
Configuring a Static IP Address
in the U30/RC User Guide.
Otherwise go to
Final HOBOlink Setup and Test
in this
Quick Start Guide
.
IMPORTANT:
Always plug in the battery first, before you plug in any solar panel or
power supply connector. When disconnecting power, always unplug any solar panel
or power supply connector first, then unplug the battery.
IMPORTANT:
Your Communication Plan will be activated one week after the unit is
shipped and you will begin paying for HOBOlink access, regardless of whether or not
you have registered and activated your unit.
Step 5 -
Configure Analog Sensor Port or TRMS Module (Optional)
See the
HOBOware User Guide
for details.
Next Task
If you are using the Smart Sensor Expander Board, you should install cables in
those slots first. You must first remove the Secondary Cable Slot cover. See the
U30 Station/Remote Communication User Guide
for details.
Page 2