15 Watt Solar Panel Installation Instructions (SOLAR-15W)
21932-C MAN-SOLAR-15W
Items Included
•
15 watt solar panel with adjustable bracket mounting
hardware (tilt arm, bracket, clamps, bolts, lock washers,
washers, and nuts; additional optional hardware may be
included that is not required for this installation)
•
Two U-bolts with saddle and two flanged nuts for
mounting solar panel to a 4.1 cm (1.63 in.) diameter mast
Tools Required
Note:
Both Metric and English sizes are required.
•
One 10 mm wrench
•
Two
½
inch wrenches
Important:
The solar panel
must
be mounted where it will
receive full sunlight or performance will be severely degraded.
Specifications
Power
15 Watts
Operating
Temperature Range
-40° to 85°C (-40°F to 185°F)
Materials
Polycrystalline silicon solar cell; aluminum
frame and mounts; zinc-coated steel bolts,
nuts, washers, and U-bolts
Dimensions
428 x 357 x 30 mm (16.85 x 14.06 x 1.18 in)
Weight
2.2 kg (4.85 lb)
Cable Length
2 m (6 ft)
Environmental Rating
Weatherproof when mounted properly, not
waterproof
The CE Marking identifies this product as
complying with all relevant directives in the
European Union (EU).
1
Remove any plastic on the solar panel or hardware. It is
recommended that you lubricate all nuts and bolts with
multi-purpose or protective lithium grease to facilitate
easy removal at a later date. Two people may be needed
to perform some of these installation steps.
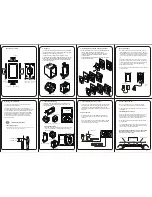
2
a.
With the cable side of the solar panel facing up, center
the tilt arm on the solar panel, oriented as shown with
the shorter end of the tilt arm flush against the edge of
the solar panel frame.
b.
Working on the flush edge first, slide a clamp under the
edge of the frame, lining up the hole in the center of
the clamp with the slot in the tilt arm.
c.
Place a lock washer, small washer, and medium washer
on the 20 mm (0.79 in.) bolt with the 10 mm head (the
lock washer is closest to the bolt head). Insert the
bolt/washer assembly through the slot in the tilt arm
and into the hole in the clamp as shown. Use a 10 mm
wrench to loosely tighten the bolt.
d.
Repeat steps 2b through 2c with the opposite side of
the tilt arm.
e.
Tighten both bolts with the 10 mm wrench. Do not
overtighten the bolts.
Tilt arm flush
with edge of
solar panel,
(bolt assembly
will be added
in next steps)
Bolt/washer
assembly
inserted
through slot in
tilt arm and
into clamp
below
Large end of tilt
arm centered
on back of panel
(bolt assembly
will be added in
next steps)
Slide clamp below tilt arm
(described in step 2b)
Side view of
proper tilt
arm/clamp
assembly