Hitachi AXM1204E, Instruction Manual
The Hitachi AXM1204E, a sleek and versatile audio system, comes with a Quick Start Manual to help you effortlessly set up and personalize your listening experience. Easily access the comprehensive manual, available for free download on our website, to maximize the potential of this exceptional product.
Share
Download


Reviews:
No comments
Related manuals for AXM1204E

Zlinx Xtreme ZXT9-RM
Brand: B&B Electronics Pages: 163

T312
Brand: Timex Pages: 10

YB-P 2000
Brand: Grundig Pages: 20

RDIN3000BK
Brand: nedis Pages: 56

Solid Digital
Brand: perfect pro Pages: 32

HQ-180 Series
Brand: Hammarlund Pages: 46

JSLM2
Brand: Dataradio Pages: 35

UH047sx
Brand: Uniden Pages: 16

GKR2300
Brand: Grundig Pages: 14

R761
Brand: Roberts Pages: 12
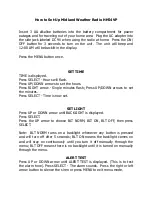
HH54VP
Brand: Midland Pages: 4

LBI-39012C
Brand: Ericsson Pages: 32

Multi-Band AC/DC Portable Radio
Brand: Radio Shack Pages: 16

SPK-WCALC-118
Brand: Laser Pages: 15

EUPHONIC 450
Brand: Sangean Pages: 7

RT-420DSC
Brand: NAVICOM Pages: 27

CR-213
Brand: Denver Pages: 14

CU600-2
Brand: Covalue Pages: 24


