background image

1

HP-60/80

HP

HP Series

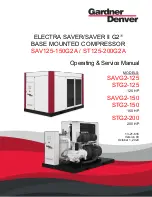
STRUCTURE AND PART NAMES

HP-60/80

HP-60
HP-80

1995/9
1995/9

─ 
─ 

HP-60/80

Filter Cover


Air Filter Gasket 

Air Filter

Fitting Boss


Upper Housing


Silencer Wrap


Casing Block


Diaphragm Ring


Diaphragm

Diaphragm Mounting


SP Switch


SP Swwitch Screw  

Electromagnet


Actuating Rod


Internal L-Tube

Hose Clamp


Frame

Vibration Control Rubber


Center Plate

Base Gasket

Lower Housing


Power Cord

Air pump

Start of production

Discontinuance of production

Goodies Wastewater Supplies

Phone: 1300 282 181 

 Fax: 1300 282 989

PO Box 1524, Oxenford  QLD  4210 

 35 Scenic Cr, Coomera  QLD  4209 

Email: [email protected] 

 Web: www.goodies.net.au

Summary of Contents for hp-60

Page 1: ...Diaphragm Mounting 潭 SP Switch 澂 SP Swwitch Screw 潼 Electromagnet 潘 Actuating Rod 澎 Internal L Tube 澑 Hose Clamp 濂 Frame 潦 Vibration Control Rubber 澳 Center Plate 澣 Base Gasket 澡 Lower Housing 澤 Power Cord Air pump Start of production Discontinuance of production Goodies Wastewater Supplies Phone 1300 282 181 Fax 1300 282 989 PO Box 1524 Oxenford QLD 4210 35 Scenic Cr Coomera QLD 4209 Email mail g...

Page 2: ...o not put the actuating rod close to a magnetic card magnetic disk or other magnetic media as the data may be destroyed STEP 1 STEP 1 To remove the upper housing Refer to REMOVING UPPER HOUSING Remove the sound absorber Pull out the L tube from the casing block STEP 2 STEP 2 Remove the 4 screws holding the chamber block and the casing block 4 screws on each side STEP 3 STEP 3 Remove 1 U lock nuts ...

Page 3: ...od When pulling out the rod be sure not to catch the rod projection on the lever of the SP switch If the pump stops automatically the safety pin must be broken to prevent any further damage to the pump Be sure all broken pieces are removed from the unit See Step 8 STEP 7 STEP 7 Mount the casing block with screws 4screws on each side And insert L tube into the nozzle of casing block Complete the ot...

Page 4: ...rom the other side of the terminal and insert it until it clicks STEP 11 STEP 11 This completes the replacement of the safety pin procedure Make sure the gaps between L shaped lever and tab of the actuating rod is even Be careful not to touch the terminal when the power is on testing the operating conditions as this will result in an electric shock Unplug the pump immediately after the check HP 60...

Page 5: ...atch the sound absorber on the upper housing Fasten it with the bolts Then place the filter and filter cover on the upper housing Refer to FILTER CLEANING AND REPLACEMENT Install the sound absorber Goodies Wastewater Supplies Phone 1300 282 181 Fax 1300 282 989 PO Box 1524 Oxenford QLD 4210 35 Scenic Cr Coomera QLD 4209 Email mail goodies net au Web www goodies net au ...

Page 6: ...against getting burned STEP 1 STEP 1 Cut the wire from terminals on the electromag nets with nippers It is recommended that you make a note of the wiring STEP 2 STEP 2 Loosen the screw fixing SP switch and remove it There are hexagonal nuts at SP switch side Be sure not to lose them as they fall inside the unit STEP 3 STEP 3 Remove the hexagonal nuts by the nut driver 7mm wrench Pull out the elect...

Page 7: ...wire requires a soldered connection Mount new electromagnet in the unit Tighten up hexagonal nuts with nut driver STEP 7 STEP 7 This completes the electromagnet replacement procedure Install the SP switch to the frame with the screws Be careful of the direction of switch lever Refer to the pictures MOUNTING THE ELECTROMAGNET Goodies Wastewater Supplies Phone 1300 282 181 Fax 1300 282 989 PO Box 15...

Reviews: