background image

Solar Powered LED
Motion Sensor Light

Model 7103

FEaturES

•  Turns on light when motion is detected.
•  Automatically turns light off.
•  Photocell keeps the light off during daylight hours.
• 

Battery Protection Circuitry.

 Unit will shut down when 

battery is low. Unit will automatically resume operation 
when battery is recharged to a safe level.

InItIaL BattEry ChargE

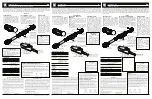
Mounting Screws (2 sizes)

Solar Light Fixture

Solar Panel

Tapered Screw (3)

Round Head Screw (2)

unPaCkIng

Be sure to remove all contents from packaging and verify 
all items are present before assembling this light fixture. 
This package includes the following items:

InStaLLatIOn

For best performance, mount the fixture about 8 feet (2.4 
m) above the ground. For best solar collection, mount the 
solar panel on a southern facing surface. Note: If fixture is 
mounted higher than 8 ft. (2.4 m), aiming the sensor down 
will reduce coverage distance.
1. 

Mount Solar Panel.

 Allow for enough wire to reach 

the  battery  case.  Attach  triangular  base  to  a  solid 
surface  using  three  tapered  screws. 

IMPORTANT:


Caulk around the base and on top of the tapered 
screw heads after installation.


Note:  See  Initial  Battery  Charge  and  illustration  on 
next page for solar panel setup information.

Three Mounting Holes for Solar Panel Base

Caulk All Mounting 
Holes (3)

Ball Joint

Caulk Base Edges

© 2010 HeathCo LLC 

200068-01

Light

Battery Case

Sensor

Thumbscrew

the  solar  panel  requires  full,  direct  sunlight  to 
charge the battery. Clouds, rain, snow, and other 
weather conditions may not allow the solar panel 
to completely recharge the battery. Other obstruc-
tions such as buildings or trees may block the sun 
as well.
When  installing  the  solar  panel,  make  sure  it  is 
aimed as described below with a minimum amount 
of obstructions. If possible, mount the panel facing 
toward the southern sky.

• 

PrIOr tO uSE, the battery will require 3 to 7 days 
of full sun to completely charge with the On-tIME 
switch in the OFF position.

 Plug the solar panel cable 

into the bottom of the battery case. If possible, aim the 
solar panel toward the south and tilt it approximately 
50° from horizontal (see illustration on next page). If 
the solar panel cannot be aimed toward the south, then 
tilt the panel approximately 30° if possible.

•  To verify battery is charged, slide the ON-TIME switch 

to TEST. Wait 2 minutes for sensor to warm up. If light 
comes on when motion is detected after warm up pe-
riod, battery is charged and ready for use. If light does 
not come on, slide the ON-TIME to OFF. Recheck the 
light the next day.

•  Actual operating time will vary depending upon how 

frequently the light is turned on by the motion sensor 
and amount of sunlight collected.

•  Solar lighting is not designed to equal standard 120V 

lighting. The amount of light output is reduced to allow 
the  sun  time  to  fully  recharge  the  battery  between 
lighting cycles.

Summary of Contents for Secure Home 7103

Page 1: ...010 HeathCo LLC 200068 01 Light Battery Case Sensor Thumbscrew The solar panel requires full direct sunlight to charge the battery Clouds rain snow and other weather conditions may not allow the solar panel to completely recharge the battery Other obstruc tions such as buildings or trees may block the sun as well When installing the solar panel make sure it is aimed as described below with a minim...

Page 2: ...e on slide the ON TIME to OFF Recheck the light the next day IMPORTANT The controls must face downward to avoiddamagefromrain Ifcontrolsfaceupward move sensor to the original down position rotate 180 then raise to the position shown below Wall Mounted Light Do Not Mount Under Eaves Note Light fixture and sensor should be mounted as shown above when installed depending upon type of installation 3 A...

Page 3: ...t source in question Note The detector is less sensitive to motion directly towards it and more sensitive to across motion Motion OPERATION Place the sensor switch in the 1 or 5 minute mode for normal operation If the light is not needed put the switch in the OFF position Mode On Time Works Day Night Test 5 Seconds x x Auto 1 or 5 Minutes x 3 Loosen the clamp screw in the sensor ball joint 4 Walkt...

Page 4: ...um of 40 000 hours of light output and do not need to be replaced BATTERY REPLACEMENT This solar light contains a rechargeable battery that can be replaced if needed Rechargeable batteries will eventually lose their ability to hold a charge To replace the battery follow the steps below HeathCo LLC reserves the right to discontinue products and to change specifications at any time without incurring...

Page 5: ...ll 1 800 858 8501 for assistance before returning product to store If you experience a problem follow this guide You may also want to visit our Web site at www hzsupport com If the problem persists call for assistance at 1 800 858 8501 8 00 AM to 5 00 PM CST M F You may also write to HeathCo LLC ATTN Technical Service Specialty Products P O Box 90045 Bowling Green KY 42102 9045 If contacting Techn...

Page 6: ...Calafatee todos los agujeros de montaje 3 Unión esférica Calafatee los bordes de la base Bombilla Caja para la batería Detector Tornillo de mano El panel solar requiere luz de sol directa y total para cargar la batería Condiciones climatológicas como nubes lluvia nieve y otros pueden evitar que el panel solar recargue completamente la batería Otros obstáculos tales como edificios o árboles también...

Page 7: ...ptor ON TIME a OFF Compruebe de nuevo la luz al siguiente día Luz montada en la pared No lo instale debajo de los aleros Nota La lámpara y el sensor debe montarse como se indica arriba una vez instalado según el tipo de insta lación 3 Acomode el Detector Para una operación correcta la cabeza del detector debe girarse de modo que los controles del detector queden ubicados hacia abajo como se muestr...

Page 8: ...irigido directamente hacia él y menos sensitivo a un movimiento al través 3 Afloje el tornillo sujetador en la unión esférica del detector 4 Camineporeláreadecoberturaydésecuentacuando las luces se prenden Mueva suavemente la cabeza del detector hacia arriba hacia abajo hacia los lados para cambiar el área de cobertura Nota Espere de 5 a 10 segundos después que se apague la luz para probarla de nu...

Page 9: ...itio donde el panel pueda guardar la luz solar La colección solar es solo efectiva bajo la luz directa del sol Por cada hora que la luz está prendida requiere un mínimo de 16 horas de carga de luz solar Los pa neles solares recolectan menos del 10 de la energÌa solar Si la usa durante varios días nublados la batería se puede descargar Debido al circuito de protección de la batería la luz no trabaj...

Page 10: ...a hablar en inglés de 8 00 AM a 5 00 PM CST L V Usted puede también escribir a HeathCo LLC P O Box 90045 Bowling Green KY 42102 9045 ATTN Technical Service Specialty Products Servicio Técnico para Productos Especiales Si se llama al Servicio Técnico por favor tener lista la siguiente información Número de Modelo Fecha de compra y Lugar de compra No hay piezas de servicio disponibles para este prod...

Page 11: ...ords de Base de Calfeutrage D éclairage Boîtier de la pile Détecteur Vis moletée Lepanneaulumineuxnécessitedelalumièredirecte et à pleine intensité afin de recharger la pile Les nuages la pluie la neige et d autres conditions météorologiques peuvent affecter le rechargement complet de la pile du panneau lumineux D autres obstructions tels que les immeubles ou les arbres peuvent également bloquer l...

Page 12: ...réchauffe Si la lumière s allume lorsqu un mouvement est détecté après la période de réchauffement la pile est rechargée et prête à l utilisation Si la lumière ne s allume pas faites glisser l interrupteur ON TIME sur la position OFF Vérifiez à nouveau la lumière le jour suivant Lumière Montée sur Mur Ne Pas Monter Sous Avant Toit Note Le luminaire et capteur devraient être montés comme montré ci ...

Page 13: ...u aux mou vements latéraux 3 Desserrer la vis de blocage de la rotule 4 Sedéplacerdanslazonedecouvertureennotantàquel endroit vous vous trouvez lorsque l éclairage s allume Déplacer doucement le capteur vers le haut vers le bas ou de côté pour régler la zone de couverture Note Attendre de 5 à 10 secondes après que l éclairage s est éteint avant de faire un nouvel essai 5 Ne pas trop augmenter la p...

Page 14: ...nnement TEST Essai 5 secondes 1 ou 5 minutes OFF Hors circuit régla ble Durée de fonctionnement à pleine charge Jusqu à 2 heures REMPLACEMENT DE LA PILE Ce luminaire à énergie solaire comporte une pile rechar geable qui peut être remplacée au besoin Les piles rechargeables perdent avec le temps la capacité de conserver leur charge Suivre les étapes ci après pour remplacer la pile IMPORTANT Gardezl...

Page 15: ... aussi visiter notre site Web à www hzsupport com Si le problème persiste composez le 1 800 858 8501 service en anglais seulement entre 8 h 00 et 17 h 00 HNC du lundi au vendredi Vous pouvez aussi écrire au HeathCo LLC P O Box 90045 Bowling Green KY 42102 9045 ATTN Technical Service Specialty Products Service technique produits de spécialité Lors d un appel au service technique veuillez avoir les ...

Page 16: ...avor guarde su recibo de venta fechado se lo requiere para cualquier solicitud de garantía Veuillez conserver le reçu portant la date d achat vous en aurez besoin pour toutes vos demandes liées à la garantie Purchase Information Información de la compra Renseignements d achat Model __________________ Date of Purchase ______________ Nº de modelo N de modèle Fecha de compra Date d achat ...

Reviews: