background image


OCTOBER 2016 

Installation and Service Manual 

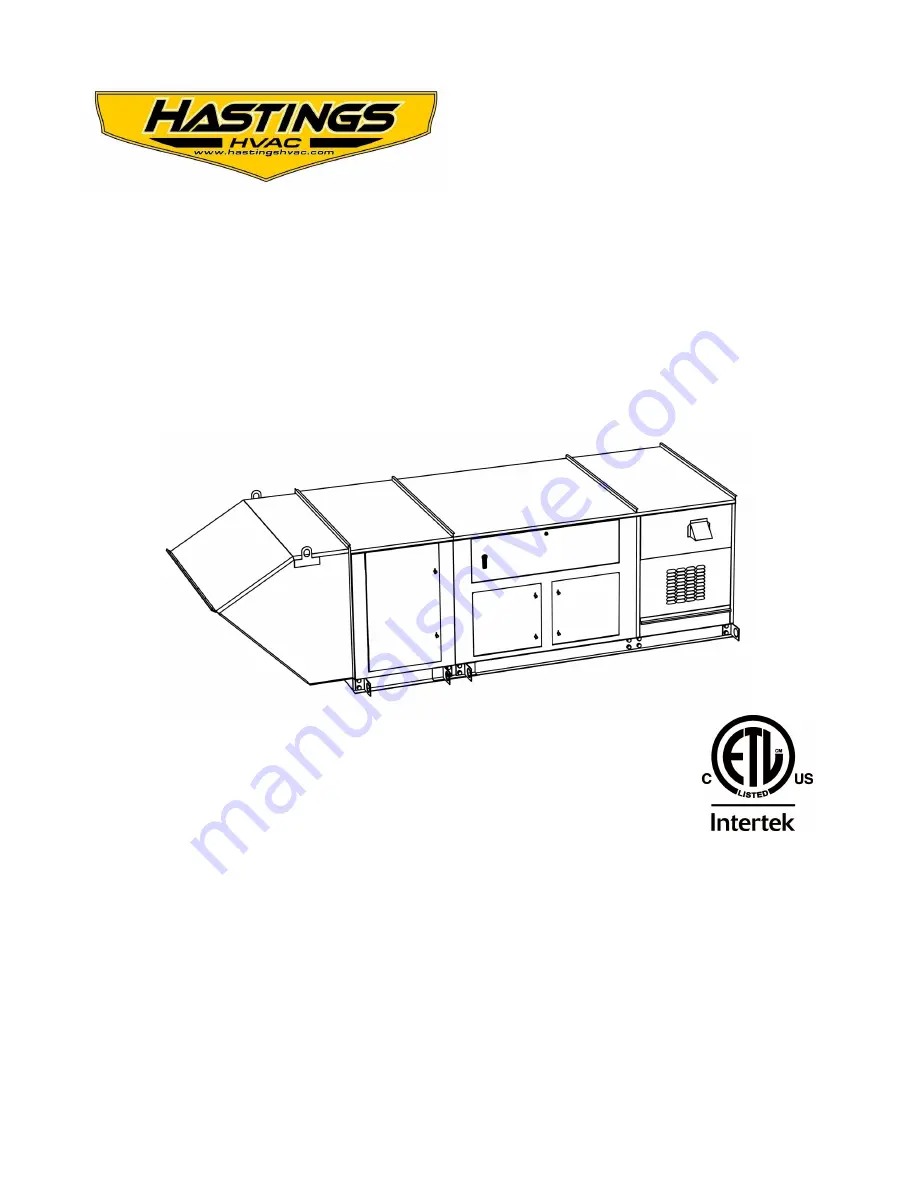
Indoor/Outdoor Heating 

and 

Individual Duct Furnaces


Notice 

Read These Instructions Before Installation 

RECEIVING INSTRUCTIONS 

Inspect unit on arrival for any shipping damage.  If any part is missing or damaged, notify the 
transportation company.  
 
This unit has been test fired for at least 15 minutes to prove out all phases of operation 

IST DUCT FURNACE SYSTEMS 

Summary of Contents for IST-100

Page 1: ...ice Read These Instructions Before Installation RECEIVING INSTRUCTIONS Inspect unit on arrival for any shipping damage If any part is missing or damaged notify the transportation company This unit has been test fired for at least 15 minutes to prove out all phases of operation IST DUCT FURNACE SYSTEMS ...

Page 2: ...not store or use gasoline or other flammable vapors and liquids in the vicinity of this or any other appliance WHAT TO DO IF YOU SMELL GAS Do not try to light any appliance Do not touch any electrical switch do not use any phone in your building Leave the building immediately Immediately call your gas supplier from a phone remote from the building Follow the gas supplier s instructions If you cann...

Page 3: ...Pipe Venting 14 Gas Piping 15 Electrical Connection 16 Operation Gas Valves 16 17 Firing Rate 17 Setting Firing Rate Two Stage 17 Single Stage 18 Modulating Unit 18 Split Manifold 19 Sequence of Operation 20 Troubleshooting 21 24 Maintenance 25 26 Technical Support 27 Model and Serial Number can be found on Equipment Specification Plate inside of Furnace access panel Model ________________________...

Page 4: ...e Combustion Air 6 Vent Pipe Flange Furnace Location I IS O Furnace Application RA OA MA RA Space Heating The Space Heating Unit is designed for 100 return air room heating applications with the air temperature being control from the heated space OA Make up Air The Make up Air unit is designed to replace exhausted building air with 100 outside air to prevent the many problems of air starvation Thi...

Page 5: ...0 000 2468 1850 1480 1234 1058 926 823 IST 150 150 000 120 000 3702 2777 2221 1851 1587 1389 1234 IST 200 200 000 160 000 4936 3702 2962 2468 2116 1851 1645 IST 250 250 000 200 000 6170 4628 3702 3085 2644 2314 2057 IST 300 300 000 240 000 7404 5554 4443 3702 3173 2777 2468 IST 350 350 000 280 000 8638 6479 5183 4319 3702 3240 2880 IST 400 400 000 320 000 9872 7404 5923 4936 4231 3702 3291 Table 1...

Page 6: ...2468 IST 500 500 000 400 000 5288 4626 4114 3072 3366 3085 IST 600 600 000 480 000 6346 5554 4936 4443 4039 3702 IST 700 700 000 560 000 7404 6478 5758 5183 4712 4319 IST 800 800 000 640 000 8460 7404 6582 5923 5385 4936 Table 2 CFM Requirements for Double Bank Furnace Model Input Btu Hr Output Btu Hr Air Temperature Rise 90 F 110 F 130 F Airflow CFM IST 1200 1 200 000 960 000 9872 8077 6835 Table...

Page 7: ...n Dimensions Cabinet Size A B C D E F G H IST 100 Thru IST 200 37 1 28 42 52 29 28 40 34 4 IST 250 Thru IST 400 43 6 28 42 66 29 28 50 44 4 Dimensions are in inches H OPN G 9 2 10 8 4 31 9 OPN G 5 6 52 1 1 Furnace Discharge Main Control Panel Blower Access Electrical Supply Location Furnace Control Gas Supply Furnace Section Blower Section ...

Page 8: ... be used in every application Refer to the wiring schematic that was shipped with furnace The wiring schematic can be found in an envelope in the furnace control access panel 4 2 3 5 6 7 8 9 10 11 12 16 15 13 1 14 17 Figure 1 Furnace Component Locations Furnace Section Figure 2 Main Control Panel Component Locations Blower Section Main Control Panel Blower Section Main Control Panel Components see...

Page 9: ...a negative air pressure condition Provide adequate make up air 6 Indoor units installed where there is sawdust lint soot dirt etc areas of high air contamination must be cleaned frequently or serious damage will result Refer to section on Maintenance for recommended frequency Installation Regulations Installation of this appliance must conform to applicable federal state and local codes and regula...

Page 10: ...rances Sides 6 Top 6 Bottom 0 Table 5 Service Clearances Control Side 46 Top 6 Back 6 Ductwork Uniform air distribution across the heat exchanger is critical for proper performance and prevention of premature heat exchanger failure The duct furnace must be installed on the positive pressure side of the air circulation blower The blower must provide the required CFM air delivery as specified on the...

Page 11: ...nting must apply accordingly The horizontal portions of the venting system should be supported to prevent sagging Suspended support straps should be placed at a minimum spacing of 4 feet horizontally and at elbows or as specified by the vent supplier and in accordance with the pitch as required in the National Fuel Gas Code ANSI Z223 1 NFPA 54 or the National Gas and Propane Installation Code CSA ...

Page 12: ...sembly within 1m horizontally of the vertical centerline of the regulator An oil tank or an oil tankfill inlet The inside corner of an L shaped structure A venting system shall not terminate within 3m of the following Above grade level or any surface that may support snow ice or debris Vent Termination Clearances USA For U S A standards vent systems must conform to the latest edition of the Nation...

Page 13: ...ould be equipped with condensate drains Every exhaust pipe must have a vent terminal on the end Vertical flue stacks shall be terminated with an approved cap The termination vent Tee should be used on horizontal venting Refer to Figures 5 and 6 for recommended arrangements Do not attach elbow directly to exhaust vent flange A minimum of 12 of horizontal vent pipe must be attached to the exhaust ve...

Page 14: ...nt Tee should be used on horizontal venting Refer to Figures 7 and 8 for recommended arrangements Do not attach elbow directly to exhaust vent flange A minimum of 12 of horizontal vent pipe must be attached to the exhaust vent flange before attaching additional horizontal or vertical vent pipe See Figure 4 Page 13 Tee with condensate drain Exhaust 12 min Exhaust Combustion Air Termination Tee with...

Page 15: ...nifold piping see Figure 9 6 A 1 8 N P T plugged tapping accessible for test gauge connection must be installed upstream of the gas supply connection to the system see Figure 9 7 When leak testing pressures will exceed 1 2 psi 14 in wg the appliance and its individual shutoff valve must be disconnected from the gas supply piping 8 The appliance must be isolated from the gas supply piping system by...

Page 16: ...ordered with a disconnect switch it is recommended that a weatherproof disconnect switch be mounted on or near the unit 5 Connect power supply lines from main disconnect switch to unit disconnect switch 6 If original wire supplied with the furnace needs to be replaced it must be replaced with wiring material having a temperature rating of at least 105 C 7 Install thermostat or remote control stati...

Page 17: ...g 1 8 NPT 3 Turn on system power Set thermostat to call for heat low stage Main burner should light 4 Remove regulator cover screw from the low outlet pressure port Figure 11 p 16 and turn screw clockwise to increase pressure or counterclockwise to decrease pressure Always adjust regulator according to furnace specifications Table 7 Replace regulator cover screw 5 Set thermostat to call for heat h...

Page 18: ...rnace specifications Table 7 p 17 6 Replace regulator cover screw Low Fire Adjustment 7 Disconnect a wire from the modulating valve terminal block Be careful not to allow wire to come in contact with any other part 8 On the modulating valve Figure 12 p 17 remove by pass cap A and turn screw B using small screwdriver to desired low fire setting Table 7 p 17 Note Clockwise screw rotation reduces flo...

Page 19: ...ct with any other part 10 On the modulating valve Figure 12 p 17 remove by pass cap A and turn screw B using a small screwdriver to desired low fire setting Table 7 p 17 Note Clockwise screw rotation reduces flow rate Do not over tighten 11 Replace bypass cap 12 Reconnect wire to modulating valve terminal block Two Stage Burner Section See Figure 16 13 Remove regulator cover screw from the high ou...

Page 20: ...me level for the entire ignition trial time If at the end of ignition trial flame is sensed above the run level the control proceeds to run mode If flame is not sensed above the Run level at the end of ignition trial the control de energizes the gas valve and proceeds with ignition retries Single Stage The burner lights at High fire and remains at high fire Two Stage Depending on call for heat the...

Page 21: ...d improperly 6 1 Soft Lockout Failed to light during four ignition trials 1 Combination valve turned off 2 Spark ignitor is disconnected loose connection or damaged 3 Flame rod disconnected loose connection or damaged 4 Burner manifold pressure too low 6 2 Soft Lockout Limit circuit opened during run recycle counter is at its maximum 1 Gas input too high Check burner operating pressure 2 Inadequat...

Page 22: ... or there is a big leakage from flame rod to ground 1 Switch power off and check flame rod and flame rod wiring 7 5 Lockout Gas Valve Fault 1 Perform power reset Gas valve relay is either welded or failed open or gas valve is connected improperly If gas valve is fine and error is reported again furnace control must be replaced 7 6 Lockout Internal Hardware Error detected 1 Perform power reset Furn...

Page 23: ...properly and there is not a crack in porcelain The spark gap should be 125 Replace the spark igniter if there is a crack or improper spark gap 6 Main gas valve Make sure minimum supply pressure see specification plate is being supplied to main valve Confirm that burner manifold pressure is adjusted correctly Check all wiring connections between ignition module and main gas valve are correct If mod...

Page 24: ...cification plate is being supplied to main valve Confirm that burner manifold pressure is adjusted correctly Check all wiring connections between ignition module and main gas valve are correct If module and wiring inspections are satisfactory replace main gas valve 2 Faulty Spark Igniter Check wiring to spark igniter and make sure it is grounded properly and there is not a crack in porcelain The s...

Page 25: ...r of debris Wire brush the inside surfaces of the heat exchanger to remove any foreign matter 9 Reattach the burner and manifold assembly 10 Reconnect gas supply 11 Check all gas connections for leaks 12 Turn ON electrical supply to the unit 13 Perform start up procedure to confirm operation Disconnect power and gas supplies before servicing unit WARNING Electrical Check all wiring and connections...

Page 26: ... 5 25 lbs 7 87 lbs Blower Motors Some small motors have sealed bearings which require no relubrication Motors with regreasable bearings are shipped with a high quality wide temperature range grease in the bearings Motors can be regreased by stopping the motor removing the drain plug and pumping new grease into fill hole Run motor with drain plug removed until excess grease has been discharged mini...

Page 27: ...nel For needed parts appliance data or assistance on a service problem contact the service department of Hastings HVAC Inc Be sure to have the following information ready when contacting us 1 Model and serial number of unit 2 Type of gas LP or Natural 3 Make of electric valve and voltage To contact Hastings HVAC Inc Service department Phone Outside of Nebraska 1 800 228 4243 1 800 228 4270 In Nebr...

Reviews: