background image

HVS-ID-QS-TORP-220, Issue 02

HVS-ID-QS-TORP-220, Issue 02

Page 1 of 7

Q

UICK 

S

TART 

G

UIDE

Torpedo

 DVB-S/S2 or DVB-T/T2 

to IP Gateway Appliance

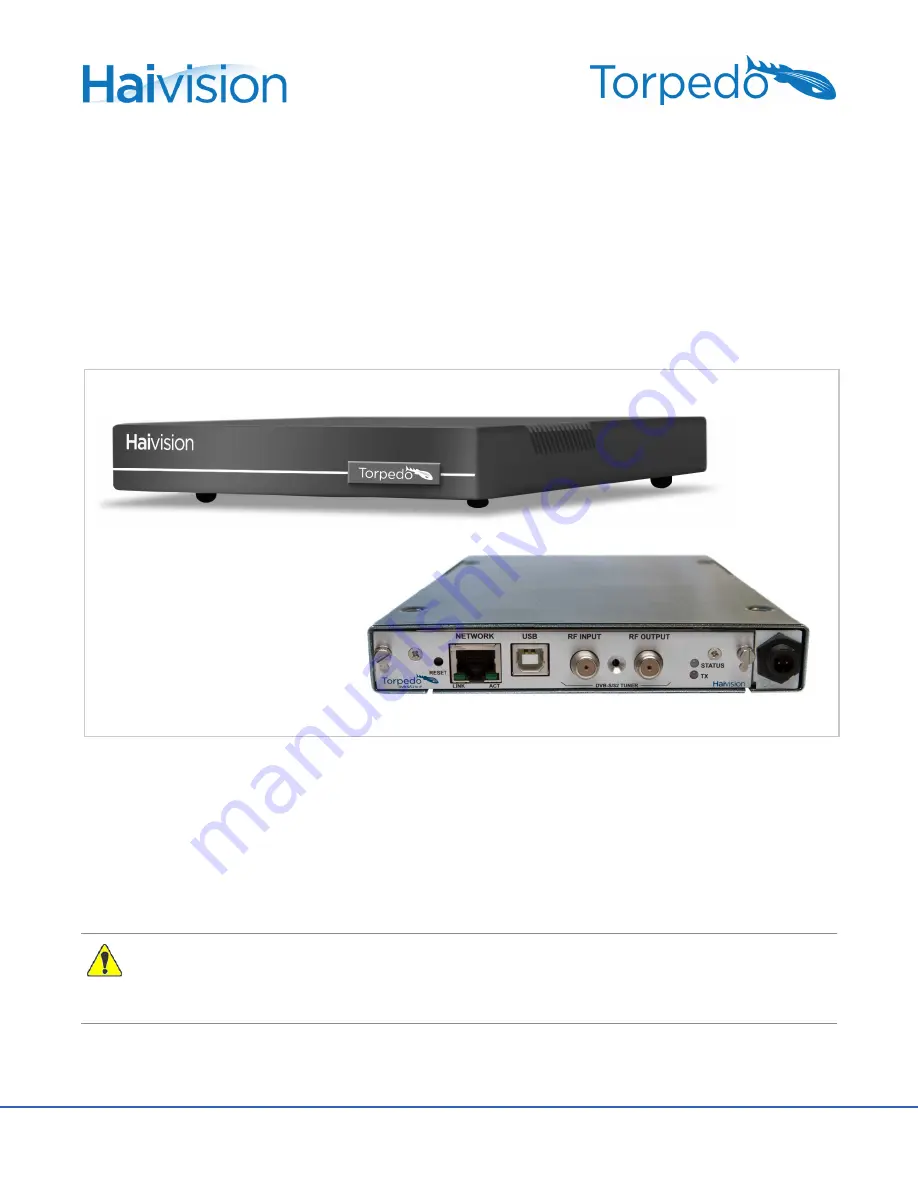
This Quick Start Guide summarizes the basic steps required to install and configure the Torpedo DVB-S/S2 or DVB-
T/T2 to IP Gateway Appliance (single chassis, as shown below*) to stream digital broadcasts onto an IP network. 
Please refer to the User’s Guide or the online help (available from the Web Interface) for detailed information.

* The color of your Torpedo may be different from those pictured above.

Installing the Torpedo

1.

Unpack the box and visually inspect the package contents for any evidence of shipping damage. [See Impor-
tant Notice for list of contents.]

2.

Install the Torpedo as a desktop unit on a flat, well-ventilated surface.

3.

Connect the power cable.

CAUTION  

Always use the AC power cord and power supply provided with the unit. Connect the power 

supply 

first

 to the chassis and then to the AC source. 

Make sure the connector is properly inserted and locked to avoid intermittent power problems. 

Summary of Contents for Torpedo

Page 1: ... from the Web Interface for detailed information The color of your Torpedo may be different from those pictured above Installing the Torpedo 1 Unpack the box and visually inspect the package contents for any evidence of shipping damage See Impor tant Notice for list of contents 2 Install the Torpedo as a desktop unit on a flat well ventilated surface 3 Connect the power cable CAUTION Always use th...

Page 2: ... s Torpedo DVB T T2 For RF terrestrial DVB T T2 signals use a 75 ohm IEC aerial connector DVB T T2CAM example shown below Torpedo DVB S S2 For SD and HD satellite DVB S and DVB S2 signals use a 75 ohm Type F Female connector NOTE With the DVB T T2 Torpedo it is possible to cascade the RF Input to other Torpedoes To do so connect the RF Output of the first Torpedo to the RF Input of the subsequent ...

Page 3: ...s Dish Setup DVB S S2 only NOTE There is no LNB configuration on DVB T T2 systems so Dish Setup is not required 1 Click SYSTEM from the main menu and then click DISH SETUP from the sidebar menu The Dish Setup page opens as shown in the following example 2 Specify the Low Noise Block LNB settings as required for your system 3 If your RF network contains DiSEqC Digital Satellite Equipment Control sw...

Page 4: ...2 or DVB T T2 Starting a Service Scan DVB S S2 1 Click SYSTEM from the main menu and then click SCAN SETUP The Scan Setup page opens as shown in the following example From here you can start a service scan and set the parameters used for scanning 2 To enable or disable Automatic scanning check or uncheck the Automatic checkbox 3 When scanning in Automatic mode you only need to select the satellite...

Page 5: ...e following example From here you can start a service scan and set the parameters used for scanning 2 To enable or disable Automatic scanning check or uncheck the Automatic checkbox 3 When scanning in Automatic mode you only need to select the country or If Automatic scanning is disabled you must enter the Start and End frequencies and select the Bandwidth 4 To save your changes and start the serv...

Page 6: ... multiplex as well as the other available multiplexes for this Torpedo 2 To view and configure the channels for a multiplex click the Frequency link for the multiplex 3 On the Multiplex Information page shown following you can enable up to 15 individual channels from a single RF multiplex for the Torpedo to stream 4 For each channel you will need to provide network information to reach the IP targ...

Page 7: ...he Status page as shown in the following example For More Information Contact Haivision Technical Support via our Support Portal on our website at http www haivision com support Or you may use the phone number or email address listed below You may download the firmware Readme file and PDF versions of the User s Guide and Quick Start Guide through our Download Center at http www haivision com downl...

Reviews: