Quick Start Guide
Recommendation: Using the ATA as a router
2. Help Centre
If you still have questions, please consult the sipgate help centre under:
http://www.sipgate.co.uk/faq
If you do not find your question answered in the help centre, contact our
support team at [email protected]
1. User manual
You will find a detailed guide for your ATA486 under:
www.grandstream.com/user_manuals/HandyTone-486UserManual.pdf
Error messages and problems
Problem:
I lift the handset and hear nothing at all.
Answer: For connecting your telephone to the ATA please use only
the enclosed phone cable TAE for the RJ11 (Western) adapter for most
telephones (e.g. Siemens, AEG). A direct connection does not function by
normal RJ11-RJ11 cables, since the wiring differs.
Problem:
I can no longer access the Internet.
Answer: Reboot your PC, DSL modem and the ATA. Make sure that you
saved the login data of your DSL Providers correctly in the ATA. You can
make a change of the login data at 192.168.2.1 in the Web configuration
menu. Please reboot the adapter after making changes. Some providers
lock your DSL account after repeated wrong logins, and you must wait a
while to try again. Enter the data with extreme care!
Problem:
The ATA does not get an IP address.
Answer: Please take the handset off of your telephone and press the
button on top of your adapter. You will hear an announcement. Following
the announcement, please press keys „0“ and „2“ on your telephone. Your
IP address will be announced through your handset. If you should get a
set of zeros announced, the ATA cannot access an „external“ IP address.
Check whether your provider supports DHCP or if you are assigned a static
IP address. Change the settings accordingly in the Web configuration
menu of the adapter. Consider the difference between internal and ex-
ternal IP addresses: Your ATA has the same (internal) IP 192.168.2.1; the
external IP address always changes.
Problem:
I can dial, but I hear no dial tone.
Answer: First reboot the DSL modem, and then reboot the ATA so it logs
in again to your provider.
Note: You can only make use of our free
email support if you use the ATA as a
router.
Problem:
My broadband modem supports only USB ports and/or my PC
does not have an Ethernet card.
Answer
: You need an adapter for USB on Ethernet in order to be able to
use your ATA. If your PC does not have an Ethernet card, you can buy a USB
for Ethernet converter, to connect your PC with the ATA and the broadband
connection.
Problem:
I would like to operate a router and/or a W-LAN router behind
the ATA. The PCs attached there do not connect to the Internet anymore; I
can however use the ATA telephone.
Answer: Reboot your PCs call up the Web configuration menu of your
old router (not the ATA! Usually 192.168.0.1 and/or. 192.168.1.1). Deac-
tivate PPPoE and the DHCP function, so it no longer gives IP addresses.
Finally, reboot your router.
To minimize complications it is best
to use the sipgate as a router. To
connect the device to your DSL line,
attach it directly behind the modem.
If you would like to use your previous
router instead of the sipgate router
(e.g. in order to connect several PC’s),
attach the old router behind the ATA
device.
TIP!
1
Get your password before connecting the router.
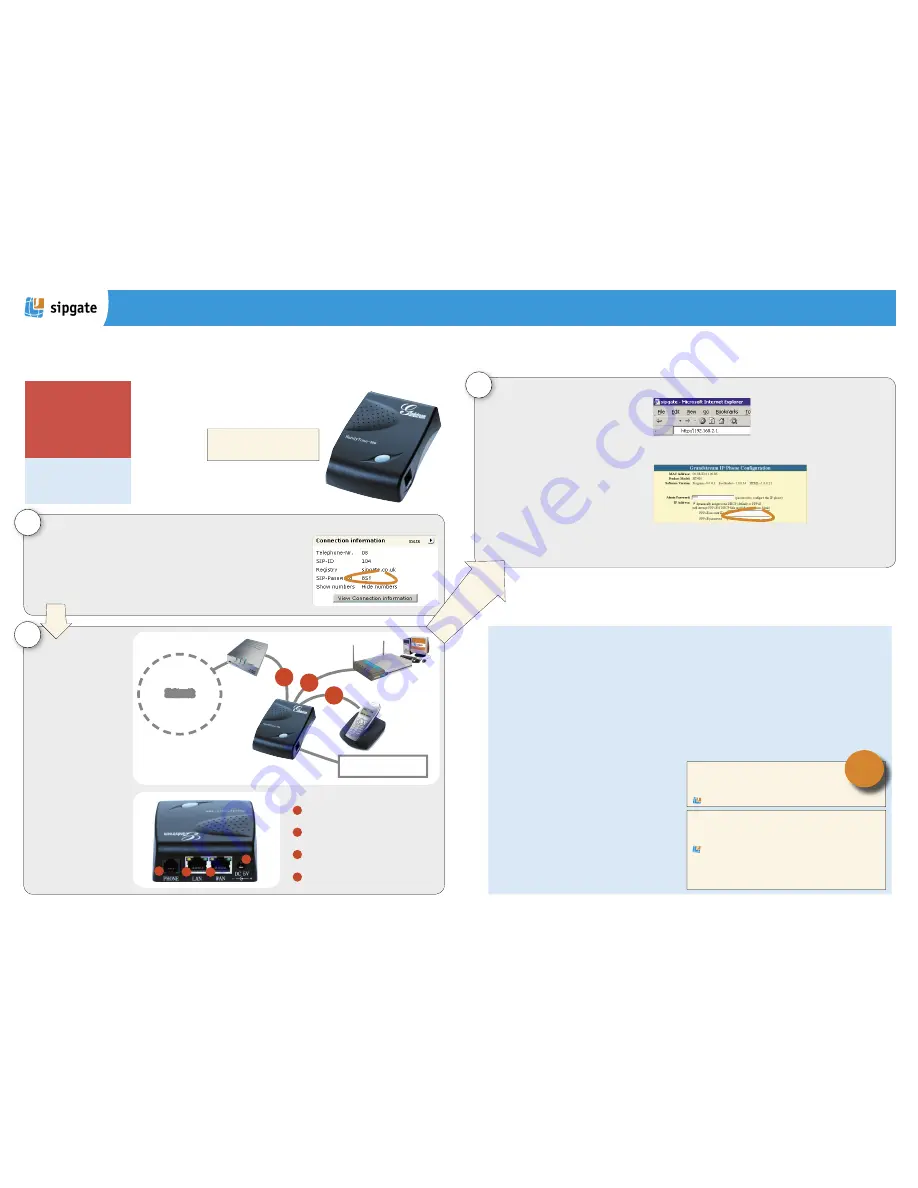
In order to access the web configuration of your ATA, you will need your SIP password. The SIP password
is NOT your password for logging in to www.sipgate.co.uk! You may find the SIP password after the
Login on www.sipgate.co.uk under „my account“, “Connection information“, „SIP password“. Copy and
paste the password from the website to an intermediate file like a text editor, in order to avoid mistakes
of letters and numbers, and/or in upper and lower case.
Only with DSL connection:
Have the login data of your Internet service provider (ISP) available since this information will also
have to be used in the set-up of your new router. Your provider should have given you the
ISP login data at the beginning of your contract.
3
Configure the ATA for your DSL line
Open a Browser (e.g. Internet Explorer) on your PC and
enter the Internet address http://192.168.2.1, in order
to get to the Web configuration menu of the ATA. You will
start off from the login page of the adapter. Paste the SIP
password copied in step 1 into the intermediate file (i.e.
through the text editor) or enter it by hand and click on
„Login“.
Under the option „IP ADDRESS“, you should activate „dy-
namically assigned via DHCP or PPPoE“.
Under „account ID“ and „password“ enter the login data of
your DSL account. Note: Some providers lock your account
if you input of the wrong password! Proceed with extreme
care! After saving the login data, the ATA adapter must be
rebooted. To „Reboot“, click on the button at the lower end
of the Web configuration menu.
Using the ATA as a router
We recommend the use of the ATA as your
router. This offers a set of advantages, the
most important to you is that setting up
the ATA as a router
is a whole lot easier
than making it work
as a client in a net-
work. If you don’t
want to use the ATA
as a router, you can
operate it as a client behind another router
(e.g. behind a firm’s network). Please read
the Quick start Guide on the other side of
this flyer for more information.
2
Attach the ATA adapter to your
Internet connection with the
enclosed white network cable.
You should attach the cable to
a 10 Mb-Ethernet port on your
DSL modem. The other end of
the cable, you must plug into
the WAN port on the back wall
of the ATA.
You may connect your PC
directly with the ATA device,
if this is the only device you
wish to connect to the Inter-
net.
You may also use the ATA to
connect another network device
such as a hub, a switch, or an
old router. This has the benefit
of allowing multiple comput-
ers and devices to access each
other and the Internet.
Attach your analogue
telephone to the provided
TAE-RJ11 Adapter (1).
The
associated socket on the ATA is
marked with “Phone“. Please
attach the power pack last.
Finally, plug in the power
cable.
Internet
DSL Modem
Your phone
Router and/or
computer
HandyTone Adapter
analog phone-port
as fallback option
1
3
Step by step:
Connect your telephone to the phone-port of
your adapter
Connect the LAN-port to the WAN-port
of your router, resp. computer.
Connect the WAN-port to your DSL-
Modem.
Please attach the power pack last.
1
2
3
4
Web configuration
Open an Internet browser (e.g. Microsoft Internet
Explorer or Opera) and enter into the address line
„http://192.168.2.1“. Press enter.
The HandyTone-486 adapter (ATA) of
sipgate has an adequate router built in.
The adapter is ideally suited for most
DSL connections and cable modems.
Note: Your PC must be restarted, so that it is able to connect to the net!
Since your computer switches over to the new DNS server only with a restart, you must
reboot to make the changes take effect („start“/“terminating“ / „new to start“).
Account data
Please enter the account
data for your Internet
Service Provider (ISP) with
extreme care.
1
2
3
4
2
8S9abcd


