background image

deluxe

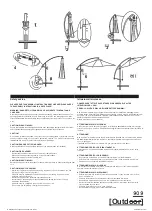
Istruzioni per l’uso

Owner’s manual

Instrucciones

Manual de utilização

Oδηγίες χρήσεως

Инструкция по 

использованию

Gebruiksaanwijzing 

Guide d’utilisation

C

od

. GR226

Made in China  Hecho en China  F

abricado na China  Сд

елано в Кит

ае

PRG S.p.A.

Via delle Primule, 5 - 20815 Cogliate (MB) - Italy


I

  In conformità con: EN 716-1-2:2017 + EN 12221-1:2008 + A1:2013


UK

  Approved to: EN 716-1-2:2017 + EN 12221-1:2008 + A1:2013

 E 

En conformidad con: EN 716-1-2:2017 + EN 12221-1:2008 + A1:2013


Em conformidade com: EN 716-1-2:2017 + EN 12221-1:2008 + A1:2013

 GR 

Σύμφωνα με: EN 716-1-2:2017 + EN 12221-1:2008 + A1:2013

 RU

  B соответствии c: EN 716-1-2:2017 + EN 12221-1:2008 + A1:2013


NL 

In overeenstemming met: EN 716-1-2:2017 + EN 12221-1:2008 + A1:2013


F

  Conformément à : EN 716-1-2:2017 + EN 12221-1:2008 + A1:2013


SA 

EN 716-1-2:2017 + EN 12221-1:2008 + A1:2013 :

Summary of Contents for deluxe

Page 1: ...tà con EN 716 1 2 2017 EN 12221 1 2008 A1 2013 UK Approved to EN 716 1 2 2017 EN 12221 1 2008 A1 2013 E En conformidad con EN 716 1 2 2017 EN 12221 1 2008 A1 2013 P Em conformidade com EN 716 1 2 2017 EN 12221 1 2008 A1 2013 GR Σύμφωνα με EN 716 1 2 2017 EN 12221 1 2008 A1 2013 RU B соответствии c EN 716 1 2 2017 EN 12221 1 2008 A1 2013 NL In overeenstemming met EN 716 1 2 2017 EN 12221 1 2008 A1 ...

Page 2: ...I UK E 3 IMPORTANTE CONSERVARLO PER OGNI RIFERIMENTO FUTURO LEGGERE ATTENTAMENTE IMPORTANT RETAIN FOR FUTURE REFERENCE READ CAREFULLY IMPORTANTE CONSERVELO PARA FUTURAS CONSULTAS LEA ATENTAMENTE ...

Page 3: ...LATERE RAADPLEGING BEWAREN LEES DEZE GEBRUIKSAANWIJZING ZORGVULDIG DOOR RU ОЧЕНЬ ВАЖНО СОХРАНИТЕ ДЛЯ ПОСЛЕДУЮЩИХ КОНСУЛЬТАЦИЙ ПРОЧТИТЕ ВНИМАТЕЛЬНО P GR IMPORTANTE CONSERVE O PARA CONSULTAS FUTURAS LEIA ATENTAMENTE ΣΗΜΑΝΤΙΚO ΚΡΑΤΗΣΤΕ ΤΙΣ ΟΔΗΓΙΕΣ ΓΙΑ ΝΑ ΤΙΣ ΣΥΜΒΟΥΛΕΥΕΣΤΕ ΣΤΟ ΜΕΛΛΟΝ ΔΙΑΒΆΣΤΕ ΠΡΟΣΕΚΤΙΚΑ ...

Page 4: ...6 1 3 7 4 8 5 7 6 2 9 PUSH PUSH ...

Page 5: ...8 10 12 13 14 15 9 11 OK OK CLICK A A B B C CLICK PUSH 16 ...

Page 6: ...10 17 21a 20 23 21 24 19 11 18 22 22a 25 CLICK OK CLICK CLICK PUSH A B 1 2 3 PUSH ...

Page 7: ...ssile del fasciatoio al lettino tramite gli appositi velcri 17 Agganciare i peluches alla capottina tramite le lin guette autoaggancianti poste sia sulla capottina che sui peluches 18 Entrata laterale con cerniera 19 Agganciare la zanzariera tramite i 2 bottoni au tomatici poste sulle 2 estremità esterne della ca pottina 20 Tirare la zanzariera fin sopra la capotta rimarrà fissa grazie all elastic...

Page 8: ...des of the bed in order to raise them upwards 3 Open the bed keeping the centre raised using the handle on the bottom and at the same time lift the 4 sides until fastened 4 Once the 4 sides are locked push the centre of the base of the bed downwards 5 Attach the cot using the zip as shown in the picture 6 Insert the 4 tubes on the sides of the cot as shown in the picture 7 Place the mattress insid...

Page 9: ...través del velcro 8 A continuación colocarcorrectamente el colchón 9 Enganchar la capota colocando los 2 ganchos de manera que quede tensada en ambos lados como se muestra en la figura 10 Fijar la parte trasera de la capota con los 2 bo tones automáticos situados en las 2 esquinas traseras de la cuna 11 Correcta colocación de los tubos C y D en el inte rior de los orificios del cambiador ATENCIÓN ...

Page 10: ...e indicado na figura 6 Introduza os 4 tubos nas partes laterais do ber ço conforme indicado na figura 7 Coloque o colchão dentro do berço Fixe o colchão à estrutura passando as 4 tiras nas ranhuras adequadas e fixe as na parte infe rior da alcofa com o velcro 8 Seguidamente posicione o colchão corretamente 9 Fixe a capota posicionando os 2 ganchos de modo a ficar esticada em ambos os lados con for...

Page 11: ...5 Στερεώστε το λίκνο με το φερμουάρ όπως φαίνε ται στο σχέδιο 6 Εισάγετε τους 4 σωλήνες στα πλάγια τμήματα του λίκνου όπως φαίνεται στο σχέδιο 7 Τοποθετήστε το στρωματάκι στο εσωτερικό του λίκνου Στερεώστε το στρώμα στο σκελετό περνώντας τις 4 λωρίδες στις κατάλληλες υποδοχές και στερεώ στε τις στο κάτω μέρος του παρκοκρέβατου μέσω του velcro 8 Στη συνέχεια τακτοποιήστε σωστά το στρω ματάκι 9 Στερ...

Page 12: ... КРОВАТКИ 1 Разместить кроватку в вертикальном положе нии расстегнуть застежки липучки 2 Взять за две короткие стороны кроватки и по тянуть одновременно вверх решительным дви жением 3 Открыть кроватку поддерживая в приподнятом состоянии центральную часть с помощью ручки на дне потянуть одновременно вверх 4 края до блокировки 4 После открытия и блокировки 4 x сторон нажать вниз на центральную часть...

Page 13: ...t behulp van de ritssluiting vast zoals in de afbeelding wordt getoond 6 Steek de 4 stangen in de zijkanten van de wieg zoals in de afbeelding wordt getoond 7 Leg het matrasje in de wieg Om de matras aan het frame vast te zetten laat u de 4 riempjes door de hiervoor bestemde gleuven lopen en zet u ze op de bodem van de wieg met het klittenband vast 8 Zorg er vervolgens voor dat het matrasje goed k...

Page 14: ...le centre de la base du petit litvers le bas 5 Accrocher le berceau à l aide de la fermeture à glis sière comme indiqué dans la figure 6 Enfiler les 4 tubes dans les parties latérales du ber ceau comme indiqué dans la figure 7 Poserle matelas à l intérieurdu berceau Pourfixerle matelas à la structure enfilerles 4 cour roies à travers les fentes prévues à cet effet puis les accrocherau fond du berc...

Page 15: ...ant Ne pas utiliser plus d un matelas à la fois dans le lit N utiliser que le matelasvendu avec le berceau ne pas ajouter un second matelas car il y aurait alors risque d étouffement N utiliser le lit qu après avoir actionné les méca nismes de blocage S assurerque ces mécanismes soient correctement actionnés avant d utiliser le lit de camp Toujours bien serrer les éléments de montage et les contrô...

Page 16: ...SA 1 2 ...

Reviews: