Note:
• Do not place the clock in direct sunlight as this
will give you an inaccurate temperature reading.
Replacing Batteries:
• We recommend using high quality batteries for
the best product performance.
• Heavy duty or rechargeable batteries are not
recommended.
•The outdoor sensor requires lithium batteries in
low temperature conditions. Cold temperatures
would cause alkaline batteries workimproperly.
• Do not mix old and new batteries. Do not mix
alkaline, standard, and rechargeable batteries.
Low Battery Indicator:
If the low battery indicator is displayed on the
LCD for either the outdoor sensor or the display
unit, immediately change the batteries to prevent
disruptions in communications of the devices.
Default settings
1.Default time: 12:00(US) 0:00(EU)
2. Default date: 01/01 (Year: 2019, date form:
M/D[US],date form: D/M[EU])
3. Default temperature: °F(US)/ °C(EU)
4. Default alarm: AM 6:00, AM 7:00.
5. Default snooze time: 5min.
6. Default week: TU (Language: EN/GE, 7
languages can be selected)
Note:
The LCD display fully for 2 seconds with backlight
when changing new battery or resetting, then with
a sound BI into the standard mode.
Operation
TIME SETTING
a. In the standard mode, hold and press “SET” for
2 seconds to enter time setting, Digits to be set
are flashing.Press UP or DOWN button to change
the value.
b. Setting order: DST ON/OFF→ 12 / 24HR→
Time zone→ Hour → Minute→ MD/DM→ Year →
Month → Day → Language(English, Italian,
French, Dutch, Spanish, Danish, German)→Exit
c. Press “SET” or no key handling for 10s,will exit
and save the setting.
d. Press “UP” once and ahead at one step; press
and hold for 2 seconds, go ahead at an 8
step/second speed.
e. Press “DOWN” once and backat one step,
press and hold for 2 seconds, go back at an 8
step/second speed.
ALARM SETTING
In standard mode, hold and press “ALARM” for 2
seconds to enter alarm time setting.
Digits to be set are flashing.Press UP or DOWN
button to change the value.
The setting order: Alarm 1 hour →Alarm 1 minute
GEEVON Auto-Dim Atomic Clock
Item No.22116
User Manual
Thank you for purchasing 22116Auto-Dim Atomic
Clock
Please take a moment to read this guide and store
it for future reference.
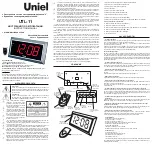
Controls and Buttons:
1. SNOOZE/LIGHT button
2. Alarm time 1 ON/OFF switch
3. Alarm time 2 ON/OFF switch
4. Time display
5. Date
6. Week
7. Temperature
8. Alarm time 1
9. Alarm time 2
10. SET button
11. UP button
12. DOWN button
13. Alarm button
14. AUTO LIGHT ON/OFF switch
15.Battery Compartment 2xAA (batteries not
included)
Package Contents:
1. Auto-dim Atomic Clock
2. Instructions Manual
Getting started
Inserting the batteries
• Place 2xAAA batteries into the clock.
1
2
3
4
8
6
5
10
14
15
11 12
13
7
9