

1
2
3
User
Manual
VISO10
–DCF
(Mainland
Europe
–
Not
UK)
1.
Features
‐
Easy
to
Read
and
Understand
Time
display
‐
Perpetual
Calendar
Up
to
Year
2099
‐
Day
of
week
&
Month
in
8
languages
user
selectable
2.
Unit
Appearance
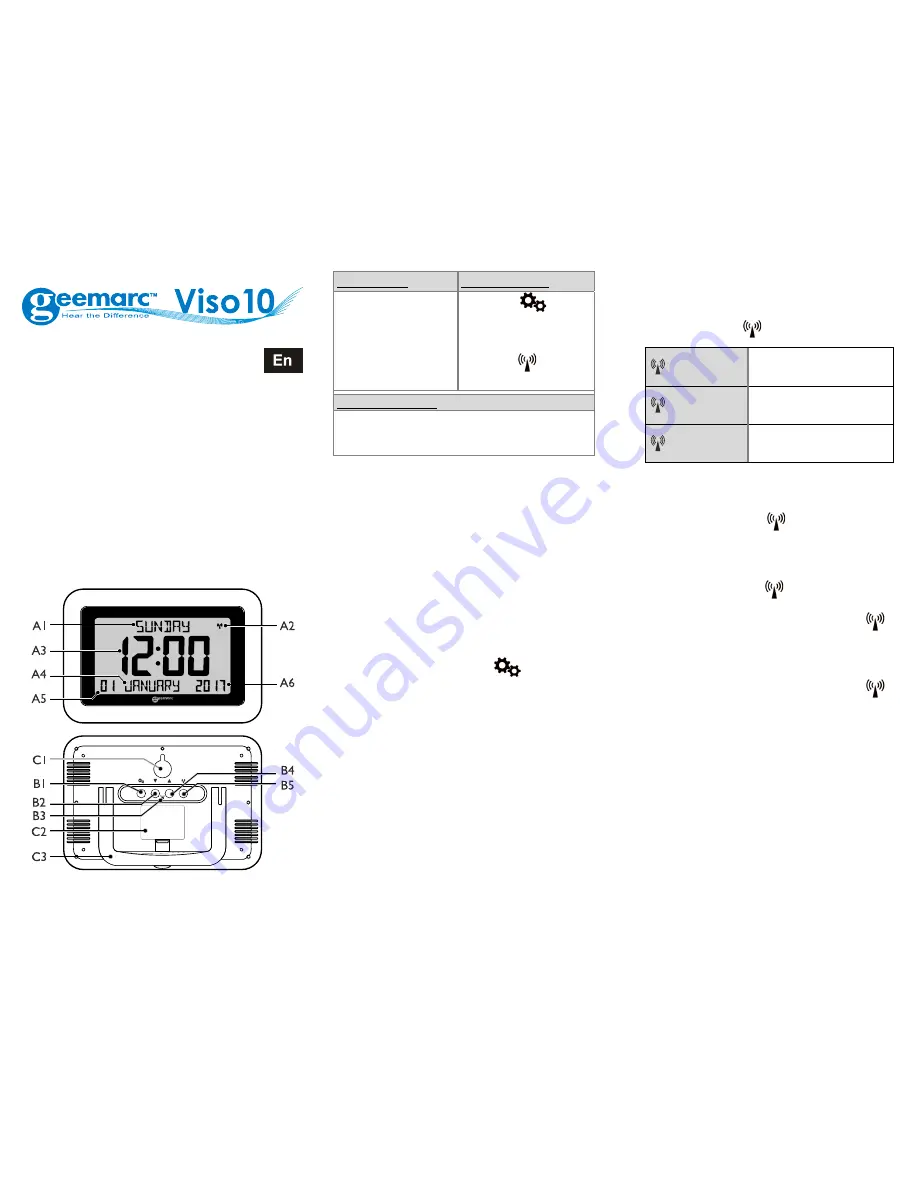
Part
A
‐
LCD
Part
B
‐
Button
A1:
Day
of
the
Week
A2:
Radio
Control
Icon
A3:
Time
A4:
Month
A5:
Date
A6:
Year
B1:
“MODE/
”Button
B2:
“
▼
”
Button
B3:
“RESET”
Button
B4:
“
▲
”
Button
B5:
“WAVE/
”
Button
Part
C
‐
Structure
C1:
Hanging
Hole
C2:
Battery
Door
C3:
Stand
3.
Getting
started:
z
Open
the
battery
Cover
(C2).
z
Insert
2
x
AA
size
alkaline
batteries
observing
polarity
[“+”
and
“–“marks].
There
is
“click”
sound
when
insert
batteries
to
remind
user
the
batteries
was
inserted
correctly.
z
Replace
the
battery
compartment
cover.
4.
Time
Setting
4.1
Manual
Time
Setting:
z
In
time
display,
hold
“MODE/
”
button
(B1)
for
3
seconds
to
enter
Clock/Calendar
setting
Mode.
z
Press
“
▼
”
(B2)
or
“
▲
”
(B4)
button
to
adjust
the
setting
and
press
“MODE”
button
(B1)
to
confirm
each
setting.
z
(By
keeping
the
“
▼
”
(B2)
or
“
▲
”
(B4)
button
pressed,
that
will
accelerate
the
process
and
you
will
reach
the
desired
value
faster)
z
The
setting
sequence
is
shown
as
follow:,
Weekday
&
Month
Language,
12/24
Hr,
RCC
(Radio
Clock)
ON/OFF,
Time
Zone,
Hour,
Minute,
Year,
Month,
Day,
DST.
z
There
are
8
languages,
English,
German,
French,
Spanish,
Italian,
Dutch,
Polish
and
Swedish,
for
day
‐
of
‐
week
&
Month.
4.2
Radio
Controlled
Time:
z
After
the
start
‐
up
of
the
unit,
the
clock
automatically
starts
to
scan
the
DCF
time
signal.
Radio
Control
Icon
“
”
(A2)
flashes
on
LCD.
(A2)
flashes
Indicating
now
is
receiving
DCF
signal
(A2)
turns
on
Indicating
signal
received
successfully
(A2)
disappears
Indicating
signal
reception
failed
z
The
clock
automatically
synchronizes
with
the
DCF
radio
signal
every
day
at
3.00
am
to
maintain
accurate
time
keeping.
If
synchronization
with
the
DCF
radio
signal
fails,
“
”
on
LCD
disappears
and
the
clock
then
attempts
to
synchronize
with
the
DCF
radio
signal
at
4.00
am
and
5am.
z
The
clock
can
be
set
to
scan
the
radio
signal
manually
by
holding
“
”
button
(B5)
for
3
seconds.
Each
reception
takes
around
several
minutes.
If
receptions
fail,
scanning
stops.
(“
”
on
LCD
disappear)
and
repeats
again
on
next
full
hour.
E.g.
scanning
failed
at
8:20a.m.
It
will
scan
again
at
9:00a.m.
z
Stop
scanning
DCF
radio
signal
by
holding
“
”
button
(B5)
for
3
seconds.
z
“
DST
”
shown
on
the
LCD
if
it
is
in
Daylight
Saving
Time
Mode.
Note
:
(1)
All
Setting
mode
will
automatically
exit
in
around
15
seconds
without
any
adjustment
(2)
For
Time
Zone:
If
you
receive
no
RC
‐
DCF
frequency
signal,
the
time
zone
should
be
set
to
0.
Time
Zone
is
used
in
countries
which
can
received
the
DCF
frequency
signal
but
the
time
zone
is
different
from
German
Time
(
i.e.
GMT+1).


