PROCEDURE FOR INSTALLING
FILTER KIT
1. Ensure power is not connected to Zoneline.
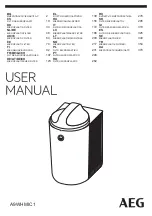
2. Insert filter housing into the far side slot of the
make-up air module.
3. Compress the filter housing by pressing on its
opposite end causing the filter housing to bend (be
careful not to apply too much pressure).
4. While in the compressed state, insert the other end
of the filter housing into the opening of the make-up
air module.
5. Release the grip on the filter housing and let it
expand back to its original shape while guiding the
other end of the housing into the near side slot of
the make-up air module.
6. Both ends of the filter housing should now be
located within both slots of the make-up module.
31-5000405 Rev. 0 05-19 GEA
WARNING
For your safety, the information in these instructions must be followed to minimize the risk of electric
shock, property damage, personal injury, or loss of life.
• Unplug or disconnect the Zoneline at the fuse box or circuit breaker prior to working on product.
NOTE:
We strongly recommend that any servicing be performed by a qualified individual.
Installation Instructions
Zoneline Make-Up Air Module MERV 13 filter
housing kit (includes 1 filter): : RAK13
Replacement MERV 13 Filter Kit: RAA13
Before you begin - Read these instructions completely and carefully. IMPORTANT – OBSERVE ALL GOVERNING
CODES AND ORDINANCES. Note to Installer – Be sure to leave these instructions with the Consumer. Note to
Consumer – Keep these instructions with your Owner’s Manual for future reference.
Installation Instructions: Filter Kit
PROCEDURE FOR INSTALLING
FILTER KIT
7. Looking at the tag on the air filter, orientate the
filter so the airflow is in the correct direction into the
make-up air module.
8. Insert the filter into the filter housing, adjust the filter
as needed to ensure it is taking up the entire cavity
of the filter housing.
9. Place the “airflow label”, as seen on the second
page, on the fan shroud across from the make-up air
module.
10.
REPLACE THE AIR FILTER WITHIN EVERY 90
DAYS IN ORDER TO AVOID VOIDING WARRANTY.
In areas where outside air quality is lower, the air filter
may need to be changed more frequently.
Far Side Slot
Filter housing
Inserted into
Near Side Slot
3ODFH$LUÀRZ/DEHO+HUH
Filter
Filter housing
Filter
Filter housing