background image


GE Energy Connections 

Grid Solutions 

KVGC 

202 

Technical Manual 

Voltage Regulating Control Relays 


Publication reference: KVGC202/EN M/H11 

Summary of Contents for KVGC 202

Page 1: ...GE Energy Connections Grid Solutions KVGC 202 Technical Manual Voltage Regulating Control Relays Publication reference KVGC202 EN M H11 ...

Page 2: ......

Page 3: ...3 3 1 Default display 15 3 3 2 Accessing the menu 16 3 3 3 Menu contents 16 3 3 4 Menu columns 17 3 3 5 System data 17 3 3 6 Status 20 3 3 7 Measure 20 3 3 8 Control 1 21 3 3 9 Logic 1 21 3 3 10 Control 2 22 3 3 11 Logic 2 23 3 3 12 Input masks 24 3 3 13 Relay masks 24 3 4 Changing text and settings 25 3 4 1 Quick guide to menu controls 25 3 4 2 To enter setting mode 26 3 4 3 To escape from the se...

Page 4: ...39 4 4 3 4 Tap Pulse Duration tPULSE 39 4 4 4 Operating Sequences 39 4 4 4 1 Method 1 39 4 4 4 2 Method 2 39 4 5 Line drop compensation 40 4 6 Auto manual and remote operation modes 41 4 6 1 Remote change of operating mode 42 4 6 2 Manual change of operating mode via logic input 42 4 7 Paralleled transformers 42 4 7 1 Master Follower schemes 43 4 7 2 Instability of individually controlled parallel...

Page 5: ...IL 68 5 1 15 Undercurrent detector IL 68 5 1 16 Total number of tap change TotalOps 68 5 1 17 Total taps available TpAvail 69 5 1 18 Tap fail time delay tFAIL 69 5 1 19 Frequent operations Ops TP tp 69 5 1 20 Power factor 69 5 1 21 Tap change indication time tTap change 69 5 2 Setting group selection 69 5 2 1 Remote change of setting group 69 5 2 2 Manual change of setting group 69 5 2 3 Controlle...

Page 6: ...nitor 78 6 4 14 Tap changer failure mechanism 78 7 CONTROL FUNCTIONS AND SERIAL COMMUNICATIONS 79 7 1 Courier language protocol 79 7 2 K Bus 79 7 2 1 K Bus transmission layer 79 7 2 2 K Bus connections 80 7 2 3 Ancillary equipment 81 7 3 Software support 81 7 3 1 Courier Access 81 7 3 2 PAS T 81 7 3 3 CourierCom 81 7 3 4 PC requirements 82 7 3 5 Modem requirements 82 7 4 Data for system integratio...

Page 7: ...transformer requirements 92 8 16 High voltage withstand 92 8 16 1 Dielectric withstand IEC 255 5 1977 92 8 16 2 High voltage impulse IEC 60255 5 1977 92 8 16 3 Insulation resistance IEC 60255 5 1977 92 8 17 Electrical environment 92 8 17 1 DC supply interruptions IEC 60255 11 1979 92 8 17 2 AC ripple on dc supply IEC 60255 11 1979 92 8 17 3 High frequency disturbance IEC 60255 22 1 1988 92 8 17 4 ...

Page 8: ...ve logic functions to be tested 99 9 5 Measurement checks 99 9 5 1 Current measurement 99 9 5 2 Voltage measurement 99 9 6 Control functions 100 9 6 1 Regulated Voltage setting VS and Dead Band dVS 100 9 6 2 Load shedding boosting 100 9 6 3 Integrated timer 101 9 6 3 1 Initial time delay 101 9 6 3 2 Definite time delay 101 9 6 3 3 Inverse time delay 102 9 6 3 4 Inter tap delay 103 9 6 4 Line drop ...

Page 9: ...t records 115 9 8 5 Communications 115 9 8 5 1 Measured values do not change 115 9 8 5 2 Relay no longer responding 116 9 8 5 3 No response to remote control commands 116 9 8 6 Output relays remain picked up 116 9 8 7 Measurement accuracy 116 9 9 Maintenance 116 9 9 1 Preliminary checks 117 9 9 1 1 Earthing 117 9 9 1 2 Main current transformers 117 9 9 2 Remote testing 117 9 9 2 1 Alarms 117 9 9 2...

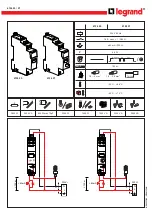
Page 10: ...KVCG202 EN M H11 Technical Manual KVGC202 ...

Page 11: ...emote personal computer PC loaded with the relevant software Integral features in the KVGC relays include inverse or definite time operating characteristic line drop compensation undervoltage and overvoltage detectors blocked tap change operation overcurrent undercurrent and circulating current supervision load shedding boosting capabilities reverse reactance or circulating current compensation fo...

Page 12: ...8 Technical Data Comprehensive details on the ratings setting ranges and specifications etc Chapter 9 Commissioning Problem Solving Maintenance A guide to commissioning problem solving and maintenance Appendix Appendices include relay time characteristic curve logic diagram connection diagrams and commissioning test records Index Provides the user with page references for quick access to selected ...

Page 13: ...veral thousand volts Discharge of these voltages into semiconductor devices when handling electronic circuits can cause serious damage which often may not be immediately apparent but the reliability of the circuit will have been reduced The electronic circuits are completely safe from electrostatic discharge when housed in the case Do not expose them to risk of damage by withdrawing modules unnece...

Page 14: ...e of the parts are damaged or the settings altered and they must only be handled by skilled persons The installation should be clean dry and reasonably free from dust and excessive vibration The site should be well lit to facilitate inspection Modules that have been removed from their cases should not be left in situations where they are exposed to dust or damp This particularly applies to install...

Page 15: ...gulated and isolated field voltage to energise the logic inputs An interface on the front of the relay allows the user to navigate through the menu to access data change settings and reset flags etc As an alternative the relay can be connected to a computer via the serial communication port and the menu accessed on line This provides a more friendly and intuitive method of setting the relay as it ...

Page 16: ...tom corner which gives details of the auxiliary voltage and current ratings Two handles one at the top and one at the bottom of the front plate will assist in removing the module from the case 3 2 2 LED indications The three LEDs provide the following functions GREEN LED Labelled as HEALTHY indicates the relay is powered up and running In most cases it follows the watchdog relay YELLOW LED Labelle...

Page 17: ...tify the individual digits that are displayed for some of the settings i e function links relay masks etc 3 3 Menu system Figure 2 Menu format Settings measured values alarm records and system data resides in a table known as MENU TABLE Data within the relays is accessed via a MENU table All the data displayed on the LCD or transmitted via the serial communications port is obtained via this table ...

Page 18: ...vided they do not require a password to be entered To change any other settings the cover must be removed from the relay to gain access to the and keys that are used to increment or decrement a value When a column heading is displayed the key will change the display to the next column and the key will change the display to the previous column giving a faster selection When a cell that can be chang...

Page 19: ...hat must be entered before certain settings may be changed 0003 SD Links PWP Function links that enable the user to enable activate the options required 0 1 Rem Cntrl 1 enable remote control 2 Rem LSB 1 enable remote load shedding boosting 3 Rem Grp2 1 enable remote change to group 2 setting 4 En Grp2 1 enable group two settings 0 hidden 5 1 Grp2 1 select group 2 settings 6 Irev Grp 2 1 enable rev...

Page 20: ...oming lost a recovery password can be obtained on request but the request must be accompanied by a note of the model and serial number of the relay 0003 SYS Function Links PWP These function links enable selection to be made from the system options 0004 SYS Description PWP This is text that describes the relay type It is password protected and can be changed by the user to a name which may describ...

Page 21: ... has alternative groups of settings which can be selected then this cell indicates the current group being used by the relay For KVGC202 it is either Group 1 or Group 2 000F SYS LSB Stage READ Cell 000F displays the level of load shedding boosting at all times The load shedding boosting can be initiated either by energising opto inputs or via K Bus The opto inputs will override the commands over t...

Page 22: ... above below threshold C IL 1 Line undercurrent detection 0105 Blocked READ 1 Tap change operation blocked 0106 V blk READ 1 Under voltage blocking 0107 V blkLower READ 1 Under voltage detection 0108 V blkRaise READ 1 Over voltage detection 0109 TpFail READ 1 Voltage remains outside deadband 010A Ic READ 1 Excessive circulating current 010B IL READ 1 Line overcurrent detection 010C TotalOps READ 1...

Page 23: ...Line Voltage Transformer overall ratio 0304 In PWP Rated current winding of relay 1A or 5A 0305 Vs SET Set value of remote regulated voltage 0306 dV SET Dead band dV 0307 Vc volt In SET Circulating current compensation 0308 Vr volts In SET Resistive LDC compensation 0309 Vx volts In SET Reactive LDC compensation reverse 030A pf Angle SET Low power factor LDC compensation 90 030B tINIT DT SET Initi...

Page 24: ...le 040C TP SET Upper tap alarm limit 040D TP SET Lower tap alarm limit 040E total ops SET Total number of tap change operations 040F ops tP SET Number of tap changes allowed in time tP 0410 tP SET Time period tP 0411 Display SET Default display required 0412 tTest Relay SET Relay test hold timer 3 3 10 Control 2 Cell Text Status Description 0500 CONTROL 2 READ Software links that are used to selec...

Page 25: ... block operation for reverse current flow 7 Runaway blk 1 block for tap change runaway 8 IL BLK 1 block for insufficient current 0602 V SET Under voltage total inhibit level of Vs 0603 V SET Over voltage blocking limit 0604 V SET Under voltage blocking limit 0605 t V V SET Under over voltage blocking timer 0606 tFAIL SET Total time outside dead band to failure 0607 Ic SET Excessive circulating cur...

Page 26: ...r voltage tap change block 0803 Blocked PWP Indication if both raise and lower tap change operations are inhibited 0804 UnBlocked PWP Indication if tap change operations are not inhibited 0805 V PWP Alarm indication for under voltage blocking 0806 V PWP Alarm indication for under voltage detection 0807 V PWP Alarm indication for over voltage detection 0808 Tap Fail PWP Alarm indication for tap cha...

Page 27: ...n immediately and returns the default display Move to next column heading Steps down the menu to the first item in the column Move to next column heading Move to previous column heading Any menu cell F short F long F 0 long 0 short 0 long Steps down the menu to the next item in the column Displays the heading for the next column Steps back up the menu to the previous item Back light turns ON no ot...

Page 28: ...re displayed Press either the or key to put the relay into the setting mode Setting mode will be indicated by a flashing cursor on the bottom line of the display If the cell is read only or password protected then the cursor will not appear and the relay will not be in the setting mode 3 4 3 To escape from the setting mode IMPORTANT If at any time you wish to escape from the setting mode without m...

Page 29: ...wn and the key can be used in a similar way to move backwards through the alphabet When the desired character has been set the F key can be given a momentary press to move the cursor to the position for the next character The process is then be repeated to enter the remaining characters that make up the password When the fourth character is acknowledged by a momentary press of the F key the displa...

Page 30: ... a link The key will change the link to a 1 to select the function and the key will change it to a 0 to deselect it Follow the instructions in Chapter 3 4 3 to exit from the setting change Not all links can be set some being factory selected and locked The links that are locked in this way are usually those for functions that are not supported by a particular relay when they will be set to 0 Merel...

Page 31: ...es the associated function and the bottom line of the display shows a series of 1 s and 0 s for the selected mask The numbers printed on the front plate under the display indicate the output relay RLY7 to RLY0 that each bit is associated A 1 indicates that the relay will respond to the displayed function and a 0 indicates that it will not A logical OR function is performed on the relay masks so th...

Page 32: ...utput Relay 2 39 40 Output Relay 7 41 42 Output Relay 3 43 44 Opto Control Input L3 45 46 Opto Control Input L0 Opto Control Input L4 47 48 Opto Control Input L1 Opto Control Input L5 49 50 Opto Control Input L2 Opto Control Input L6 51 52 Common L0 L1 L2 Opto Control Input L7 53 54 K Bus Serial Port Common L3 L4 L5 L6 L7 55 56 K Bus Serial Port Key to connection tables and indicate the polarity o...

Page 33: ...g the above values The opto isolated logic control inputs are divided into two groups three L0 L1 L2 have their common connection on terminal 52 and inputs L3 L4 L5 L6 L7 have their common connection on terminal 55 When they are to be energised from the field voltage then terminals 52 and 55 must be connected to terminal 8 the negative of the field voltage The logic inputs can then be energised by...

Page 34: ...y suitably setting the OUTPUT MASKS The control functions to which these relays respond are selectable via the menu system of the relay In addition there is a watchdog relay which has one make and one break contact Therefore it can indicate both healthy and failed conditions As these contacts are mainly used for alarm purposes they have a lower rating than the programmable outputs The terminal num...

Page 35: ...be stepped through the alarm word from left to right with each press of the F key and text identifying the alarm bit selected will be displayed The only alarm flag that can be manually set is bit 6 the watchdog test flag When this flag is set to 1 the watchdog relay will change state and the green LED will extinguish When any alarm flag is set the ALARM LED will be continuously lit However there i...

Page 36: ...d as a series of ones and zeroes in the boxes provided on the logic diagram Case connection diagrams for the KVGC202 can be found at the back of this manual They may be copied and notes added in the appropriate boxes to indicate the function of the logic inputs and relay outputs This diagram will then give the appropriate terminal numbers to which the external wires must be connected In particular...

Page 37: ...09 Freq and set the frequency to 50Hz or 60Hz as appropriate This is an important setting because it will be the default frequency used by the analogue digital converter when appropriate signals are not available for frequency tracking If the address of the relay on the serial communication bus is known then it can be entered at this time This cell is password protected on the series 2 relays This...

Page 38: ...nction of the programmable relay outputs is selected in the RELAYS column The following settings are not mandatory but it is suggested that they are followed where possible so that different schemes will use a particular output relay for the same or similar function RLY0 Raise V Raises the voltage by 1 tap RLY1 Lower V Lowers the voltage by 1 tap RLY3 Blocked KVGC202 blocked from automatic operati...

Page 39: ...ically controlled by a voltage regulating relay VRR such as the KVGC202 A VRR constantly monitors the system voltage and initiates the tap change mechanism to Raise or Lower the voltage to be within set limits of a desired value 4 4 2 Basic requirements The fundamental objective of a VRR is to control a voltage regulating transformer such that the system voltage is maintained within set limits of ...

Page 40: ...by control link CTL1 Selection of a Definite initial time delay provides a fixed definite time delay before initiating a tap change and is independent of the voltage deviation Whereas selection of an Inverse characteristic gives the initial time delay as follows The general expression for the inverse time curve is t k initial time delay setting x 1 N where k 0 5 for initial time delay setting 20s ...

Page 41: ...e voltage deviations is required to give better regulation The initial delay setting tINIT determines the delay in initiating any tap change sequence After the set initiating pulse tPULSE the inter tap delay setting determines the delay between subsequent tap change initiations This process continues until the system voltage is restored to within the deadband limits For rapid restoration of nomina...

Page 42: ...eadband and is suitable only where load conditions will tolerate this 4 5 Line drop compensation Throughout a voltage distribution network it is often required to regulate the system voltage at a point remote to the regulating transformer for example the customer end of a feeder The remote system voltage is to be regulated within the deadband limits irrespective of varying load current conditions ...

Page 43: ... equal to 20 Iload Irated Volts Figure 9 below shows a vector diagram demonstrating the effect of the separate resistive and reactive compensation applied to the relay Figure 8 Line drop compensation to regulate system voltage at remote point to tap changer Figure 9 LDC Vector diagram 4 6 Auto manual and remote operation modes The relay has the following modes of operation AUTO MANUAL BLOCK REMOTE...

Page 44: ...d Auto Mode are provided to allow an external indication of the operating mode 4 6 1 Remote change of operating mode Either link SD1 must be set to 1 or the REMOTE input mask must be energised before the relay will respond to a remote command to change the operating mode The Mode command in the STATUS menu is used to remotely or locally select Manual or Auto operating modes The operating mode is r...

Page 45: ...o the selected tap position The common points of each potentiometer are then interconnected through coupling relays which operate to correct any tapping disparity with reference to the master transformer Alternatively a step by step sequence can be controlled by interconnecting step switches from each tap changer in such a way that the followers sequentially come into alignment with the master tra...

Page 46: ... copper losses and hence the operating temperature of the transformers For a small tap disparity one or two taps apart it can be shown that both these effects are negligible A large tap disparity can give rise to a circulating current in the transformers which exceeds the full load ratings of the transformers This effectively sets a limit to the allowable difference between the tap positions of th...

Page 47: ...quire a raise voltage signal The circulating current is reactive and is therefore shown leading the load current by 90 leading because it is negative Ic This current component will provide resistive and reactive compensation which is likewise leading the Vr and Vxl load current compensation by 90 The relay is trying to regulate to a remote voltage shown by Vrem However the circulating current has ...

Page 48: ...11 Technical Manual KVGC202 Figure 11 Circulating currents due to tap disparity Figure 12 Voltages with transformers T1 and T2 on the same tap position Figure 13 Effects of circulating currents on LDC IL Ic Volts Low ...

Page 49: ...trol circulating current between parallel transformers It has the advantage over the pilot method of control in that no interconnections are required between individual relays It is also applicable to parallel transformers of different impedance tap changers or source buses Its main disadvantage is that it provides less accurate regulation than the pilot method of control For reverse reactance con...

Page 50: ...rem is different to that from Figures 13 and 14 also shown as dotted lines on Figures 15 and 16 In practice this error is very small for a unity power factor load current The above diagrams demonstrate how reverse reactance control is used to eliminate circulating current All the above figures also assume that line drop compensation is being used as well This is not necessarily the case If LDC is ...

Page 51: ... will increase It is possible to increase the resistive compensation setting to help decrease this error However the resultant error can still be significant at low power factors Figure 19 demonstrates this In this example Vr is set to Vr 3 x IP x RL XL XT tan φ VT_ratio Figure 19 Low power factor with negative reactance control and LDC 1 There is a feature included within the KVGC to overcome the...

Page 52: ...ffset the adverse effects of IcXL as previously described Precise values of Vc are determined during commissioning procedures to give stable control of two or more transformers in a parallel group An approximate setting is given by Vc 3 x IP x XT VT_ratio where XT reactance of the transformer As can be seen from the above equations the KVGC is set in terms of the volt drop that will occur when rat...

Page 53: ...als 21 22 see Figure 5 Appendix 3 The requirement of a pilot wire loop usually limits the use of this scheme to control transformers which are paralleled on a local site Where this is not the case then reverse reactance schemes must be used Figure 21 Pilot Method of Circulating Current Control Figure 22 Circulating Current Compensation 4 7 4 1 Independent parallel control Where transformers connec...

Page 54: ...sistances are negligible Therefore when the LDC circuits are paralleled it is necessary to pad out the burden of the LDC circuits by use of an external swamping resistor If both power transformers are the same they will share the total load current 2 IL Therefore with the swamping resistors in the LDC circuit each LDC input to the relay will see the average of the 2 load currents from each transfo...

Page 55: ...rculating current CT input KVGC202 terminals 23 and 24 for In 1A or terminals 25 and 26 for In 5A XM1 CT1 magnetising impedance which will be ignored due to its high value when CT is unsaturated RCT1 CT1 winding resistance RL Resistance of one lead between AVRs including any interposing CTs CT1 Driving CT T1 loaded CT2 Idling CT T2 loaded 2IL Current flowing in line s fed by T1 T2 which creates li...

Page 56: ...2IL I1 2RL RLDC I1 2IL 2RL RLDC RLDC 2RL RLDC Simplifying I1 2IL 2RL RLDC 1 2 RL RLDC 1 And I1 IL 2X 1 X 1 where X RL RLDC Ideally I1 should equal IL also I2 IL but since RL is not zero I1 will exceed IL The required value of X to bring I1 down to 1 05IL will be determined by 1 05IL IL 2X 1 X 1 1 05X 1 05 2 X 1 0 05 0 95X X 0 0526 Therefore we require X 0 0526 for I1 1 05IL ...

Page 57: ... at 75W Therefore use RS 7 Ω 75W Note RS should withstand the maximum main CT secondary rms current for a minimum of three seconds The maximum output of the main CTs should not exceed three times the steady state current through its connected burden and CT resistance to cause saturation Example 2 Application of two VRRs 5A rated using 5A 0 5A interposing transformers to isolate the individual line...

Page 58: ...fore RLDC 0 007Ω And X RL RLDC 0 0526 Therefore RICT1 RICT2 RL 100 0 0526 or RLDC must be increased to RLDC via a series resistor so that RLDC 19 RICT1 RICT2 RL 100 e g RICT1 0 02 RICT2 0 3 RL 0 2 This gives RLDC 19 0 02 0 03 0 2 100 0 475 RLDC RLDC RS Therefore Rs 0 475 0 007 0 468 Choose a value of 0 5Ω Required continuous current capability 2In 10A ...

Page 59: ...r rated The current inputs on the KVGC are rated to carry 3 2In continuously If this is likely to be exceeded then interposing CTs should be used to reduce the current to the LDC inputs and the VR and VX settings should be increased accordingly Figure 28 Series Connection of LDC Circuits 4 7 4 2 3 Embedded generation If embedded generation is installed close to the load centre then this could caus...

Page 60: ...ese component tolerances and so to prevent runaway the action of the negative reactance must exceed this tendency The KVGC has a reverse current element which can be used to block tap changing or change setting groups where there is reverse power flow caused by embedded generation 4 8 Supervision functions of a VRR A range of supervision functions are required to provide a comprehensive voltage re...

Page 61: ...urrent IL through a transformer drops below the threshold setting an alarm is initiated visibly and remotely if the IL output relay is allocated in relay output mask If logic Link LOG8 is set to 1 then an internal software relay will operate blocking both Raise and Lower operations thus preventing tap changer operation 4 8 7 Circulating current detection IC The circulating current detector IC limi...

Page 62: ...or this purpose a 3EA22A device is available This unit provides a series chain of 22 x 390 ohm resistors mounted on two PCBs in a 150 mm DIN case When used with the KVGC to indicate up to 22 tap positions the regulated voltage is applied across the 22 resistor chain as shown in Figure 30 using the VT voltage When used with the KVGC to indicate up to 40 tap positions the regulated voltage is applie...

Page 63: ...Technical Manual KVCG202 EN M H11 KVGC202 VT Figure 29 Connection of 22 tap potential divider to KVGC with VT voltage input ...

Page 64: ...KVCG202 EN M H11 Technical Manual KVGC202 5 6 AC External Supply VT 17 18 EXT Figure 30 Connection of 22 tap potential divider to KVGC with AC External supply ...

Page 65: ...ontrol functions manual tap change local control sequences or remote tap change sequences If the auxiliary power is lost the operation counter values and TPI are retained On power restoration the tap difference between the TPI on power off and power on is incremented to the operations counter 4 9 1 2 Frequent operations monitor An alarm is initiated if the number of tap change operations exceeds a...

Page 66: ... level Vs can be lowered or raised by means of the load shedding boosting option This allows a system operator to override the VRR automatic regulation to increase or decrease the system voltage supply Adjusting the system voltage will have a direct effect on the load current decreasing the voltage will reduce shed load current and increasing the voltage will increase boost the load current Three ...

Page 67: ... 1A 0 5A In 5A 0 10A Circulating current compensation Vc 0 50V 1 0V Resistive line drop compensation Vr 0 50V 1 0V Reactive line drop compensation Vxl 0 50V 1 0V Reverse reactance control Internal reversal of VXL vector Initial delay tINIT Definite Inverse 0 20 secs 20 300 secs See Chapter 6 3 3 1 sec 10 secs Intertap delay tINTER 0 120 secs 0 1 secs Tap pulse duration tPULSE 0 5 5 secs 0 5 secs L...

Page 68: ...n of an inverse characteristic gives a time delay inversely proportional to the voltage deviation from the setting voltage Vs For inverse characteristic the initial time delay setting defines the operating time delay at the edge of the deadband N 1 Larger voltage deviations give corresponding faster operating times as shown by the inverse characteristic in Appendix 1 The general expression for inv...

Page 69: ...T ratio RL Cos φ XL Sin φ Xt Sin φ Where Cos φ power factor of load Note The setting PF angle setting in the control column should be set to Cos φ in this case The above shows that the effective Vr compensation can vary significantly for varying power factors Reverse reactance control of parallel transformers is used where transformers are dissimilar or at different locations and the power factor ...

Page 70: ... 300 seconds An alarm is initiated if either the over or the under voltage detectors have operated 5 1 12 Undervoltage blocking V The undervoltage blocking settings can be set between 60 and 130 volts Where the system voltage falls below the set value the undervoltage detector operates and instantaneously resets the initial time delay thus inhibiting the relay outputs to Raise or Lower tap change ...

Page 71: ...lection The relay has two setting groups but as supplied only setting group 1 will be visible To make the second group of settings visible in the menu set function link SD4 1 in the SYSTEM DATA column The value of the group 2 settings is unimportant when link SD4 0 because group 1 settings will be in use by default The menu cell 000E in the SYSTEM DATA column is a read only cell that displays the ...

Page 72: ... 1 0 SYS Password AAAA SYS Function Links 0 0 0 0 0 0 1 0 0 0 0 1 0 1 1 0 SYS Description KVGC202 01Fx 1Gx SYS Plant Ref KVGC202 01Fx 1Gx SYS Model No KVGC202 01Fx 1Gx SYS Frequency 50 Hz SYS Relay Address 255 Alarms x x x x x x x x x 1 0 0 0 0 0 0 5 3 2 Link settings F E D C B A 9 8 7 6 5 4 3 2 1 0 CTL Links 0 0 0 0 0 0 0 0 0 0 0 0 0 0 0 0 LOG Links 0 0 0 0 0 0 0 0 0 0 0 1 1 0 0 0 5 3 3 Initial c...

Page 73: ... 5000 Number of tap changes allowed in time tP opstP 40 Time period tP 24 Relay test hold timer tTest relay 1s 5 3 5 Preferred use of logic inputs The following is not mandatory but it is suggested that it is followed where possible so that different schemes will use the particular logic input for the same or similar function INPUT MASKS DEFAULT SETTINGS Remote 00000000 Automatic 00000001 Manual 0...

Page 74: ... 0000000 V 00100000 Tap Fail 01000000 Ic 10000000 IL 10000000 Il 00000000 TotalOps 00000000 FreqOps 00000000 Irev 00000000 RUN AWAY 00000000 Tap Limit 00000000 Tap Odd 00000000 Tap Even 00000000 Auto Mode 00000000 Manual Mode 00000000 Select tst rlvs 00000000 Test Relays 0 ...

Page 75: ...is adjusted automatically by actuating the tap changer mechanism The regulated voltage Vreg is stored in cell location 0202 6 1 3 Frequency The sampling frequency of the A D converter is synchronised to the power system frequency when there is a signal of sufficient strength to reliably make a frequency measurement In the absence of a signal to frequency track the sampling frequency defaults to th...

Page 76: ...mented every time a tap change operation is initiated over a preset time tP after which an event is raised and the value of the number of operations is recorded The delay timer and the counter for the tap change operation are reset to zero after the event is logged The counter can be reset to zero at any time by pressing the 0 key The value of the counter is stored in cell location 020B 6 1 8 Time...

Page 77: ...Event records cannot be viewed on the relay and can only be accessed via the serial communication port of the relay A PC with suitable software such as PAS T can automatically extract the records display them on a screen print them or store them to either a floppy disc or to the hard disc of the computer When a new record is generated the oldest event record is automatically overridden and the eve...

Page 78: ...the functions described in this Chapter The relay masks can be found in chapter 3 Chapter 3 3 12 of this service manual The logic diagram showing the logic for each of the functions can be found in Appendix 2 6 4 1 Raise lower volts indication Relay outputs can be allocated in the relay masks to give an indication for raise and lower volts tap change 6 4 2 Blocked indication Relay output can be al...

Page 79: ...ication If the logic link LOG3 is set to 1 the operation of tap changer will be inhibited for fault or overload current through the transformer The pick up drop off differentials on the overcurrent detector is 5 of the threshold setting 6 4 8 Undercurrent detection IL If the load current IL through a transformer drops below the threshold setting IL output relay allocated in the relay mask will pic...

Page 80: ...mode any further tap change operations is blocked and hence putting the relay out of service until the alarm condition is cleared by pressing the 0 key The values of the timer and counter can be reset to zero when any of the following has occurred Tap change is blocked After the events have been recorded after every elapse of time period The maintenance timer has exceeded the preset time period Al...

Page 81: ...w additional devices should implement the Courier language so as to be consistent with all other devices 7 2 K Bus K Bus a communication system developed to connect remote slave devices to a central master control unit thus allowing remote control and monitoring functions to be performed using an appropriate communication language It is not designed to allow direct communication between slave devi...

Page 82: ... U shaped terminal supplied and which has to be secured with a self tapping screw in the hole in the terminal block just below terminal 56 as shown in the diagram Operation has been tested up to 32 units connected along a 1 000 metres of cable The specification for suitable cable will be found in the technical data Chapter The method of encoding the data results in the polarity of the connection t...

Page 83: ... the setting is within limits stores it then replies to state s if the new value has been accepted or rejected If the setting selected is password protected the relay will reply that access is denied Any data received in error is automatically resent any data not understood but received without error is ignored Thus setting changes by this route are secure A complete setting file can be extracted ...

Page 84: ...ata bits no parity and 1 stop bit Although Courier and IEC 870 both have inherent error detection the parity checking on each individual character in the 11 bit frame provides additional security and is a requirement of IEC 60870 to meet the error rate levels it guarantees It is therefore recommended that modems should be used which support these 11 bit frames The following modems have been evalua...

Page 85: ... a particular serial number This method is useful for devices that are not provided with a user interface with which to read the or change the current address and is supported by both PAS T ACCESS and CourierCom 7 4 2 Measured values Any measured value can be extracted periodically by polling the relay Measured values are stored in the menu locations under column heading MEASURE 7 4 3 Status word ...

Page 86: ...still be extracted within certain limitations The event records can only be read via the serial communication port and a K Bus IEC 60870 5 Interface Unit will be required to enable the serial port to be connected to an IBM or compatible PC Suitable software will be required to run on the PC so that the records can be extracted When the event buffer becomes full the oldest record is overwritten by ...

Page 87: ... entry Thus with link SD1 0 remote setting changes are password protected To change them the password must be remotely entered and the function link SD function link SD1 set to 1 to enable remote setting changes When all setting changes have been made set link SD1 0 to restore password protection to remote setting changes 7 5 2 Remote control of setting group The setting group selection is fully d...

Page 88: ...el 3 Select level 3 setting 7 6 2 Local control of loadshedding boosting Local loadshedding boosting control of the relay are via using the opto inputs assigned in input mask The three levels can be selected by energising one of the three opto input channels as required by the user If more than one opto inputs are energised at any one time then the relay acts on the setting nearest to 0 For exampl...

Page 89: ...powered 24 125 19 150 50 133 190 48 250 33 300 87 265 380 Frequency Fn Nominal rating Hz Operative range Hz Freq tracking 50 or 60 45 65 Non tracking 50 47 52 5 Non tracking 60 57 63 Rating Vdc Off state Vdc On state Vdc Logic inputs 50 12 35 8 2 Outputs Field voltage 48V dc current limited to 60mA 8 3 Burdens 8 3 1 Current circuits Circulating Line Conditions In 1A 2 600 0 007 ohms at In In 1A 2 ...

Page 90: ... 0 1 Resistive line drop compensation Vr 0 50V 1 0V Reactive line drop compensation Vxl 50 50V 1 0V Circulating current compensation Vc 0 50V 1 0V Load shedding boosting 0 10 of Vs 1 Total taps available TapsAvail 1 30 1 Maximum tap position TP 1 40 1 30 1 Minimum tap position TP 1 30 1 30 1 Total number of tap changes TotalOps 1 10000 1 Tap changer operations Ops tP 1 100 1 Time period tP 0 24 hr...

Page 91: ...ent time delay tIC 0 180 seconds 10 secs Alarm initiation time delay tFAIL 0 15 minutes 30 secs Power factor angle Angle 0 90 degrees 1 deg 8 7 Transformer ratios CT ratios 9999 1 Default 1 1 VT ratios 9999 1 Default 1 1 8 8 Measurement displayed System voltage 0 819 x VT ratio low accuracy 70 200 x VT ratio high accuracy volts phase phase Load current 1 30 In x CT ratio amps Circulating current 0...

Page 92: ...ent temperature Operative range 25 to 55 C Current settings 1 Voltage settings 0 03 per C Operation times 1 Angle measurement 2 8 10 2 Frequency With frequency tracking Operative range 46 to 65Hz Current setting 1 Voltage settings 1 Operating times 1 Angle measurement 1 Without frequency tracking Reference range 47Hz to 51Hz or 57Hz to 61Hz Operating times 2 8 10 3 Angle measurement 2 Auxiliary su...

Page 93: ... Output relays Output relays 0 to 7 Type 1 make Rating Make 30A and carry for 0 2s Carry 5A continuous Break DC 50W resistive 25W inductive L R 0 04s AC 1250VA maxima of 5A Subject to a maxima of 5A and 300V Watchdog Type 1 make 1 break Rating Make 10A and carry for 0 2s Carry 5A continuous Break DC 30W resistive DC 15W inductive L R 0 04s AC 1250VA maxima of 5A Subject to a maxima of 5A and 300V ...

Page 94: ...f the same circuit except output contacts 8 16 3 Insulation resistance IEC 60255 5 1977 100MΩ when measured at 500Vdc 8 17 Electrical environment 8 17 1 DC supply interruptions IEC 60255 11 1979 The relay shall withstand a 10ms interrupt without de energising 8 17 2 AC ripple on dc supply IEC 60255 11 1979 The relay shall withstand 12 ac ripple 8 17 3 High frequency disturbance IEC 60255 22 1 1988...

Page 95: ...95 35V m over the frequency range 25 to 1000MHz 8 19 Environmental 8 19 1 Temperature IEC 60255 6 1988 Storage and transit 25 C to 70 C Operating 25 C to 55 C 8 19 2 Humidity IEC 60068 2 3 1969 56 days at 93 relative humidity and 40 C 8 19 3 Enclosure protection IEC 60529 1989 IP50 Dust protected 8 20 Mechanical environment 8 20 1 Vibration IEC 60255 21 1 1988 Response Class 1 Endurance Class 1 8 ...

Page 96: ...5 Operating voltage 110V ac 50 60Hz 1 C T Rating 5 1A User selectable G Language English E French F German G Spanish S 8 22 Frequency response The operating criteria for each element have been chosen to suit the applications for which it is most likely to be used Knowing how these elements respond under operating conditions will help to apply them effectively Figure 35 Response of Fourier filterin...

Page 97: ...he frequency does not coincide with 1 on the horizontal scale the harmonics will not be of zero amplitude For small frequency deviations of 1Hz this is not a problem but to allow for larger deviations an improvement is obtained by the addition of frequency tracking With frequency tracking the sampling rate of the analogue digital conversion is automatically adjusted to match the applied signal In ...

Page 98: ...located to which outputs 9 1 3 Electrostatic discharge ESD See recommendations in Chapter 2 of this user manual before handling module outside its case 9 1 4 Inspection Loosen the four cover screws and remove the cover the relay can now be withdrawn from its case Carefully examine the module and case to see that no damage has occurred since installation and visually check the current transformer s...

Page 99: ...ransformer circuits c Auxiliary voltage supply d Field voltage output and opto isolated control inputs e Relay contacts f Communication port g Case earth Note Do not apply an insulation test between the auxiliary supply and the capacitor discharge terminals because they are part of the same circuit and internally connected 9 2 Commissioning test notes 9 2 1 Equipment required For KVGC202 relays th...

Page 100: ... up with the lcd showing the default display and the centre green led being illuminated this indicates the relay is healthy The relay has a non volatile memory which remembers the state ON or OFF of the led control indicator when the relay was last powered and therefore the indicator may be illuminated With a continuity checker monitor the state of watchdog contacts as listed in Table 2 Terminals ...

Page 101: ...n alternative relay can be reallocated until such time as a replacement can be fitted Refer to Chapter 3 Sections 3 4 13 3 4 14 for how to set logic and relay masks Selective logic functions Test Regulated Voltage setting VS and Dead Band Setting dVS 6 1 Load Shedding Boosting 6 2 Integrated timer 6 3 Line drop compensation 6 4 Under Voltage Detector V 7 1 Over Voltage Detector V 7 2 Load Current ...

Page 102: ...tting Vs to terminals 17 and 18 The CONTROL LED should extinguish and the raise lower volts relay contacts should become open Slowly increase the supply voltage and record the voltage VHIGH at which the Lower volts contacts closes The CONTROL LED should illuminate Reduce the supply voltage until CONTROL LED extinguishes again Slowly reduce the voltage further and record the voltage VLOW at which t...

Page 103: ...switch S1 Repeat this for test 5 and 6 i e other load shedding levels if set Restore all settings changed i e input masks and inter tap delay tINTER setting Load Shedding Setting Measured Vs TEST L0 L1 L2 1 3 0 0 97 of Vs 2 0 6 0 94 of Vs 3 0 0 9 91 of Vs 4 3 0 0 103 of Vs 5 0 6 0 106 of Vs 6 0 0 9 109 of Vs Table 5 9 6 3 Integrated timer 9 6 3 1 Initial time delay The relay should be commissioned...

Page 104: ... band edges dead band setting and initial time delay setting The general expression for inverse time curve t k initial time delay setting x 1 N where k 0 5 for initial time delay setting 20s 0 for initial time delay setting 20s N indicates deviation from Vs in multiples of dVs and is calculated as N Vbc Vs Vs 100 dVs where Vbc Voltage to be regulated Vs Voltage setting dVs Dead band Calculate the ...

Page 105: ...eck the output is continuous the CONTROL LED should be continuously illuminated Restore the following settings intertap delay tINTER and deadband setting dVs 9 6 4 Line drop compensation 9 6 4 1 Resistive load current compensation Vr The relay should be commissioned with the settings calculated for the application Check the relay mode setting 0102 STATUS Before making the following changes note th...

Page 106: ...ting Vr to 0V reactive line drop compensation setting Vx to required setting or 20V load current setting IL to 1In The reactive load drop compensation may be used to compensate for voltage drop due to reactive elements in the power line in the same way as the resistive load drop compensation In addition by setting the compensation to reverse compensation can be achieved for circulating currents as...

Page 107: ...Vr to 0V reactive line drop compensation setting Vx to 0V circulating current setting Ic to In 9 6 4 4 Negative compensation Apply 0 2In to the circulating current Ic inputs terminals 23 24 For the 5A rated relay use terminals 25 26 Adjust the phase shifter to give a 180 degree phase angle negative Ic compensation between the system voltage input and circulating current A tap change should be init...

Page 108: ...esistive line drop compensation setting Vr reactive line drop compensation setting Vx load current setting IL Set the SD1 link to 0 dead band setting dVs to 1 intertap delay tINTER to 0 seconds system voltage input setting Vs to 100V circulating compensation voltage setting Vc to 0V resistive line drop compensation setting Vr to 10V reactive line drop compensation setting Vx to 10V load angle ANGL...

Page 109: ...ndervoltage relay contact V closes Check the measured voltage is within V 2 of setting Check the Lower volts contacts remain open and Raise volts contacts remain closed Increase the applied voltage above Vs setting and ensure Lower volts contact closes and Raise volts contact opens Restore the following settings initial time delay setting tINIT intertap delay tINTER undervoltage setting V 9 7 2 Ov...

Page 110: ... delay tINTER to 0 seconds load current IL to 0 5In Set the relay mask to operate IL and Blocked relay output contacts Both contacts should be open Connect a current source to load current input terminals 27 28 Apply voltage equivalent to the system voltage setting Vs to system voltage input terminals 17 18 Slowly increase the load current from zero and measure the current at which the IL relay co...

Page 111: ...nput voltage until the V contacts closes simultaneously with the opening of the Raise volts contacts V blk should be displayed on the LCD Check the voltage at which the tap change is cancelled is in the range V 5 of setting Both Raise volts and Lower volts relay contacts should be open The CONTROL LED should be permanently lit and the Blocked relay contacts should be closed Restore the following s...

Page 112: ...the LCD Set the timer to start from application of circulating current and stop on closing of Ic relay contacts Set the excessive circulating current time delay setting tIC to 10 seconds Set the circulating current Ic setting to 0 5In Apply 105 of Ic to terminals 23 24 terminals 25 26 for the 5A relay and measure the time It should be 10 seconds 5 The Ic relay contact should be closed Reduce the c...

Page 113: ...ap position indication inputs causing the tap changer to operate Both Raise volts and Lower volts relay contacts should remain open The Blocked and RunAway relay contacts should be closed Reset the relay to clear the RunAway alarm by depressing the 0 key The CONTROL LED should be extinguished The Blocked and RunAway relay contacts should be open Decrease the system input voltage Vs causing the vol...

Page 114: ...o ratio of primary to secondary voltages of line VT Before making the following changes note the settings for Vr and VX deadband setting dVs initial time delay setting tINIT Set the Vr and VX to the calculated values deadband setting dVs to 3 initial time delay setting tINIT to 0 seconds At the receiving end of the feeder measure the phase to phase voltage on the secondary of the VT Repeat this at...

Page 115: ...le remote load shed boost Set function link 0003 SD Links link 3 to 1 to enable remote change to group 2 setting Set function link 0003 SD Links link 4 to 1 to enable group 2 settings 0 hidden Set function link 0003 SD Links link 5 to 1 to hold group 2 setting Set function link 0003 SD Links link 6 to 1 to enable reverse current to select group 2 setting Set function link 0003 SD Links link 7 to 1...

Page 116: ...te The following notes will give further guidance 9 8 3 1 Watchdog alarm The watchdog relay will pick up when the relay is operational to indicate a healthy state with its make contact closed When an alarm condition that requires some action to be taken is detected the watchdog relay resets and its break contact will close to give an alarm Note The green led will usually follow the operation of th...

Page 117: ...t relay local setting change or alarm conditions are stored in the relay Few events for change in state of logic inputs and relay outputs can be stored in the event records The change in state of inputs and outputs can occur frequently to generate many events for each change in state occurrence Setting System Data Link SD7 to 0 will turn off this feature and allow the maximum number of event recor...

Page 118: ... boosting levels set from the courier master station Check input masks settings to ensure the load shedding boosting is not selected by the opto inputs as this will override the commands over the serial port 9 8 6 Output relays remain picked up Relays remain picked up when de selected by link or mask If an output relay is operated at the time it is de selected either by a software link change or b...

Page 119: ...ether 9 9 1 2 Main current transformers DO NOT OPEN CIRCUIT THE SECONDARY CIRCUIT OF A LIVE CT SINCE THE HIGH VOLTAGE PRODUCED MAY BE LETHAL TO PERSONNEL AND COULD DAMAGE INSULATION 9 9 2 Remote testing The relay can be communicated with from a remote point via its serial port then some testing can be carried out without actually visiting the site 9 9 2 1 Alarms The alarm status led should first b...

Page 120: ...t fit and will require levering apart taking care to ease the connectors apart gradually so as not to crack the front pcb card The connectors are designed for ease of assembly in manufacture and not for continual disassembly of the unit Reassemble in the reverse of this sequence making sure that the screen plate is replaced with all four screws securing it c Replacement of auxiliary expansion boar...

Page 121: ...crews securing the right hand terminal block to the bottom plate of the module Unplug the back plane from the power supply pcb Twist outwards and around to the side of the module Replace the pcb and terminal block assembly Reassemble in the reverse of this sequence 9 9 5 Recalibration Whilst recalibration is not usually necessary it is possible to carry it out on site but it requires test equipmen...

Page 122: ...KVCG202 EN M H11 Technical Manual KVGC202 Figure 36 Test circuit diagram ...

Page 123: ...Technical Manual KVCG202 EN M H11 KVGC202 APPENDIX 1 ...

Page 124: ...KVCG202 EN M H11 Technical Manual KVGC202 ...

Page 125: ...Technical Manual KVCG202 EN M H11 KVGC202 Figure 37 Relay inverse time characteristic curve ...

Page 126: ...KVCG202 EN M H11 Technical Manual KVGC202 ...

Page 127: ...Technical Manual KVCG202 EN M H11 KVGC202 APPENDIX 2 ...

Page 128: ...KVCG202 EN M H11 Technical Manual KVGC202 ...

Page 129: ...Technical Manual KVCG202 EN M H11 KVGC202 ...

Page 130: ...KVCG202 EN M H11 Technical Manual KVGC202 ...

Page 131: ...Technical Manual KVCG202 EN M H11 KVGC202 APPENDIX 3 ...

Page 132: ...KVCG202 EN M H11 Technical Manual KVGC202 ...

Page 133: ...Technical Manual KVCG202 EN M H11 KVGC202 W02474 10 KVGC202 00 SHEET 1 ...

Page 134: ...KVCG202 EN M H11 Technical Manual KVGC202 W02475 10 KVGC202 00 SHEET 2 ...

Page 135: ...Technical Manual KVCG202 EN M H11 KVGC202 W02476 10 KVGC202 00 SHEET 3 ...

Page 136: ...KVCG202 EN M H11 Technical Manual KVGC202 W02477 10 KVGC202 00 SHEET 4 ...

Page 137: ...Technical Manual KVCG202 EN M H11 KVGC202 W02478 10 KVGC202 00 SHEET 5 ...

Page 138: ...KVCG202 EN M H11 Technical Manual KVGC202 W02479 10 KVGC202 01 SHEET 1 ...

Page 139: ...Technical Manual KVCG202 EN M H11 KVGC202 W02480 10 KVGC202 01 SHEET 2 ...

Page 140: ...KVCG202 EN M H11 Technical Manual KVGC202 W02481 10 KVGC202 01 SHEET 3 ...

Page 141: ...Technical Manual KVCG202 EN M H11 KVGC202 W02482 10 KVGC202 01 SHEET 4 ...

Page 142: ...KVCG202 EN M H11 Technical Manual KVGC202 W02483 10 KVGC202 01 SHEET 5 ...

Page 143: ...Technical Manual KVCG202 EN M H11 KVGC202 APPENDIX 4 ...

Page 144: ...KVCG202 EN M H11 Technical Manual KVGC202 ...

Page 145: ... B A 9 8 7 6 5 4 3 2 1 0 0002 Password 0003 SD Links 0004 Description 0006 Plant Ref 0007 Model 0008 Serial No 0009 Freq 000A Comms Level 000B Relay Address 000C Plant status 000D Control status 000E Group now 000F Load shed boost stage 0011 Software Ref 0020 Logic status 0021 Relay status 0022 Alarms 0300 Control 1 F E D C B A 9 8 7 6 5 4 3 2 1 0 0301 CTL Links 0302 CT Ratio 0303 VT Ratio 0304 In...

Page 146: ... D C B A 9 8 7 6 5 4 3 2 1 0 0501 CTL Links 0502 CT Ratio 0503 VT Ratio 0504 In 0505 Vs 0506 dV 0507 Vc volt In 0508 Vr volt In 0509 Vx volt In 050A PF Angle 050B tINIT DT 050C tINTER 050D tPULSE 050E LSB level 1 050F LSB level 2 0510 LSB level 3 0511 tTapChange 0400 Logic 1 F E D C B A 9 8 7 6 5 4 3 2 1 0 0401 Log Links 0402 V 0403 V 0404 V 0405 t V V 0406 tFAIL 0407 Ic 0408 tIc 0409 IL 040A IL 0...

Page 147: ...9 8 7 6 5 4 3 2 1 0 0601 Log Links 0602 V 0603 V 0604 V 0605 t V V 0606 tFAIL 0607 Ic 0608 tIc 0609 IL 060A IL 060B TpAvail 060C TP 060D TP 060E totalops 060F ops tP 0610 tP 0611 Default Display 0612 tTest Relay 0700 Log Links F E D C B A 9 8 7 6 5 4 3 2 1 0 0701 Remote 0702 Automatic 0703 Manual 0704 Raise V 0705 Lower V 0706 Block 0707 Level 1 0708 Level 2 0709 Level 3 070A Stg GRP2 ...

Page 148: ...k 1 4 Serial number on case module and cover checked CT shorting switches in case checked Terminals 21 and 22 23 and 24 25 and 26 27 and 28 checked for continuity with module removed from case External wiring checked to diagram if available 1 5 Earth connection to case checked 1 7 Test block connections checked 1 8 Insulation checked Auxiliary supply checked 3 1 Auxiliary power checked 3 1 1 Auxil...

Page 149: ...ay tINIT Grp1 Grp2 Setting definite s s Measured definite s s Setting inverse s s Measured inverse s s Inter tap time delay tINTER s s Setting s s Measured s s Line drop compensation Resistive compensation volts setting Vr V V Mode setting 0102 STATUS Manual auto Manual auto Voltage setting Vs V V Vreg 0202 MEASURE V V Measured resistive compensation Vr reg Vs V V Grp1 Grp2 Reactive compensation v...

Page 150: ...s document is indicative only No representation or warranty is given or should be relied on that it is complete or correct or will apply to any particular project This will depend on the technical and commercial circumstances It is provided without liability and is subject to change without notice Reproduction use or disclosure to third parties without express written authority is strictly prohibi...

Reviews: