background image

KTD-405/KTD-405A Controller Keypad

User Manual

Summary of Contents for KTD-405

Page 1: ...KTD 405 KTD 405A Controller Keypad User Manual ...

Page 2: ...used or copied only in accordance with the license terms THE ENCLOSED PROGRAM IS FURNISHED SUBJECT TO THE TERMS AND CONDITIONS OF THIS AGREEMENT RETENTION OF THE PROGRAM FOR MORE THAN 30 DAYS OPENING OF THE SEALED WRAPPER IF ANY SURROUNDING THE PROGRAM OR USE OF THE PROGRAM IN ANY MANNER WILL BE CONSIDERED ACCEPTANCE OF THE AGREEMENT TERMS IF THESE TERMS ARE NOT ACCEPTABLE RETURN THE UNUSED PROGRA...

Page 3: ...ctions 9 KTD 405A connections 10 I O box connections 11 RJ cable connections 11 Twisted pair connections 12 Connecting a multiplexer or DVMRe and domes 13 Connecting multiple keypads with RJ45 cables 14 Connecting multiple keypads with STP cable 15 Connecting new and old I O boxes 16 Setting audio attenuation 17 Chapter 3 Programming 19 Programming modes 20 Entering programming modes 21 Supervisor...

Page 4: ...olling a recording device 45 System information menus 46 Help menu 46 Audio 47 System controller mode 48 Zone mode 49 Programming a DVMRe multiplexer camera sequence 52 Chapter 5 Troubleshooting maintenance support 53 Troubleshooting your keypad 54 Contacting technical support 55 Online publication library 55 Appendix A Sample configurations and charts 57 Sample system configurations 58 Old I O bo...

Page 5: ...er to Online publication library on page 55 for instructions on accessing our online publication library Note A qualified service person complying with all applicable codes should perform all required hardware installation Conventions used in this document The following conventions are used in this document Safety terms and symbols These terms may appear in this manual Bold Menu items and buttons ...

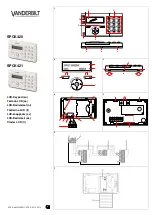
Page 6: ...KTD 405 KTD 405A Controller Keypad User Manual 2 ...

Page 7: ...This chapter provides an explanation of the conventions in this document and an overview of your keypad In this chapter Product overview 4 Operating modes 5 Chapter 1 KTD 405 KTD 405A overview ...

Page 8: ...ages in addition to the items shown include this KTD 405 KTD 405A Controller Keypad User Manual 1036547 and a quick reference guide 1047307 Figure 1 KTD 405 package contents Figure 2 KTD 405A package contents Inspect the package and contents for visible damage If any components are damaged or missing do not use the unit contact the supplier immediately If you need to return the unit you must ship ...

Page 9: ...ting in a hybrid Digiplex mode This enables the DVMRe or multiplexer to provide multiscreen views by connecting the output of the unit to an input on the matrix switcher Digiplex mode standard or hybrid does not require that the DVMRes have dedicated monitors If you are using Calibur units they must be connected to the keypad s RS 485 control signal other brands must be connected to the keypad s R...

Page 10: ...ension of standard and hybrid Digiplex modes a mode that allows use of the KTD 405 with the HDS High Density Switch system controller In this type of system each user is assigned a user number that determines the user s access privileges for each of the system resources Users must log on to the keypad using their assigned user number The keypad uses the number to ask the system controller for perm...

Page 11: ...ns you ll need to make to get your keypad and all the peripheral devices working within a diverse video surveillance network In this chapter Installation guidelines 8 Back panel connections 9 I O box connections 11 Chapter 2 Installation ...

Page 12: ...be biased If keypads reside on separate electrical circuits separated by fiber or Ethernet bridges for example then more than one keypad might have the bias switch set to ON one for each circuit The bias is sensitive to the polarity of the 12 VDC supply If polarity on the power line is reversed the keypad will not be damaged but biasing will not operate correctly Each electrical segment being term...

Page 13: ...al codes and those provided in Installation guidelines on page 8 Figure 5 KTD 405 back panel connections RS 232 programming port future use RJ45 control cable GE equipment uses two different RJ45 cables You must use the RJ45 cable provided with the unit I O box RS 485 and RS 422 in out Power supply RS 485 termination switch Power cord A D E B F C G ...

Page 14: ...ose provided in Installation guidelines on page 8 Figure 6 KTD 405A back panel connections RS 232 programming port future use RJ11 audio cable I O box Audio port RJ45 control cable GE equipment uses two different RJ45 cables You must use the RJ45 cable provided with the unit Power supply RS 485 and RS 422 in out Power cord RS 485 termination switch A E G B F H C I D ...

Page 15: ...6 7 8 Pin 1 RS 485 shield Ground one end only preferably at mux DVMRe Multiplexer or DVMRe Observe polarity for audio RS 422 RS 485 12 VDC power Transformer must have a positive center polarity plug Note When using multiple keypads you can connect CyberDomes and other receivers to the RS 422 output from any keypad RS 485 optional RJ45 connection For DVMRes multiplexers ProBridges and additional KT...

Page 16: ...LE TERMINAL STRIP EARTH GROUND 7 8 9 10 6 5 3 2 1 4 RS485 A B A B A B RS422 IN RS422 OUT SP SHIELD SPEAKER Bias switch The bias switch maintains an appropriate load on the RS 485 line Set the bias switch to ON for one keypad in a typical system any one keypad and only one keypad If your system is divided into groups that are separated by fiber or Ethernet bridges you must set the bias switch to ON...

Page 17: ...ltiplexers or DVMRe s ground at mux DVMRe KEYPAD IN RS 422 and RS 485 data in from keypad RS 422 data and power out to keypad RS 422 IN data in from devices such as alarm units ASCII converters or keypads see guidelines RS 422 OUT data out to devices such as domes switchers or keypads other than KTD 405s 1 2 3 4 5 6 7 8 7 8 9 10 6 5 3 2 1 4 POWER 12 VDC BIAS SWITCH 7 8 9 10 6 5 3 2 1 4 RS485 A B A...

Page 18: ...ad via RJ45 cable KEYPAD IN RS 422 and RS 485 data in from keypad RS 422 data and power out to keypad AUDIO IN from keypad PIN 1 to RS 485 shield ground one end only PIN 3 to RS 485 A PIN 6 to RS 485 B PINs 2 4 5 7 and 8 are not connected 7 8 9 10 6 5 3 2 1 4 POWER 12 VDC BIAS SWITCH 7 8 9 10 6 5 3 2 1 4 RS485 A B A B AUDIO KEYPAD RS485 RS485 A B RS422 IN RS422 OUT SPEAKER SHIELD SPEAKER REMOVABLE...

Page 19: ...only one of the two RJ45 RS 485 OUT connections to a multiplexer or DVMRe This ensures proper termination KEYPAD IN RS 422 and RS 485 data in from keypad RS 422 data and power out to keypad AUDIO IN from keypad PIN 1 to RS 485 shield ground one end only PIN 3 to RS 485 A PIN 6 to RS 485 B PINs 2 4 5 7 and 8 are not connected 7 8 9 10 6 5 3 2 1 4 POWER 12 VDC BIAS SWITCH 7 8 9 10 6 5 3 2 1 4 RS485 ...

Page 20: ...ver cable for old I O box RS 422 IN data in from devices such as alarm units ASCII converters or keypads see guidelines RS 422 OUT data out to devices such as domes switchers or keypads other than KTD 405s KEYPAD IN RS 422 and RS 485 data in from keypad black straight through cable for new I O box 12 VDC observe polarity on new I O box PIN 1 to RS 485 shield ground one end only RS 485 to I O box o...

Page 21: ...sition Figure 13 The attenuation jumpers are located on the audio IO card which is attached to the keypad s base plate When not using an audio converter leave the attenuation jumpers in their default OFF position Figure 13 Audio I O board with attenuation jumpers Back of keypad with cable ports Attenuation jumpers Front of keypad ...

Page 22: ...KTD 405 KTD 405A Controller Keypad User Manual 18 ...

Page 23: ...e programming modes and goes through the various steps you ll need to follow to program your keypad In this chapter Programming modes 20 Supervisor programming 22 User programming 28 Remote programming 34 Chapter 3 Programming ...

Page 24: ...e navigation keys in Table 2 on page 20 while moving through the programming menus Figure 14 Menu keys gray keys are available on the KTD 405A only Table 2 Navigating the programming menus Key Function displays the next menu displays the previous menu scrolls up when indicated by K in the menus scrolls down when indicated by L in the menus scrolls right when indicated by J in the menus scrolls lef...

Page 25: ...r They will tell you the new codes if your are allowed access to the menu Menus time out after four minutes Menus that were not implemented in this release are indicated by two beeps and a message that reads NOT IMPLEMENTED 1 When you provide power to the unit the normal operating display appears Figure 15 Figure 15 Normal operating display 2 Press and hold the key until you hear a tone and see th...

Page 26: ...tory values If you chose YES you have these further options RESET ALL Resets all stored settings to factory default RESET ALL BUT TITLES Retains the zone titles but sets everything else to factory defaults In addition this screen allows you to reinitialize CyberScout cameras so that they find all of their orientation points Access the CyberScout you want to reset before you enter supervisor progra...

Page 27: ...t the default value of NO However if the KTD 405 you are using in a system that needs to communicate PTZ commands to a Calibur CBR KB3 J keypad or ProBridge you may need to select YES so that the KTD 405 communicates properly with these devices Figure 18 KB3 PTZ PROTOCOL display 4 Enabling remote programming allows you to enter the 9 5 1 seq code for programming remote devices in the system If dis...

Page 28: ...e times and recall it by pressing find twice 6 The keypad lockout priority menu Figure 21 allows the supervisor to set up a hierarchical relationship amoung keypads in the system so that keypads with a higher priority level can prevent other keypads with lower priority from interfering with PTZ control of cameras The default value is zero which disables the priority lockout system functions for th...

Page 29: ... TO PROGRAM display Figure 24 returns If you want to reprogram additional keys repeat the process from step 4 Otherwise press esc to exit to the PROGRAM SOFT KEYS display 8 To change key assignments press the side of the zoom focus or iris keys Figure 23 PROGRAM SOFT KEYS display 9 At the PRESS KEY TO PROGRAM display Figure 24 press any of the available reprogrammable keys You can also program the...

Page 30: ... no code is required Any other value means that you must enter that number followed by the Enter key in order to have access to the keypad Access will time out after a period of inactivity The length of that period is set at the display in Figure 30 on page 27 The series of four displays is activated only when you press at the first display in Figure 27 You can navigate forward and backward within...

Page 31: ...set to the same rate Figure 28 BAUD RATE display 17 Pressing or entering a baud rate value takes you to the SYSTEM CONTROLLER display Figure 29 A System Controller is used with the HDS High Density Switch system to provide more comprehensive control of larger systems In an HDS system the keypad asks the System Controller for permission to access resources including the keypad itself To allow the k...

Page 32: ...enus are used to set the system s size to restrict the user from calling up unused addresses They also define the maximum number of keystrokes used to automatically select an address For example if there are fewer than ten cameras in the system the keypad user can select each camera site with only one key press 1 Enter the highest camera number in your system 2 Enter the highest monitor number in ...

Page 33: ...511 or enter 0 for NONE Figure 34 VCR access display 8 These menus Figure 35 are used to configure multiplexers 9 Use or or the joystick to scroll through multiplexer manufacturers 10 If the DVMRe multiplexer s outputs are connected to an input on a matrix switcher enter the input number 1 to 511 or 0 for none 11 Enter the number of outputs 1 to 5 connected to the matrix switcher This returns you ...

Page 34: ...tor number is assigned pressing the 1st key displays the first site number in the annunciation queue on the spot monitor and the keypad automatically addresses control to that monitor 12 By default the selected monitor number corresponds to the number of the matrix switcher output to which it is connected For example if monitor 12 appears in the keypad s display window and a camera selection is ma...

Page 35: ...Enter a two digit zone address to display the ZONE xx TITLE menu Figure 41 Use the or keys or move the joystick to title the zone or K Moves from a space to A through Z to 9 through 0 or L Moves from a space to 0 through 9 to Z through A or J Moves the cursor right or I Moves the cursor left Figure 41 ZONE xx TITLE menu Zone titles enable you to identify which zone is being addressed Building 248 ...

Page 36: ...ding on the hub up to 64 for matrix switchers up to 32 for multiplexers and up to 16 for all others Figure 45 Zone camera inputs 9 The following system access menus Figure 46 are used to restrict the keypad from addressing specified sites in the system Note If you are using MMX or Triplex without a VCR attached through submacros deny zone recorder access The last menu in Figure 46 returns you to t...

Page 37: ... the keypad produces a tone on a call in request or alarm This sound can be set to one frequency single or to warble between two frequencies multiple Figure 49 Call tone menu 13 When a spot monitor number is assigned Figure 50 pressing the 1st key displays the first site number in the annunciation queue on the spot monitor and the keypad automatically addresses control to that monitor Figure 50 SP...

Page 38: ... site number Pressing 3 in zone mode prompts you to enter a camera number in the current zone Note Supervisors may disable remote programming ENTER MONITOR NUMBER 1 64 BACK SEE MONITOR FOR MENUS HOLD SEQ 3 SEC TO EXIT 1 SWITCHER MPLX 2 ALARMS 3 CAMERA RCVR EXIT ENTER CALIBUR ADDRESS 1 32 BACK ENTER MONITOR NUMBER 1 64 BACK SEE MONITOR FOR MENUS HOLD SEQ 3 SEC TO EXIT SEE MONITOR FOR MENUS HOLD SEQ...

Page 39: ... stop recording Your shadow tour is now available for use Follow the keypad s instructions for activating the shadow tour See Table 3 on page 38 1 Beginning at the normal operating display bring up the PROGRAM SHADOW TOUR display Figure 52 by pressing and holding the esc key then pressing the tour key Figure 52 Normal operating display 2 At the PROGRAM SHADOW TOUR display Figure 53 press the side ...

Page 40: ...KTD 405 KTD 405A Controller Keypad User Manual 36 ...

Page 41: ...operate your keypad It also describes the different operating modes standard Digiplex mode and zone mode In this chapter Operating your keypad 38 Standard Digiplex mode 41 System controller mode 48 Zone mode 49 Chapter 4 Operation ...

Page 42: ...ne mode Caliber devices will display their address status disappears when the key is released View message Recalls the last message sent from HDS system controller zone With number keys selects a zone Group Activates group switching and group sequence initiation aux 1 Open gate or other device at selected camera address Unlock aux 2 Close Lock aux 3 Stop Flip Pan 180 degrees to point in opposite d...

Page 43: ...tofocus Places selected CyberDome camera in autofocus mode Autopan 0 9 Selects camera selects any numeric entry following other keys No shifted function Places selected DSR DVMRe or VCR in fast forward mode Site up Selects the camera number one more than the current one Places selected monitor s DSR VCR or DVMRe in fast reverse mode Site down Selects the camera number one less than the current one...

Page 44: ...et 0 Toggles selected multiplexer s full screen picture between normal and 2X magnification Light Locates video on selected DVMRe 0 lux dsr vcr With number keys addresses remote recording device Alt Key for DVMRe face Control of specialized ID checking unit Card badge Control of specialized ID checking unit Door 1 over Control of specialized ID checking unit Door 2 vol Increase audio volume Slow v...

Page 45: ...t last camera will be selected as well when the monitor is switched back This allows you to alternate between two monitors and have the camera control follow the monitor selection This only works for two monitors If the monitor selected is not the previous one the camera selection remains the same as it is on the current monitor Note System controller mode will usually restore the last camera used...

Page 46: ...tion the user can set the autopan limits which are stored in presets 62 and 63 The Legend camera has additional presets 64 to 127 and by default these also can be set from the keypad With this default setting presets below 58 must be set from the camera setup menus which the user may or may not have access to The installer or supervisor can allow a user to set more or fewer presets from the keypad...

Page 47: ... value of the Preset Limit setting itself defines a shortcut preset that can be accessed with only the store or find keys For example if the Preset Limit is set to 35 to store a position in preset 35 press the store key three times In effect the second press substitutes for typing the preset number The preset defined by the Preset Limit can be recalled by pressing the find key twice If the Preset ...

Page 48: ... point of the camera s back and forth motion do the following 1 Position the camera at the desired right limit and press store Note Do not attempt to enter a preset number The preset number 63 is reserved for the right autopan limit and is automatically entered when you perform step 3 2 Press 3 Press store again The Store Preset Number displays on the keypad Controlling a DVMRe multiplexer hybrid ...

Page 49: ...s on DSR VCR in reverse shifts play direction to forward in pause mode steps playback forward one frame reverse playback action depends on DSR VCR playing forward shifts play direction to reverse in pause mode steps playback in reverse one frame zooms image to 2X magnification toggle calls up screen to search for specific recording puts DVMRe in playback mode Joystick twisting right steps forward ...

Page 50: ... press the mon key Release both keys Figure 59 HELP menu To display a key s default function at the HELP menu press the key To display a key s shifted secondary function press esc and the key See Table 3 on page 38 for a list of keys and their default assignments for normal and shifted functions The help menu times out in ten seconds To force an exit press Highest preset Lowest user programmable p...

Page 51: ...To call up any site in the queue Press 0 through 9 to enter a site number The site will be removed from the queue and the waiting requests will move up on order Note When an annunciation call is received a tone sounds every 15 seconds until the call is cleared by an operator In multiplexer mode the tone sounds every 5 seconds Two way audio To establish two way audio communication with a site 1 Pre...

Page 52: ...ns if the communication has been disrupted by other messages on the circuit connecting keypads to the system controller In this situation retrying will usually succeed Access menus If a system controller is not available and you need to change the keypad s setup you can access the menus by entering the special user number 55555 This brings you to the same place as holding down the enter key for th...

Page 53: ...ing a camera The control address of a PTZ camera in zone mode is offset from the number used to select it When setting up and controlling your cameras in zone mode refer to Zone receiver site addressing on page 65 in Appendix A PTZ Pan tilt and zoom are controlled by the joystick Zoom is also controlled by the zoom key To pan move the joystick left or right To tilt move the joystick up or down To ...

Page 54: ...ck when attached to a DSR VCR in pause mode twisting right steps forward at a variable rate twisting left steps in reverse at a variable rate in any mode with 2X magnification right pans right left pans left up pans up down pans down in play or pause mode right fast forwards left rewinds up skips forward approximately 15 sec down skips backward approximately 15 sec twisting right steps forward at ...

Page 55: ... navigate the DVMRe multiplexer programming menus see Table 6 Table 6 Navigating Calibur menu Control Function Joystick moves left and right within menu options can be used to move up and down within the menu options makes selections backspaces out of selections exits the programming menus if pressed in the main menu moves up within menu options moves down within menu options moves right within me...

Page 56: ...epeat step 4 until all cameras in the sequence have been entered 6 Press Note Pressing seq toggles between sequencing and not sequencing 2 Press seq to display the ENTER SEQUENCE menu Figure 63 3 Enter the number of the first camera in the sequence 4 Wait the amount of time you want between cameras then press the next camera in the sequence Figure 63 Enter sequence menu ENTER SEQUENCE CAMERA CANCE...

Page 57: ...ous problems that may arise while configuring or using your GE Security product and offers technical support contacts in case you need assistance In this chapter Troubleshooting your keypad 54 Contacting technical support 55 Chapter 5 Troubleshooting maintenance support ...

Page 58: ...MRe Readdress the cameras or move the coaxial connections up one input on the DVMRe If none of these solutions corrects the problem contact customer support I cannot connect to a DVMRe Make sure that the correct hub device is selected in the zone programming menus The slection defaults to Triplex Also check the termination and bias settings see Installation guidelines on page 8 I have lost control...

Page 59: ...eat resource for assistance with your GE Security products is our online publication library available to all of our customers on our website To access our publication library go to our website at the following location http www gesecurity com In the Tools area at the top click the Publication Library link then select Video Surveillance After you register and log on you may search through our onli...

Page 60: ...KTD 405 KTD 405A Controller Keypad User Manual 56 ...

Page 61: ...IP switch aids charts and other helpful information In this appendix Sample system configurations 58 Old I O box connections 62 Connecting multiple keypads to the old I O box 64 Zone receiver site addressing 65 Reprogrammable keys and commands 67 System planning chart 69 Appendix A Sample configurations and charts ...

Page 62: ...9 10 6 5 3 2 1 4 POWER 12 VDC BIAS SWITCH 7 8 9 10 6 5 3 2 1 4 RS485 A B A B AUDIO KEYPAD RS485 RS485 A B RS422 IN RS422 OUT SPEAKER SHIELD SPEAKER REMOVABLE TERMINAL STRIP EARTH GROUND 7 8 9 10 6 5 3 2 1 4 POWER 12 VDC BIAS SWITCH 7 8 9 10 6 5 3 2 1 4 RS485 A B A B AUDIO KEYPAD RS485 RS485 A B RS422 IN RS422 OUT SPEAKER SHIELD SPEAKER REMOVABLE TERMINAL STRIP EARTH GROUND Video RS 422 RS 485 A D ...

Page 63: ... VDC BIAS SWITCH 7 8 9 10 6 5 3 2 1 4 RS485 A B A B AUDIO KEYPAD RS485 RS485 A B RS422 IN RS422 OUT SPEAKER SHIELD SPEAKER REMOVABLE TERMINAL STRIP EARTH GROUND CAMERA 22 MONITOR 2 ZONE 32 PARKING GARAGE mon view zone 2 3 B C 1 A 4 5 6 D E 7 8 9 esc 0 1st focus auto iris zoom focus clear set dsr vcr seq aux 1 alarm tour aux 2 aux 3 store aux 4 find face badge over vol vol last Video RS 422 RS 485 ...

Page 64: ... 32 PARKING GARAGE mon view zone 2 3 B C 1 A 4 5 6 D E 7 8 9 esc 0 dsr vcr seq aux 1 alarm tour aux 2 aux 3 store aux 4 find 1ST focus auto iris zoom focus 7 8 9 10 6 5 3 2 1 4 POWER 12 VDC BIAS SWITCH 7 8 9 10 6 5 3 2 1 4 RS485 A B A B AUDIO KEYPAD RS485 RS485 A B RS422 IN RS422 OUT SPEAKER SHIELD SPEAKER REMOVABLE TERMINAL STRIP EARTH GROUND 7 8 9 10 6 5 3 2 1 4 POWER 12 VDC BIAS SWITCH 7 8 9 10...

Page 65: ...ONE 32 PARKING GARAGE mon view zone 2 3 B C 1 A 4 5 6 D E 7 8 9 esc 0 dsr vcr seq aux 1 alarm tour aux 2 aux 3 store aux 4 find 1ST focus auto iris zoom focus 7 8 9 10 6 5 3 2 1 4 POWER 12 VDC BIAS SWITCH 7 8 9 10 6 5 3 2 1 4 RS485 A B A B AUDIO KEYPAD RS485 RS485 A B RS422 IN RS422 OUT SPEAKER SHIELD SPEAKER REMOVABLE TERMINAL STRIP EARTH GROUND 7 8 9 10 6 5 3 2 1 4 POWER 12 VDC BIAS SWITCH 7 8 9...

Page 66: ...Data connections RS 485 A RS 422 out B RS 485 B RS 422 out A 12 VDC in no polarity RS 422 in B 12 VDC in no polarity RS 422 in A RS 422 in B 12 VDC in no polarity RS 422 in A 12 VDC in no polarity RS 422 out B RS 485 B RS 422 out A RS 485 A Audio connections Audio A Shield float in field Audio B BR G BK BL W Y O R R G BK RD BR BK W OR G BL Y GN BL YL O BR BK WH R R G BK ...

Page 67: ...to the old I O box Connect PIN 3 to RS 485 A RD To multiplexer or DVMRe ground at mux DVMRe RS 422 output to CyberDomes PTZ receivers Connect PIN 6 to RS 485 B BK Floating shield RS 422 input if used Connect PIN 1 to RS 485 shield 12 VDC in no polarity RD BK OR BL GN YL BR WH A E G B C F H D ...

Page 68: ...or multiplexer DVMRe ground at mux DVMRe RS 422 output to CyberDomes To from KTD 405 12 VDC in no polarity Shield float RS 422 input from alarm chassis Audio connections 12 VDC in no polarity 12 VDC in no polarity Audio A RJ45 to from KTD 405 RJ11 to from KTD 405A Float shield in field RJ45 to from KTD 405A To additional keypads or multiplexer DVMRe ground at mux DVMRe Audio B RS 422 output to Cyb...

Page 69: ... from that difference Continue to subtract the highest possible switch value from the difference until you have zero For example assume you want address 209 The highest value under 209 is 128 switch 8 Subtracting 128 from 209 yields 81 The highest value under this remainder is 64 switch 7 Subtracting 64 from 81 yields 17 and from there you would subtract 16 switch 5 and 1 switch 1 Therefore for ad...

Page 70: ...73 205 237 269 301 333 365 397 429 461 493 15 14 46 78 110 142 174 206 238 270 302 334 366 398 430 462 494 16 15 47 79 111 143 175 207 239 271 303 335 367 399 431 463 495 17 16 48 80 112 144 176 208 240 272 304 336 368 400 432 464 496 18 17 49 81 113 145 177 209 241 273 305 337 369 401 433 465 497 19 18 50 82 114 146 178 210 242 274 306 338 370 402 434 466 498 20 19 51 83 115 147 179 211 243 275 3...

Page 71: ...ssing and holding the key Figure 73 Normal operating display 2 After the keypad beeps and the code entry display appears Figure 74 quickly enter the access code for the supervisor menus by pressing the 1 4 7 6 seq key sequence The display will automatically advance to the next display Figure 74 Code entry display 3 Press the key for NEXT until the PROGRAM SOFT KEYS display appears Figure 75 Press ...

Page 72: ...FWD FAST AUX FCS FAR FCS NEAR FIND FIRST FLIP GROUP HOME IRIS CLS IRIS OPN JOY CCW JOY CW JOY DOWN JOY LEFT JOY RGT JOY UP LAST LENS RST LIGHT LIVE LOCK MACRO for future use MAGNIFY OPEN OPEN 1 OPEN 2 OVER PAUSE PLAY RECORD REWIND SEARCH SHADOW SITE DWN SITE UP SLOW STOP STABILIZ STEP STEP FWD STEP REV STOP RCD STORE for future use TALK TOUR UNLOCK VIEW VOL DOWN VOL UP ZONE ZOOM IN ZOOM OUT 0 LUX ...

Page 73: ...Appendix A Sample configurations and charts 69 System planning chart Make photocopies of this table to help you plan your system IP Address if applicable Description Title Type Switcher Input ...

Page 74: ...KTD 405 KTD 405A Controller Keypad User Manual 70 ...

Page 75: ...mode 5 41 hybrid 5 standard 5 G group switching 43 H help menu 46 hybrid mode 5 I inactive timeout 27 installation guidelines 8 I O box connections 11 62 K key assignments 25 keypad operation 38 L log on off 48 M monitor selection 41 49 multiple keypads connections 64 multiplexer control 44 50 O operating mode 5 Digiplex 5 system controller mode 6 zone 6 P preface 1 presets 24 42 product contents ...

Page 76: ...cording device 45 reprogrammable keys 67 S safety terms and symbols 1 shadow tours 35 site address 65 soft keys 26 67 standard mode 5 system configuration 58 system controller mode 6 48 T technical support 55 timeouts 48 troubleshooting 53 Z zone mode 6 49 ...

Reviews: