G-Technology G SPEED STUDIO XL, Product Manual
Introducing the G-Technology G SPEED STUDIO XL, a high-performance storage solution designed to meet your professional needs. Gain quick access to the product manual, available for free download on our website, manualshive.com, ensuring you have all the necessary knowledge to maximize the potential of this remarkable device.
Share
Download


Reviews:
No comments
Related manuals for G SPEED STUDIO XL
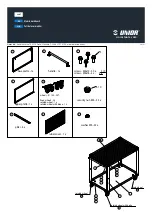
940T
Brand: Unior Pages: 2
GSX
Brand: Gearwrench Pages: 9

Duramax Yardmate
Brand: USP Pages: 25

Cold Frame Single
Brand: Palram Pages: 11

SB302-LB
Brand: AIC Pages: 101

RLS-4124
Brand: Qualstar Pages: 205

CMP-MOBSTOR120
Brand: Konig Pages: 33

PG-HDH61A
Brand: Fujitsu Pages: 12

PG-HD6G1C
Brand: Fujitsu Pages: 16

MPG3xxxAT
Brand: Fujitsu Pages: 201

PG-HD2E4H
Brand: Fujitsu Pages: 14

MPC3045AH
Brand: Fujitsu Pages: 185

MPC3032AT
Brand: Fujitsu Pages: 179

MPA3017AT
Brand: Fujitsu Pages: 176

MPD3091AH
Brand: Fujitsu Pages: 191

MJA2080BH
Brand: Fujitsu Pages: 320

MPD3043AT
Brand: Fujitsu Pages: 191

MPB3021AT
Brand: Fujitsu Pages: 180


