FV
se reserva el derecho de modificar,
cambiar, mejorar y/o anular materiales,
productos y/o diseños sin previo aviso.
MEDIDAS SUGERIDAS PARA LA INSTALACIÓN (en cm):
Código:
Asegúrese que la persona que vaya a instalar el
producto sea un profesional en la materia, para
prevenir errores que afecten las instalaciones o
el correcto funcionamiento del producto.
Realice los ajuste del sanitario UTILIZANDO
una herramienta adecuada para que la
superficie y el acabado del producto no se raye
o lastime.
Recuerde que todos los productos tienen un
mecanismo de control que debe ser revisado y
cambiado de ser necesario, ya que este puede
deteriorarse debido a la frecuencia de uso.
To prevent any error that may affect the facilities
or the correct functioning of the product, make
sure that the person who is going to install the
product is a professional. Install the product
using suitable tools, so that it is not scratched.
Remember that all products have a control
mechanism that must be reviewed and changed
if necessary, since it can deteriorate due to the
frequency of use.
RECOMENDACIONES:
RECOMMENDATIONS:
MEDIDAS /
MEASURES:
Dimensiones en milímetros /
Dimensions in millimeters
Dimensiones en pulgadas /
Dimensions in inches
E172.1-COLOR
E101.10-COLOR
E172.2-COLOR
E172.2.2
E172.2.1
E102.10
490
19” 9/32
695
27” 3/
8
365
150
14” 3/
8
5” 7/
8
368
733
14” 1/
2
28” 7/
8
305
12”
490
19” 9/32
695
27” 3/
8
365
150
14” 3/
8
5” 7/
8
368
733
14” 1/
2
28” 7/
8
305
12”
1.
Ubicar el inodoro en la posición que irá, verificar la alineación del inodoro respecto
a la pared y posicionar de acuerdo a las dimensiones (grá fi co
# 1
).
Verify the alignment of toilet regarding the wall and place from agreement to the
dimensions
(graphic
# 1
).
LEA LAS INSTRUCCIONES COMPLETAMENTE ANTES DE INSTALAR /
READ ALL INSTRUCTIONS BEFORE INSTALLING
3.
Perforar y colocar los tacos de fijación #10 (no incluidos) (grá fi co
# 3
).
Drill and place the fixation bolts #10 (not included) (graphic
# 3
).
4-
Voltear hacia abajo el inodoro y colocar el anillo de cera alrededor del de sa güe
(grá fi co
# 4
).
Turn down the toilet and place the waxing rings around the drain (graphi c
# 4
).
2.
Marcar (grá fi co
# 2
).
Mark (graphic
# 2
).
INSTRUCCIONES DE INSTALACIÓN /
INSTALLATION INSTRUCTIONS
:
COLORES DISPONIBLES /
COLORS AVAILABLE
:
• Blanco /
White
:
BL
• Bone /
Bone
:
BO
30.5 cm
15 cm 15 cm
Llave angular F.V.
F.V. Angle stop set
Empaque espumoso
F.V. Angle stop set
Agujeros
para fijación
Fixation holes
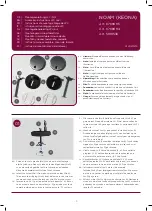
Abra el tanque e instale el herraje, confirme que los
pernos y empaque estén como se indica en el
gráfico. Ubique el tanque sobre el inodoro
alineando ambas piezas.
Open the tank and install the tank fitting, rewiew
that the gaskets and the screws has been installed
propperly, like the graphique. Place the tank over
the toilet bowl alained both pieces.
Open the tank and install the tank fitting, check
that gaskets and screws have been installed
properly as shown in the drawing. Place the tank
over the toilet bowl alaigning both pieces.
30.5 cm
15 cm 15 cm
Llave angular F.V.
F.V. Angle stop set
Empaque espumoso
F.V. Angle stop set
Agujeros
para fijación
Fixation holes
Abra el tanque e instale el herraje, confirme que los
pernos y empaque estén como se indica en el
gráfico. Ubique el tanque sobre el inodoro
alineando ambas piezas.
Open the tank and install the tank fitting, rewiew
that the gaskets and the screws has been installed
propperly, like the graphique. Place the tank over
the toilet bowl alained both pieces.
Open the tank and install the tank fitting, check
that gaskets and screws have been installed
properly as shown in the drawing. Place the tank
over the toilet bowl alaigning both pieces.
E170
Inodoro /
Toilet
Victoria