Содержание FFFU20F2VW

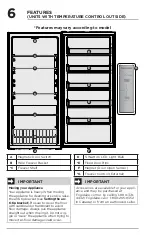
Страница 1: ...tallation 7 Door Removal Reversal Units with Temperature Control Inside 8 Door Removal Reversal Units with Temperature Control Outside 12 Door Handle Installation some models 16 Controls and Settings Units with Temperature Control Inside 17 Controls and Settings Frost Free Units with Temperature Control inside 18 Controls and Settings Units with Temperature Control Outside 19 Storage Features 22 C...

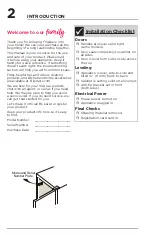
Страница 2: ...p together This manual is your resource for the use and care of your product Please read it before using your appliance Keep it handy for quick reference If something doesn t seem right the troubleshooting section will help you with common issues FAQs helpful tips and videos cleaning products and kitchen and home accessories are available at Frigidaire com We are here for you Visit our website cha...

Страница 3: ...this appliance Child Safety This appliance is not intended for use by persons including children with reduced physical sensory or mental capabilities or lack of experience and knowledge unless they have been given supervision or in struction concerning use of the appliance by a person responsible for their safety Destroy or recycle the carton plastic bags and any exterior wrapping mate rial immedi...

Страница 4: ...lectrician Avoid connect ing the appliance to a Ground Fault Interrupter GFI circuit Do not use an extension cord or adapter plug If the power cord is damaged an authorized service technician should replace it to prevent any risk Never unplug the appliance by pull ing on the power cord Always grip the plug firmly and pull straight out from the receptacle to prevent dam aging the power cord Unplug ...

Страница 5: ...ppliance Rub a small amount of liquid dish soap over the adhesive with your fingers Rinse with warm water and dry with a soft cloth Do not use sharp instruments rubbing alcohol flammable fluids or abrasive cleaners to remove tape or glue These products can damage the surface of your appliance After you remove all of the package materials clean the inside of your appliance before using it See the C...

Страница 6: ...avy When moving the appliance for cleaning or service raise the anti tip bracket see Setting the an ti tip bracket Be sure to cover the floor with cardboard or hardboard to avoid floor damage Always pull the appliance straight out when moving it Do not wig gle or walk the appliance when trying to move it as floor damage could occur IMPORTANT Accessories are available for your appli ance and may be...

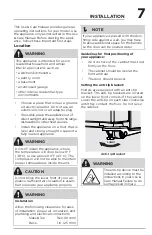
Страница 7: ...odels are equipped with an anti tip bracket The anti tip brackets are located on the lower front corners of the cabinet Lower the anti tip on each side clockwise until they contact the floor Do not raise the cabinet Location Lower Anti tip Bracket INSTALLATION CAUTION Do not block the lower front of your ap pliance Sufficient air circulation is essen tial to operate your appliance properly WARNING...

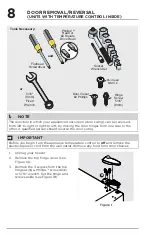
Страница 8: ...ppliance temperature control to off and remove the electrical power cord from the wall outlet Remove any food from door shelves or Tools Necessary Socket Wrench Set 5 16 8mm Fixed Wrench Flathead Screwdriver and or PhillipsTM Head or 2 Square Drive Head Door Closer 2 Phillips Hinge Screw 5 16 8mm Pan Head MSX12 1 Unplug your freezer 2 Remove the top hinge cover see Figure 1A 3 Remove the 3 screws ...

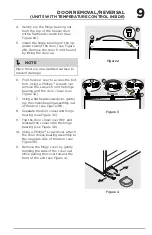
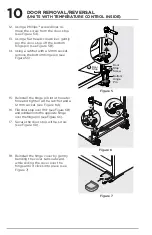
Страница 9: ...remove the screws from the hinge bearing and the door closer see Figure 3A 7 Using a flat head screwdriver gently pry the closer bearing assembly out of the door see Figure 3B 8 Separate the door closer and hinge bearing see Figure 3C 9 Flip the door closer over 180º and reinstall the closer onto the hinge bearing see Figure 3D 10 Using a Phillips screwdriver attach the door closer bearing assembl...

Страница 10: ...e Figure 5C 15 Reinstall the hinge pin into the outer hole and tighten with a ratchet and a 12 mm socket see Figure 6A 16 Flip door stop over 180 see Figure 6B and reinstall onto the opposite hinge over the hinge pin see Figure 6C 17 Secure the door stop with a screw see Figure 6D 18 Reinstall the hinge cover by gently bending the cover tabs outward while sliding the cover over the hinge until it ...

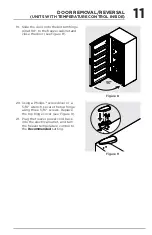
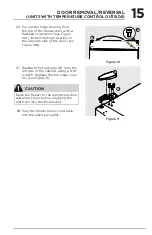
Страница 11: ... 8 20 Using a Phillips screwdriver or a 5 16 wrench secure the top hinge using three 5 16 screws Replace the top hinge cover see Figure 9 21 Plug the freezer power cord back into the electrical outlet and turn the freezer temperature control to the Recommended setting DOOR REMOVAL REVERSAL UNITS WITH TEMPERATURE CONTROL INSIDE ...

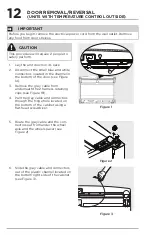
Страница 12: ...through the hinge hole located on the bottom of the cabinet using a flat head screwdriver 5 Route the gray cable and the con nectors out from under the wheel axle and the wheel spacer see Figure 2 A B Figure 1 CAUTION This procedure will require 2 people to safely perform Figure 2 Figure 3 IMPORTANT Before you begin remove the electrical power cord from the wall outlet Remove any food from door sh...

Страница 13: ...closer onto the hinge bearing see Figure 5D 12 Using a Phillips screwdriver attach the door closer hinge bearing as sembly to the opposite side of the door see Figure 5E 13 Remove the screw from the door stop located on the bottom hinge using a Phillips screwdriver see Figure 6A 14 Using a flathead screwdriver gently pry the door stop off the bottom hinge pin see Figure 6B 15 Using a ratchet with ...

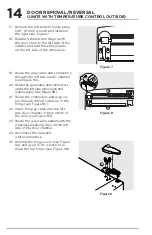
Страница 14: ...the left side wheel axle and wheel spacer see Figure 8B 21 Route the connectors and gray ca ble through the left side hole in the hinge see Figure 8C 22 Insert the gray cable into the left side door channel in the bottom of the door see Figure 8D 23 Route the gray cable underneath the 2 harness retaining clips on the left side of the door channel 24 Reconnect the blue and white connectors 25 Remov...

Страница 15: ...aring on the opposite side of the door see Figure 10B Figure 10 A B 27 Reattach the top hinge B onto the left side of the cabinet using a 5 16 wrench Replace the top hinge cover A see Figure 11 Figure 11 A B CAUTION Raise the freezer to the upright position and allow 1 hour before plugging the unit back into electrical outlet 28 Plug the freezer power cord back into the electrical outlet ...

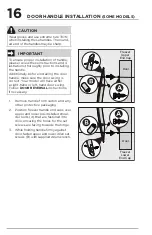
Страница 16: ...nstructions if necessary CAUTION Wear gloves and use extreme CAUTION when installing these handles The round ed end of the handles may be sharp 1 Remove handle from carton and any other protective packaging 2 Position freezer handle end caps over upper and lower pre installed shoul der bolts A that are fastened into door ensuring the holes for the set screws are facing towards the hinge 3 While ho...

Страница 17: ...colder temperatures adjust the knob towards Coldest For warmer temperatures adjust the knob towards Cold Appliance Control Alarms High Temp Alert If the temperature increases above freezing your food the LED light at the bottom of the cabinet will flash and the alarm will sound The alarm can be reset by opening and then closing the door The LED will continue to flash until the cabinet temperature ...

Страница 18: ...ob to the desired temperature setting The interior light will not illuminate while in Sabbath Mode when the door is open NOTE The temperature setting is not affected by the Sabbath Mode For food safety the High Temp alert will sound for 10 minutes if the internal temperature increases After 10 minutes the alarm will stop but the LED light at the bottom of the cabinet will continue to flash until y...

Страница 19: ...iance to operate with the door closed for at least 8 hours before loading it with food Power On Plugging in the appliance for the first time causes an audible alert and the Recommended temp setting LED to illuminate Temp Pressing the Temp button will allow you to scroll through the five temperature set tings from Cold top to Coldest bottom and then loop back to Cold ...

Страница 20: ...3 seconds Power Failure In the event of a power failure where the temperature increases above freezing your food once you restore power the red High Temp LED light will illuminate and the alarm will sound Reset the alarm by pressing and holding the Temp button for 3 seconds IMPORTANT If the high temp condition has not im proved after a period of time the alert will be displayed again In this event...

Страница 21: ...after power failure recovery It must be deactivated with the buttons on the control panel For further assistance guidelines for proper use and a complete list of models with the Sabbath feature please visit star k org NOTE The temperature setting is not affected by the Sabbath Mode For food safety the High Temp alert will sound for 10 minutes if the internal temperature increases After 10 minutes ...

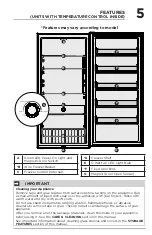
Страница 22: ...in on each side of the door bin to release it from the locking tabs 2 Lift up on the bin and pull it straight out Wire Shelf Freezer Basket some models The freezer basket is ideal for large items or items that do not store well on the shelves To install the door bins 1 Push the bin back and down into the locking tabs 2 The bin sides will lock into the tabs Glass Shelf A Manual Defrost Upright Free...

Страница 23: ...detergents bleaches or cleansers containing petroleum products on plastic parts interior doors gaskets or cabinet liners Do not use paper towels metallic scouring pads or other abrasive cleaning materials or strong alkaline solutions CAUTION Damp objects stick to cold metal surfaces Do not touch interior metal surfaces with wet or damp hands Some upright freezers are frost free and defrost automat...

Страница 24: ...ed can simply be dumped into a drain Please note that the cover that comes with the basket may not be water tight Defrosting without using a garden hose or a cap may lead to water leaking onto the floor surface Cleaning the Inside After defrosting wash inside surfaces of the unit with a solution of 2 tbsp 25 g of baking soda in 1 qt 1 l warm water Rinse and dry Wring excess water out of the sponge...

Страница 25: ... soapy water and a dishcloth Rinse with clean water and a soft cloth Use a non abrasive stainless steel cleaner These cleaners can be purchased at Frigidaire com or major department stores Always follow manufacturer s instructions Do not use household cleaners containing ammonia or bleach NOTE Always clean wipe and dry with the grain to prevent scratching Wash the rest of the cabinet with warm wat...

Страница 26: ...atisfactory Check freezer temperatures and adjust the temperature control as needed Appliance temperature is warmer than preferred Set control to a colder setting until appliance temperature is satisfactory Allow 24 hours for the temperature to stabilize Appliance is noisy or vibrates The cabinet is not level Adjust the anti tip bracket See Setting the anti tip bracket in the INSTALLATION section ...

Страница 27: ...ux parts or parts obtained from persons other than authorized service companies or external causes such as abuse misuse inadequate power supply accidents fires or acts of God DISCLAIMER OF IMPLIED WARRANTIES LIMITATION OF REMEDIES CUSTOMER S SOLE AND EXCLUSIVE REMEDY UNDER THIS LIMITED WARRANTY SHALL BE PRODUCT REPAIR OR REPLACEMENT AS PROVIDED HEREIN CLAIMS BASED ON IMPLIED WARRANTIES INCLUDING W...

Страница 28: ...aire com 1 800 374 4432 Frigidaire ca 1 800 265 8352 owner support accessories service Our home is your home Visit us if you need help with any of these things registration See your registration card for more information ...

Отзывы: