FAR KJ 73-A, Translation Of Original Instructions
The FAR KJ 73-A user manual is a crucial resource for operating your device effectively. This manual provides a Translation of Original Instructions for easy understanding. Download it for free from manualshive.com to access important information on how to maximize the performance of your FAR KJ 73-A.
Share
Download


Reviews:
No comments
Related manuals for KJ 73-A

721
Brand: RAMSET Pages: 16

SAT105
Brand: SGS Pages: 13
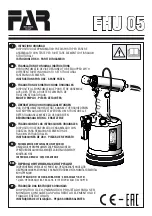
FHU 05
Brand: FAR Pages: 52

lubemate L-OD90B
Brand: Macnaught Pages: 5

GB751SR-8
Brand: Gage Bilt Pages: 24

554 DCC
Brand: BEA Pages: 4

180x50-786E
Brand: BEA Pages: 4

145/32-178C
Brand: BEA Pages: 5

Jack Jumper USJJ-007
Brand: Utility Solutions Pages: 2

Jack Jumper USJJ-006
Brand: Utility Solutions Pages: 2

018719
Brand: Meec tools Pages: 47

CAR8P
Brand: Clarke Pages: 7

3120178
Brand: Clarke Pages: 16

3110462
Brand: Clarke Pages: 16

3108005
Brand: Clarke Pages: 16

PFCAH1
Brand: Matco Tools Pages: 4

MT1827A
Brand: Matco Tools Pages: 10

GG60B
Brand: Matco Tools Pages: 13


