


1
ISS 608 • Setup Guide
This guide provides quick start instructions for an experienced installer to set up and operate the Extron ISS 608 Integration
Seamless Switcher, a seamless, scaling, video and audio switcher. The ISS 608 features six HDMI inputs, two DisplayPort inputs,
and two HDMI outputs. The inputs and outputs are HDCP 2.2 compliant and support resolutions up to 4096x2160 at 60 Hz.
Installation and Cabling Features
RESET
100-240V --A MAX
50-60 Hz
HDMI
1
HDMI
2
HDMI
3
HDMI
4
HDMI
1A
HDMI
DISPLAYPORT
6
7
DISPLAYPORT
8
HDMI
2A
INPUTS
ISS 608
OUTPUTS
PREVIEW
PROGRAM
AUDIO
REMOTE
HDMI
5
PREVIEW
L
R
PROGRAM
L
R
LAN
Tx Rx
RS-232
G
F
F
A
A
G
G
H
H
D
D
C
C
B
B
E
E
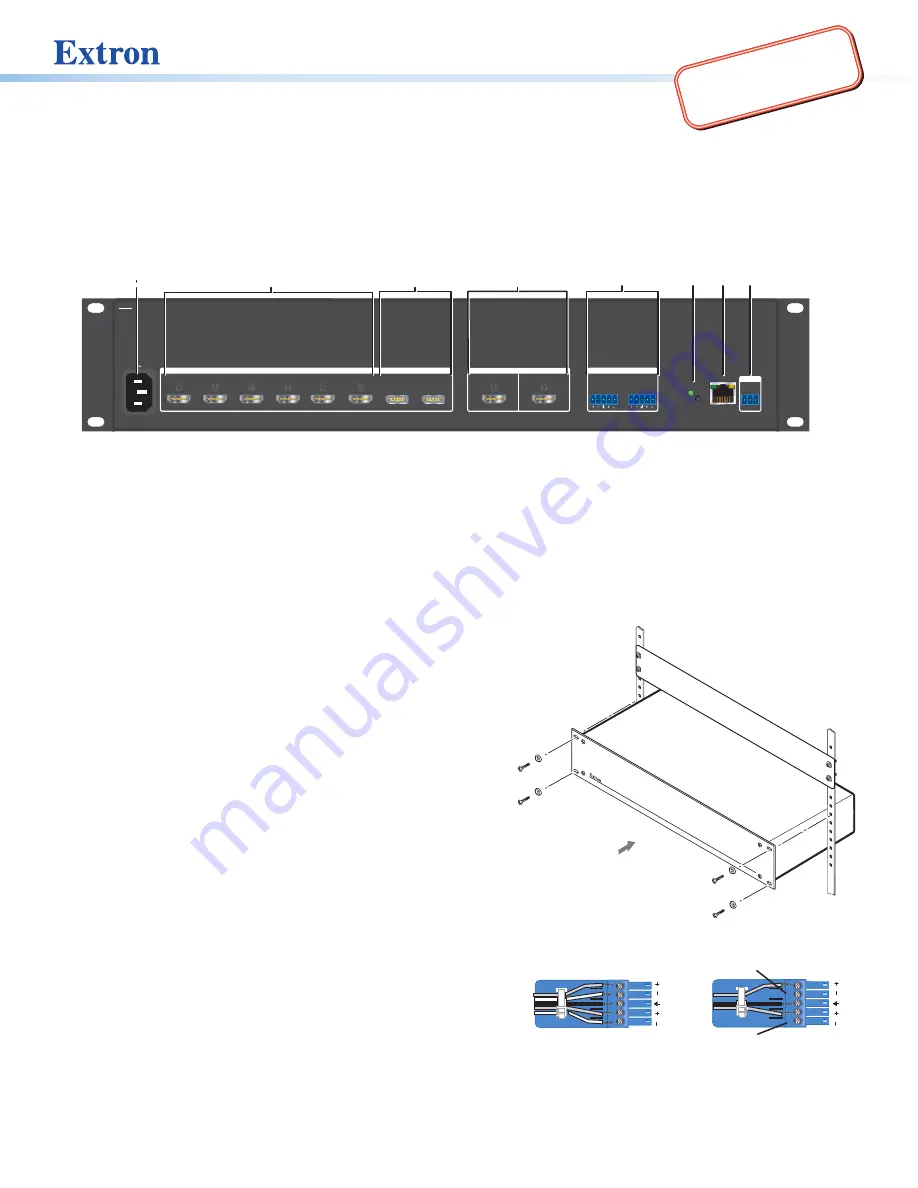
Figure 1.
ISS 608 Rear Panel
AC power connector
E
Analog
audio output connectors
B
HDMI input connectors
F
Reset button and LED
C
DisplayPort input connectors
LAN connector
D
HDMI output connectors
Remote RS-232 connector
Connections
Step 1 — Mounting
Turn off or disconnect all equipment power sources.
•
For tabletop use, affix the rubber feet and remove the brackets.
•
For optional rack mounting, mount in a rack via the attached
brackets (see figure 2).
Step 2 — Video inputs
•
HDMI input connectors 1 through 6
— Connect HDMI video to
these inputs (see figure 1,
B
).
•
DisplayPort input connectors 7 and 8
— Connect DisplayPort
video to these inputs (
C
).
Step 3 — Video outputs
HDMI output connectors
— Connect displays to the Program and
Preview HDMI output connectors (
D
).
Figure 2.
Mounting Diagram
Step 4 — Audio outputs
Connect balanced or unbalanced stereo audio or mono audio
devices to the program and preview 5-pole captive screw
output connectors (
E
) (see figure 3 for wiring).
Balanced Audio Output
Tip
Ring
Tip
Ring
Sleeves
Unbalanced Audio Output
Tip
No Ground Here
No Ground Here
Tip
Sleeves
LR
LR
Do not tin the wires
Balanced Stereo Input
Tip
Sleeves
Ring
Ring
Tip
LR
Unbalanced Stereo Input
Tip
Sleeve
Sleeve
Tip
LR
3/16” Max
(5mm)
Figure 3.
Audio Wiring Configuration
1
2
3


