manualshive.com logo in svg
background image


Model: Way-out  

Date: 02/06/2021 

Product code: 380965 

Version: v3.0 


Way-out  

User Manual 


Содержание 380965

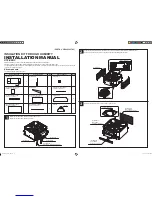
Страница 1: ...Model Way out Date 02 06 2021 Product code 380965 Version v3 0 Way out User Manual ...

Страница 2: ...dleiding is met de grootst mogelijke zorg samengesteld Wij behouden ons desalniettemin het recht voor deze handleiding te allen tijde te verbeteren en aan te passen De gebruikte afbeeldingen kunnen afwijken Het volgende symbool en de volgende term worden in deze handleiding gebruikt om veiligheidskwesties en belangrijke informatie duidelijk te maken aan de lezer LET OP Duidt op een gevaarlijke sit...

Страница 3: ...ing 1 LET OP Zorg er altijd voor dat de stroom warme lucht ongehinderd naar buiten kan Zorg dat de luchtuitlaat Afbeelding 1 pos 5 nooit geblokkeerd is Als de brievenbusgleuf Afbeelding 1 pos 4 gedeeltelijk geblokkeerd is door uw post verwijder dan de brieven uit de brievenbusgleuf Vervoer en opslag Maak het apparaat schoon voordat u het opbergt Vervoer het apparaat in de originele verpakking Bewa...

Страница 4: ...fdbehuizing Afbeelding 3 pos 3 in de doorvoer Afbeelding 3 pos 4 2 Zorg dat alleen het handvat Afbeelding 3 pos 2 uit de brievenbus steekt Afbeelding 3 pos 1 Afbeelding 3 Brievenbusklep naar buiten 1 Plaats de hoofdbehuizing Afbeelding 4 pos 3 in de doorvoer Afbeelding 4 pos 4 2 Zorg dat de hoofdbehuizing Afbeelding 4 pos 3 uit de brievenbus steekt Afbeelding 4 pos 2 zodat de brievenbusklep Afbeel...

Страница 5: ...de doorvoer met de schroeven Afbeelding 6 pos 2 Gebruik hiervoor een kruiskopschroevendraaier Afbeelding 6 pos 1 Afbeelding 6 Installatie LET OP Alleen geschikt voor mobiele airconditioners met een koelvermogen tot 14 000 BTU 4 100 watt LET OP Alleen geschikt voor een airconditioningslang met een diameter van 150 mm Er kunnen twee verschillende airconditioningslangen aan de Way out worden bevestig...

Страница 6: ...e airconditioningslang Afbeelding 7 pos 1 in de hoofdbehuizing Afbeelding 7 pos 2 Afbeelding 7 Draaisysteem 1 Plaats de airconditioningslang Afbeelding 8 pos 1 in de hoofdbehuizing Afbeelding 8 pos 2 en draai vast Afbeelding 8 ...

Страница 7: ...oog en duw een brief max 5 mm door de sleuf van de brievenbus Afbeelding 9 pos 2 Afbeelding 9 Verwijdering Gooi het apparaat aan het einde van de levensduur weg volgens de plaatselijke wetten en voorschriften of lever het apparaat in bij uw leverancier ...

Страница 8: ...nual has been compiled with the utmost care Nevertheless we reserve the right to improve and adjust this manual at any time The images used may differ The following symbol and term are used in this manual to alert the reader on safety issues and important information CAUTION Indicates a hazardous situation which if the safety instructions are not followed can lead to light and or moderate damage t...

Страница 9: ... conditioning hose 150 mm Figure 1 CAUTION Always ensure that an unhindered flow of warm air is allowed out Make sure that the air outlet Figure 1 pos 5 is never blocked If the mailbox slot Figure 1 pos 4 is partially blocked by mail remove the mail from the mailbox slot Transport and storage Clean the device before storing it Transport the device in its original packaging Store the device in its ...

Страница 10: ...ert the main body Figure 3 pos 3 into the transit Figure 3 pos 4 2 Make sure only the handle Figure 3 pos 2 is sticking out from the mailbox Figure 3 pos 1 Figure 3 Mailbox flap outwards 1 Insert the main body Figure 4 pos 3 into the transit Figure 4 pos 4 2 Make sure the main body Figure 4 pos 3 is sticking out from the mailbox Figure 4 pos 2 so that the mailbox flap Figure 4 pos 1 stays open and...

Страница 11: ... and transit with the screws Figure 6 pos 2 using a Philips screwdriver Figure 6 pos 1 Figure 6 Installation CAUTION Only suitable for mobile air conditioning systems with a cooling capacity of up to 14 000 BTU 4 100 watts CAUTION Only suitable for an air conditioning hose with a diameter of 150 mm Two different air conditioning hoses can be installed to the Way out With a click system for a hose ...

Страница 12: ... 1 Insert the air conditioning hose Figure 7 pos 1 into in the main body Figure 7 pos 2 Figure 7 Rotating system 1 Insert the air conditioning hose Figure 8 pos 1 into the main body Figure 8 pos 2 and tighten Figure 8 ...

Страница 13: ...e Figure 9 pos 1 upwards and push a letter max 5 mm through the mailbox slot Figure 9 pos 2 Figure 9 Disposal At its end of life discard the device according to the local laws and regulations or deliver the device to your supplier ...

Страница 14: ...den Das Handbuch wurde mit größter Sorgfalt erstellt Wir behalten uns jedoch das Recht vor das Handbuch jederzeit zu verbessern und anzupassen Die verwendeten Bilder können abweichen Die folgenden Symbole und Begriffe werden in diesem Handbuch verwendet um den Leser auf Sicherheitsfragen und wichtige Informationen aufmerksam zu machen VORSICHT Weist auf eine gefährliche Situation hin die wenn die ...

Страница 15: ...ngehinderter Warmluftstrom austritt Stellen Sie sicher dass der Luftauslass Abbildung 1 Pos 5 zu keiner Zeit blockiert ist Falls der Briefkastenschlitz Abbildung 1 Pos 4 teilweise durch Post blockiert ist entfernen Sie dann die Post aus dem Briefkastenschlitz Transport und Lagerung Reinigen Sie das Gerät bevor Sie es aufbewahren Transportieren Sie das Gerät in der Originalverpackung Bewahren Sie d...

Страница 16: ... den Hauptkörper Abbildung 3 Pos 3 in den Durchgang ein Abbildung 3 Pos 4 2 Stellen Sie sicher dass nur der Griff Abbildung 3 Pos 2 aus dem Briefkasten herausragt Abbildung 3 Pos 1 Abbildung 3 Briefkastenklappe nach außen 1 Führen Sie den Hauptkörper Abbildung 4 Pos 3 in den Durchgang ein Abbildung 4 Pos 4 2 Stellen Sie sicher dass der Hauptkörper Abbildung 4 Pos 3 aus dem Briefkasten herausragt A...

Страница 17: ...ptkörper und den Durchgang mit den Schrauben Abbildung 6 Pos 2 mithilfe eines Phillips Kreuzschlitzschraubendrehers Abbildung 6 Pos 1 Abbildung 6 Installation VORSICHT Nur für mobile Klimaanlagen mit einer Kühlleistung von bis zu 14 000 BTU 4 100 Watt geeignet VORSICHT Nur für einen Klimaanlagenschlauch mit einem Durchmesser von 150 mm geeignet Am Way out können zwei verschiedene Klimaanlagenschlä...

Страница 18: ...anlagenschlauch Abbildung 7 Pos 1 in den Hauptkörper ein Abbildung 7 Pos 2 Abbildung 7 Rotierendes System 1 Führen Sie den Klimaanlagenschlauch Abbildung 8 Pos 1 in den Hauptkörper ein Abbildung 8 Pos 2 und ziehen Sie ihn fest Abbildung 8 ...

Страница 19: ... oben und schieben Sie einen Brief max 5 mm durch den Briefkastenschlitz Abbildung 9 Pos 2 Abbildung 9 Abfallentsorgung Entsorgen Sie das Gerät am Ende seiner Lebensdauer gemäß den örtlichen Gesetzen und Vorschriften oder liefern Sie es an Ihren Lieferanten ...

Страница 20: ...nd soin Nous nous réservons néanmoins le droit d améliorer et d adapter ce manuel à tout moment Les images utilisées peuvent être différentes de l appareil lui même Les symboles et termes suivants sont utilisés dans ce manuel pour attirer l attention du lecteur sur les aspects de la sécurité et diverses informations importantes ATTENTION Indique une situation dangereuse qui peut entraîner des domm...

Страница 21: ... 7 Tuyau de climatisation 150 mm Figure 1 ATTENTION Veillez toujours à ce que l air chaud puisse s échapper sans entrave Veillez à ce que la sortie d air Figure 1 pos 5 ne soit jamais bloquée Si la fente de la boîte aux lettres Figure 1 pos 4 est partiellement bloquée par du courrier retirez le courrier de la fente de la boîte aux lettres Transport et rangement Nettoyez l appareil avant de le rang...

Страница 22: ...gure 3 pos 3 dans le dispositif de transfert Figure 3 pos 4 2 Assurez vous que seule la poignée Figure 3 pos 2 dépasse de la boîte aux lettres Figure 3 pos 1 Figure 3 Boîte aux lettres avec rabat extérieur 1 Insérez la partie principale Figure 4 pos 3 dans le dispositif de transfert Figure 4 pos 4 2 Assurez vous que la partie principale Figure 4 pos 3 dépasse de la boîte aux lettres Figure 4 pos 2...

Страница 23: ... dispositif de transfert avec les vis Figure 6 pos 2 en utilisant un tournevis Phillips Figure 6 pos 1 Figure 6 Installation ATTENTION Convient uniquement à des systèmes de climatisation mobiles avec une capacité de refroidissement de maximum 14 000 BTU 4 100 watts ATTENTION Convient uniquement à un tuyau de climatisation d un diamètre de 150 mm Deux tuyaux de climatisation différents peuvent être...

Страница 24: ...sérez le tuyau de climatisation Figure 7 pos 1 dans la partie principale Figure 7 pos 2 Figure 7 Système à rotation 1 Insérez le tuyau de climatisation Figure 8 pos 1 dans la partie principale Figure 8 pos 2 et serrez Figure 8 ...

Страница 25: ... 1 et poussez une lettre maximum 5 mm à travers la fente de la boîte aux lettres Figure 9 pos 2 Figure 9 Élimination En fin de vie mettez l appareil au rebut conformément aux lois et réglementations locales ou confiez l appareil à votre fournisseur ...

Страница 26: ...26 ...

Страница 27: ...27 ...

Страница 28: ...28 Kokosstraat 20 8281 JC Genemuiden The Netherlands T 31 038 385 43 21 E info eurom nl I www eurom nl Model Way out Date 02 06 2021 Product code 380965 Version v3 0 ...

Отзывы: