background image

Page 

1 of 6

EPSON


P

RODUCT 

S

UPPORT 

B

ULLETIN

Date:

4/30/2003

Originator:

DS

PSB #:

PSB.2003.05.005

Authorization:

Reference:

N/A

Total Pages:

6

Product(s):

EpsonNet 802.11b Wireless Print Server

Subject:

OS X Procedure for Updating the Firmware

This bulletin was created to inform you of the procedural steps used to update the EpsonNet
802.11b Wireless Print Server firmware using the OS X Terminal Utility.

Procedure:

1.) Configure the Macintosh and the EpsonNet 802.11b Wireless Print Server for TCP/IP.

2.) Download/copy the “WLEP399.bin” firmware file to the Desktop.

3.) Navigate to Macintosh HD>Applications>Utilities>Terminal, and launch the Terminal

Utility program.

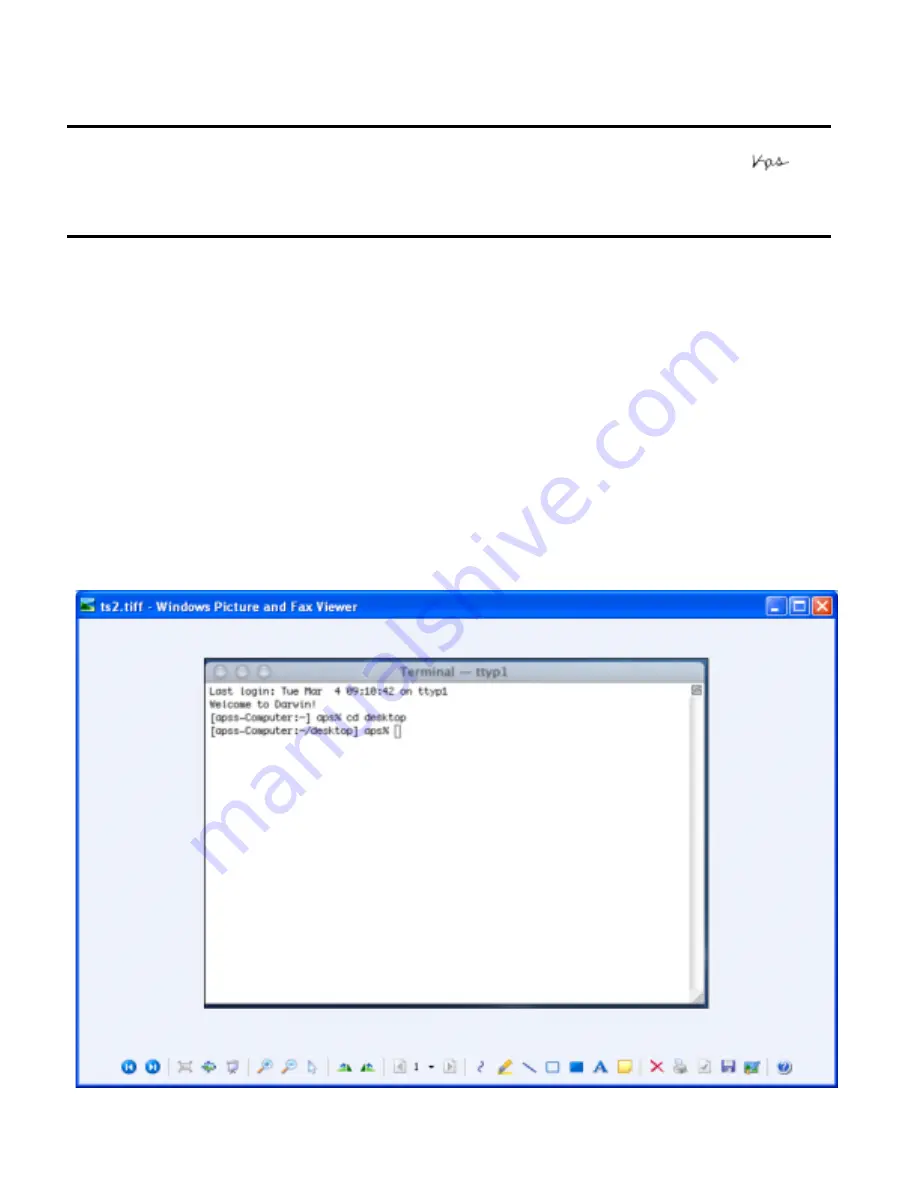
4.) At the Terminal program screen do the following:

Type cd desktop, press RETURN

Summary of Contents for EpsonNet 802.11b

Page 1: ...form you of the procedural steps used to update the EpsonNet 802 11b Wireless Print Server firmware using the OS X Terminal Utility Procedure 1 Configure the Macintosh and the EpsonNet 802 11b Wireless Print Server for TCP IP 2 Download copy the WLEP399 bin firmware file to the Desktop 3 Navigate to Macintosh HD Applications Utilities Terminal and launch the Terminal Utility program 4 At the Termi...

Page 2: ...Page 2 of 6 TYPE tftp enter the IP address of the print server then press RETURN Example tftp 139 63 2 150 then press the RETURN key ...

Page 3: ...Page 3 of 6 At the tftp prompt type the word binary then press RETURN Example tftp binary then press the RETURN key ...

Page 4: ...Page 4 of 6 At the tftp prompt type put WLEP399 bin file name then press RETURN Example tftp put WLEP399 bin then press the RETURN key ...

Page 5: ...r TCP IP settings Cycle the power of the print server Run WP Admin click CLEAR then click START Check the TCP IP settings in the Configuration page of the print server save the settings then Quit Rerun step 4 5 Next go to the print server and perform a reset then launch WP Admin again to setup the print server 6 At WP Admin in the search screen click on CLEAR first then click on START for the prin...

Page 6: ... configuration page and confirm the settings are correct change if necessary 8 Print the Configuration page Click on the WP Admin drop down menu at the top of the page and select TEST PAGE or PRINT 9 Save then Quit WP Admin ...

Page 7: ...Point Base station CONFIGURATION menu is the type of WEP key Open or Shared Key Type If The Epson Wireless Print Servers firmware is version 3 91 or earlier the print server defaults to Open and with no selection for Shared key type Some Base Stations Proxim for example default to Shared key type other manufacturers may also and would need to be set to OPEN key type Refer to the documentation for ...

Page 8: ... section down click and select WEP 64BITs or 128BITs from the drop down button box 3 Enter the encryption value in the 64Bit Key 1 box for example 3132333435 or the 128bit Key 1 box for example 31323334350000000000000000 Important Note If you forget to enter a value into the Key box and click OK to save the settings you will not have any communications with the print server To recover from this go...

Page 9: ...TEWAY tab in the TCP IP PROPERTIES box o In the NEW GATEWAY box enter the appropriate IP ADDRESS for your network gateway o Example Gateway IP 192 168 0 1 1 for the Access Point Click the ADD button Click OK button In the lower right of the Taskbar click the WIRELESS icon o Click Advanced Configuration from the menu that appears o Click the Configuration tab o In the Configuration screen verify or...

Page 10: ...xample Key 1 31 32 33 34 35 00 00 00 00 00 00 00 00 WEP Authentication Open System Choose this Shared Key Click SAVE On the next screen click FINISHED 7 Close the browser 8 Go to the property settings of the Computer s Adapter Card Right click NETWORK Icon Click PROPERTIES Highlight the WIRELESS ADAPTER setting Click PROPERTIES button Select ENCRYPTION Tab o Encryption WEP click on the drop down b...

Page 11: ...click and expand the EPSON_LPR printer icon Next Screen o Browse and highlight the IP address PRINTER ICON symbol o Click OK Next Screen o On ADD PORT box click OK On EPSON STYLUS C80 SERIERS PROPERTIES BOX click Apply Epson Stylus C80 Series box Click GENERAL tab o Click the PRINT TEST PAGE button Next Screen o If the test page printed click Yes Click OK 2 Verify the print out 3 Close the Epson S...

Page 12: ... being input by the computer user Note 2 The status lights on the printer server will turn off during the entry of the WEP code in step 7 and remain off until the AirPort Base Station is re linked by the UPDATE function in step 10 and 11 below Requirements You will need to have the Macintosh computer and the Epson C80WN printer configured and operational in Infrastructure mode AirPort Utility Open...

Page 13: ...econds From the status sheet verify that the settings just entered were retained If you try to do another server search the unit will not be found because the WEP key has been enabled and the server is now transparent This is normal The server will be available and visible when the notebook has been setup with the same WEP key and the AirPort session re linked Airport Admin Utility 9 Start the Air...

Page 14: ...333435 Open WP Admin and verify that you can access the configuration page of the print server and check the settings Do not change any settings Click the CANCEL button The previous page will show again click the QUIT button Text Editor Open the text editor enter some test text and then send a print request to the Stylus C80WN printer With a good WEP link you will see a blue white horizontal barbe...

Page 15: ...CONFIGURATION menu is the type of WEP key Open or Shared Key Type If The Epson Wireless Print Servers firmware is version 3 91 or earlier the print server defaults to Open with no selection for Shared key type Some Access Points Proxim for example default to Shared key type other manufacturers may also and would need to be set to Open key type Refer to the documentation for your Access Point hardw...

Page 16: ...ION screen appears go to the WEP KEY section down click and select WEP 64BITs or 128BITs from the drop down button box 1 Enter the encryption value in the 64Bit Key 1 box for example 3132333435 or the 128bit Key 1 box for example 31323334350000000000000000 Important Note If you forget to enter a value into the Key box and click OK to save the settings you will not have any communications with the ...

Page 17: ... TCP IP PROPERTIES box Click on USE THE FOLLOWING IP ADDRESS bullet o Enter the IP address Example IP Address 192 168 0 5 5 for the computer Tab Subnet Mask 255 255 255 0 Subnet was entered automatically Tab Gateway IP 192 168 0 1 1 for the Access Point Click OK button to close the INTERNET PROTOCOL TCP IP PROPERTIES box Click on WIRELESS NETWORKS tab Remove check mark from USE WINDOWS TO CONFIGUR...

Page 18: ...0 Go the property settings of the computer s wireless adapter card On lower right Taskbar right click WIRELESS Icon Click ADVANCED CONFIGURATION Select ENCRYPTION Tab o Encryption WEP click on the drop down button and select 64 bit or 128 bit o Click CREATE KEYS MANUALLY bullet o Type in 3132333435 or 31322234350000000000000000 Click on APPLY button Click OK button to close the WIRELESS box 11 Reb...

Page 19: ...ally when entering the TCP IP address o Click the NEXT button o The Completing the Add Printer Port box will appear o Click the FINISH Button o At the PRINTER PORTS box click the CLOSE button o Click Apply o In the Epson Stylus C80 Series box click the GENERAL tab o Click the PRINT TEST PAGE button o If the test page printed click OK 3 Verify the print out 4 Close the Epson Stylus C80 Series Prope...

Page 20: ...CONFIGURATION menu is the type of WEP key Open or Shared Key Type If The Epson Wireless Print Servers firmware is version 3 91 or earlier the print server defaults to Open with no selection for Shared key type Some Access Points Proxim for example default to Shared key type other manufacturers may also and would need to be set to Open key type Refer to the documentation for your Access Point hardw...

Page 21: ...earch window and click the CONFIGURE button When the PASSWORD box shows on screen click OK without entering a password to continue When the CONFIGURATION screen appears go to the WEP KEY section down click and select WEP 64BITs or 128BITs from the drop down button box 1 Enter the encryption value in the 64Bit Key 1 box for example 3132333435 or the 128bit Key 1 box for example 31323334350000000000...

Page 22: ...s also a DHCP Server skip this step and go to step 2 1 Change the TCP IP settings on the wireless notebook computer Adapter Card to the address of the Access Point for this test a Proxim Wireless Gateway was used Example 192 168 0 1 Right click the NETWORK Icon o Click PROPERTIES Highlight the Network Connection WIRELESS LAN CONNECTION o Right Click WIRELESS LAN CONNECTION o Click PROPERTIES o Dow...

Page 23: ... key 6 Find the Wireless Configuration page for the Access Point and set as follows Navigate to the CONFIGURE section for the Wireless Setup and set the WEP Encryption type and value in the WEP Data Privacy section to match the settings of the print server For Example 64 Bit Encryption using this key table for Key 1 31 32 33 34 35 or 128 Bit Encryption using this key table for Key 1 31 32 33 34 35...

Page 24: ...Add Standard TCP IP Port Wizard box o Type the Printer Name or IP Address Enter the TCP IP address Port Name IP_xxx xxx xxx xxx The TCP IP address is filled in automatically when entering the TCP IP address Click the NEXT button Click the FINISH button in the Completing the Add Printer Port box Click the CLOSE button in the PRINTER PORTS box Click the APPLY button Click the GENERAL tab in the Epso...

Page 25: ...tation CONFIGURATION menu is the type of WEP key Open or Shared Key Type If The Epson Wireless Print Servers firmware is version 3 91 or earlier the print server defaults to Open and with no selection for Shared key type Some Base Stations Proxim for example default to Shared key type other manufacturers may also and would need to be set to OPEN key type Refer to the documentation for your Access ...

Page 26: ...ck OK without entering a password to continue When the CONFIGURATION screen appears go to the WEP KEY section down click and select WEP 64BITs or 128BITs from the drop down button box 3 Enter the encryption value in the 64Bit Key 1 box for example 3132333435 or the 128bit Key 1 box for example 31323334350000000000000000 Important Note If you forget to enter a value into the Key box and click OK to...

Page 27: ...IP WIRELESS LAN CARD Click Properties button for the next screen In the TCP IP PROPERTIES box select the IP ADDRESS tab Click on SPECIFY AN IP ADDRESS bullet o Enter the appropriate IP ADDRESS values for your network o Example IP Address 192 168 0 5 5 for the computer Tab between periods o Subnet Mask 255 255 255 0 Tab between periods Next click on the GATEWAY tab in the TCP IP PROPERTIES box o In...

Page 28: ...ver 64 Bit Encryption using a key table like this example Key 1 31 32 33 34 35 or 128 Bit Encryption using a key table like this example Key 1 31 32 33 34 35 00 00 00 00 00 00 00 00 WEP Authentication Open System Choose this Shared Key Click SAVE On the next screen click FINISHED 7 Close the browser 8 Go to the property settings of the Computer s Adapter Card Right click NETWORK Icon Click PROPERT...

Page 29: ...Double click and expand the EPSON_LPR printer icon Next Screen o Browse and highlight the IP address PRINTER ICON symbol o Click OK Next Screen o On ADD PORT box click OK On EPSON STYLUS C80 SERIERS PROPERTIES BOX click Apply Epson Stylus C80 Series box Click GENERAL tab o Click the PRINT TEST PAGE button Next Screen o If the test page printed click Yes Click OK 2 Verify the print out 3 Close the ...

Page 30: ... twenty six digit for 128 bit WEP key in hexadecimal format If it only allows a password or pass phrase it will normally be 5 digits for 40 bit or 64 bit WEP or thirteen digit for 128 bit WEP If this is the case you can use the following table to determine what WEP key to use for your wireless print server HEX ASCII HEX ASCII HEX ASCII HEX ASCII 30 0 48 H 59 Y 70 p 31 1 49 I 60 Z 71 q 32 2 4A J 61...

Reviews: