

69052-Daley-FL 20160815
Endon Lighting, LS9 0SE
Daley Floor Light
Safety Warnings
INSTRUCTION MANUAL
•
This product is only suitable for connection to a 240V~50Hz supply in accordance with current IEE wiring
regulations. It is for indoor use only, and not suitable for a bathroom location.
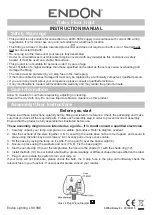
• This fitting is a Class II, Double Insulated product
and does not require an Earth. Live or Neutral
must
not
be connected to Earth.
•
Do not plug into the mains until your lamp is fully assembled.
•
Under no circumstances must this table lamp be covered with any material as this could pose a safety
hazard. It must be used on a stable, flat surface.
•
This product is not suitable for persons under 14 years of age.
• Never fit bulbs of a higher wattage than those specified on the label as these may cause overheating and
damage the fitting.
•
The lamp must be protected by a 3 amp fuse in the mains plug.
• If the mains cable becomes damaged it must only be replaced by a technically competent, qualified person.
• If you are in any doubt about your competence please consult a qualified electrician.
• If any modification is made it will invalidate the warranty and may render the product unsafe.
Assembly/ User Instructions
Before you start
Please read these instructions carefully before fitting and retain for reference. Check the packaging and make
sure that you have all the required parts. Follow each assembly step in order to prevent incorrect assembly.
Ensure that the product is fully assembled as illustrated before use.
These assembly diagrams are intended as a guide – if in doubt consult a qualified electrician.
Care Information
Allow 10 minutes to cool before replacing, adjusting or cleaning.
Clean with a dry cloth only. Do not use liquid or abrasive cleaners on this product.
1.
Carefully unpack your lamp, and place on a stable, flat surface. Refer to diagram overleaf.
2. Slot the sections of the stem together (1 & 3) ensuring the cable does not become trapped, and secure in
place using the Allen key and screws (2 & 4). Gently pull out any excess cable.
3. Fit the base by laying the lamp on it’s side. Fit the pan (5) over the base weight (6).
4.
Secure in place using the washers and nuts (7 & 8). Fix the base pad (9).
5. Slot the candle drip (10) over the lampholder, then secure the shade (11) with the shade ring (12).
6.
Install the Bulb (13). Do not install a bulb with a greater wattage or different shape than specified on the label.
7. Plug in, and operate the switch to turn your lamp on.
If your lamp will not illuminate, please check the bulb, the 3 amp fuse in the plug and ultimately check the
relevant fuse in your fuse box. If unsuccessful please consult your retailer.
Class II Plug Wiring Diagram