

4i Edge 112
Quick Start
www.endian.com
What You Have and What You Need
With your 4i Edge box you receive:
• 4i Edge 112
• 2 pin terminal block for power input
To install your 4i Edge 112 and protect your network you need:
• 24V DC power socket or DC power jack
• Ethernet switch (connected to your network)
• DIN rails (optional)
• Maximum surrounding air temperature 60 °C
Hardware Installation
1. Place your 4i Edge 112 on a steady surface or attach it to the DIN rail
2. Connect the LAN port of your 4i Edge 112 to your switch using a standard
patch cable (or a crossover patch cable for a direct connection to the Ether-
net interface of your PC)
Warning! The default IP address of the unit ’s GREEN interface is
192.168.0.15. Make sure there is no other machine with this address in
your network; should you have such a machine, turn it off or disconnect it
from the switch during the installation and initial configuration of the unit.
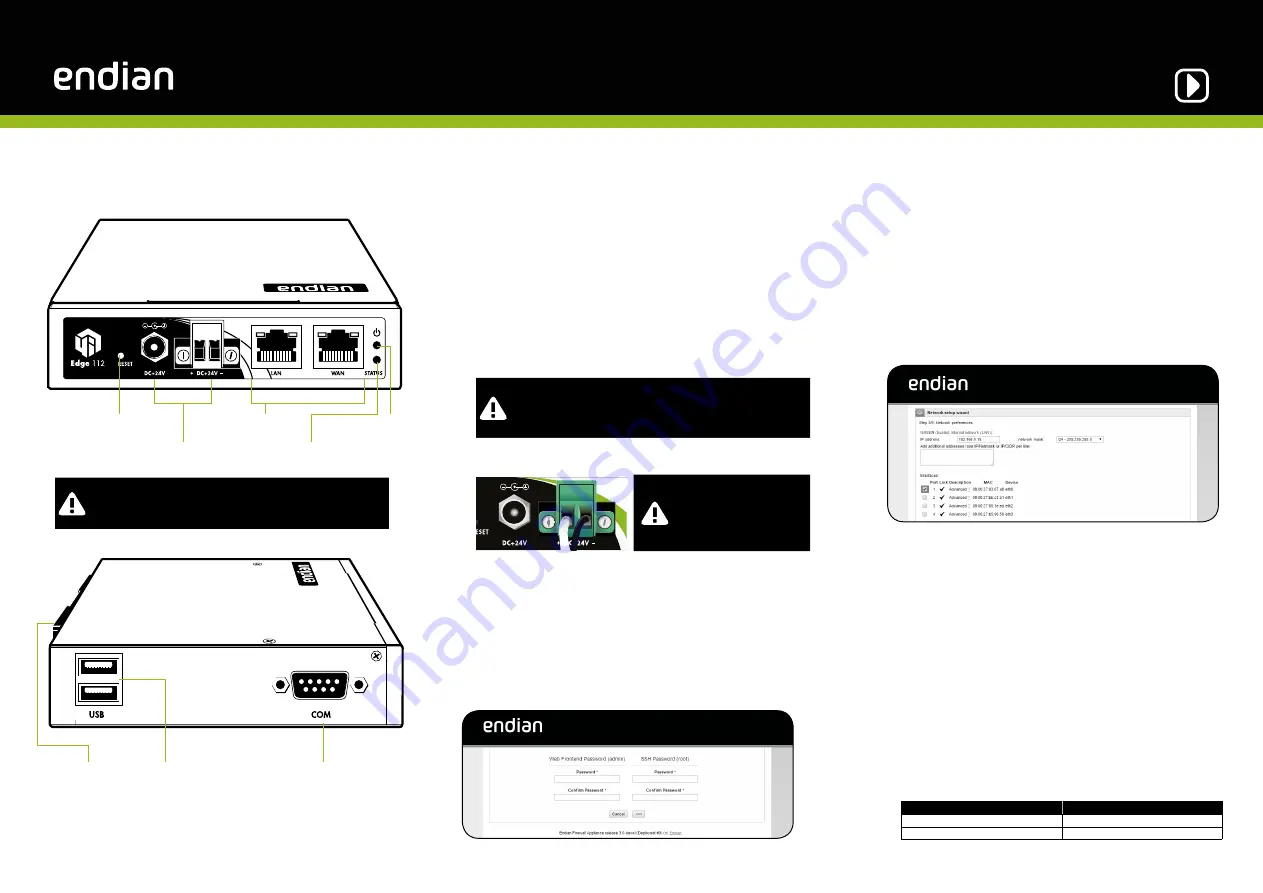
3. Connect the DC power socket to the unit. The front view of the terminal block
connector is shown here.
Terminal Block: 105°C suitable
for 12-30AWG wire size,torque
value 5-7 lb-in.
Web Interface
1. Configure your PC Ethernet interface with an IP address belonging to the
192.168.0.0/24
subnet that is different from
192.168.0.15
(Endian IP
address)
2. Open your Internet browser (e.g. Mozilla Firefox) and go to address
192.168.0.15
• The system will redirect you to
https://192.168.0.15:10443/
and ask you
for your preferred language and your time zone. After that you need to
accept the license agreement.
• The system will now ask you to choose 2 passwords (admin for web
interface and root for console).
Choose Your Internet Connection Mode
Now it is time to configure your Internet connection:
1. Choose your network mode
• Routed: if you want to use the appliance as router in your network
• Bridged: if you want your appliance to act transparently with-
out having to change the existing network infrastructure
• No uplink: if the appliance should not act as a router but
require clients to address it directly
2. When choosing routed mode the uplink type must be specified:
• Ethernet static
• Ethernet DHCP
• PPPoE
• Analog/UMTS modem
Network Settings
1. Every network “area” is assigned to a color:
• GREEN
local network (LAN). This is the safe area where your
trusted computers are.
• RED
external network (WAN). Usually this is the interface connect-
ed to the Internet.
• BLUE
wireless network. It is suggested to place the computers that
use wireless connections in this area. This kind of network is usually
not as safe as a wired one.
• ORANGE
network for servers connected to the Internet (DMZ).
It is meant for systems that have to provide services to external
networks. This way, even if the security of one of these servers has
been compromised, the GREEN area will remain safe.
2. You can configure the appliance’s Ethernet ports to your liking by
assigning them to the respective zones. Follow all the wizard steps to
configure the appliance and protect your network.
This is how the Ethernet ports are mapped to device names in the
setup wizard:
Ethernet port
Wizard device name
LAN
eth0
WAN
eth1
24V Power Input
Ethernet Ports
Reset Switch
Status LED
Power LED
For use in Pollution Degree 2 Environment.
CAUTION: FOR USE IN A CONTROLLED ENVIRONMENT.
ATTENTION: EN CAS D’UTILISATION EN ATMOSPHÈRE CONTROLÉE.
USB Ports
COM Port
Rail Mounting


