background image

Precautions

Functions

Setup

Inf

ormation

Español

If you need additional operating assistance after

reading this owner’s manual, please call  

TOLL FREE : 1-800-256-2487

or visit our web site at http://www.EmersonAudioVideo.com

Precautions

Laser Safety . . . . . . . . . . . . . . . . . . . . . . . . . . . . . . . . . 2

■ 

Important Safeguards . . . . . . . . . . . . . . . . . . . . . . . . . 3

Supplied Accessory . . . . . . . . . . . . . . . . . . . . . . . . . . . . 4
Installation Location . . . . . . . . . . . . . . . . . . . . . . . . . . . . 4
About Copyright. . . . . . . . . . . . . . . . . . . . . . . . . . . . . . . 4
Avoid the Hazards of Electrical Shock and Fire . . . . . . . 4
Moisture Condensation Warning . . . . . . . . . . . . . . . . . . 4
Symbols Used in This Manual . . . . . . . . . . . . . . . . . . . . 4
Maintenance . . . . . . . . . . . . . . . . . . . . . . . . . . . . . . . . . 4

■ 

About the Discs . . . . . . . . . . . . . . . . . . . . . . . . . . . . . . 5

Playable Discs . . . . . . . . . . . . . . . . . . . . . . . . . . . . . . . . 5
Unplayable Discs . . . . . . . . . . . . . . . . . . . . . . . . . . . . . . 5

Setup

■ 

Connections . . . . . . . . . . . . . . . . . . . . . . . . . . . . . . . . 6

Connection to a TV . . . . . . . . . . . . . . . . . . . . . . . . . . . . 6
RF Modulator Connection . . . . . . . . . . . . . . . . . . . . . . . 6
Connection to an Audio System . . . . . . . . . . . . . . . . . . . 7
Rear Terminals . . . . . . . . . . . . . . . . . . . . . . . . . . . . . . . 7

■ 

About the Remote Control . . . . . . . . . . . . . . . . . . . . . 8

Remote Control . . . . . . . . . . . . . . . . . . . . . . . . . . . . . . . 8
Installing the Batteries for the Remote Control . . . . . . . . 8

Functions

■ 

Playback. . . . . . . . . . . . . . . . . . . . . . . . . . . . . . . . . . . . 9

■ 

MP3/WMA Playback . . . . . . . . . . . . . . . . . . . . . . . . . . 10

■ 

On-Screen Display . . . . . . . . . . . . . . . . . . . . . . . . . . . 10

■ 

Search Function . . . . . . . . . . . . . . . . . . . . . . . . . . . . 11

Track Search . . . . . . . . . . . . . . . . . . . . . . . . . . . . . . . . 11
Title / Chapter Search . . . . . . . . . . . . . . . . . . . . . . . . . 11
Time Search . . . . . . . . . . . . . . . . . . . . . . . . . . . . . . . . 11

■ 

Marker Setup . . . . . . . . . . . . . . . . . . . . . . . . . . . . . . . 11

■ 

Repeat / Random / Programmed Playback . . . . . . . . 12

Repeat Playback . . . . . . . . . . . . . . . . . . . . . . . . . . . . . 12
Repeat A-B Playback. . . . . . . . . . . . . . . . . . . . . . . . . . 12
Random Playback . . . . . . . . . . . . . . . . . . . . . . . . . . . . 12
Programmed Playback . . . . . . . . . . . . . . . . . . . . . . . . . 12

■ 

Special Settings. . . . . . . . . . . . . . . . . . . . . . . . . . . . . 13

Subtitle Language . . . . . . . . . . . . . . . . . . . . . . . . . . . . 13
Audio Language . . . . . . . . . . . . . . . . . . . . . . . . . . . . . 13
Camera Angles . . . . . . . . . . . . . . . . . . . . . . . . . . . . . . 13
Black Level Setting . . . . . . . . . . . . . . . . . . . . . . . . . . . 13
Stereo Sound Mode. . . . . . . . . . . . . . . . . . . . . . . . . . . 13
Virtual Surround . . . . . . . . . . . . . . . . . . . . . . . . . . . . . 13

■ 

DVD Setup . . . . . . . . . . . . . . . . . . . . . . . . . . . . . . . . . 14

LANGUAGE Setting . . . . . . . . . . . . . . . . . . . . . . . . . . . 14
DISPLAY Setting . . . . . . . . . . . . . . . . . . . . . . . . . . . . . 15
AUDIO Setting . . . . . . . . . . . . . . . . . . . . . . . . . . . . . . . 15
PARENTAL Setting . . . . . . . . . . . . . . . . . . . . . . . . . . . 16
OTHERS Setting . . . . . . . . . . . . . . . . . . . . . . . . . . . . . 16
Reset to the Default Setting
(Except for PARENTAL Setting) . . . . . . . . . . . . . . . . . . 17

Information

■ 

Troubleshooting Guide . . . . . . . . . . . . . . . . . . . . . . . 17

■ 

Specifications . . . . . . . . . . . . . . . . . . . . . . . . . . . . . . 18

■ 

Language List . . . . . . . . . . . . . . . . . . . . . . . . . . . . . . 18

■ 

Limited Warranty . . . . . . . . . . . . . . . . . . . . . . . . . . . . 18

Español  . . . . . . . . . . . . . . . . . . . . . . . . . . . . . . . . . . . .19
Quick Use Guide  . . . . . . . . . . . . . . . . . . . . . .Back Cover

Table of Contents

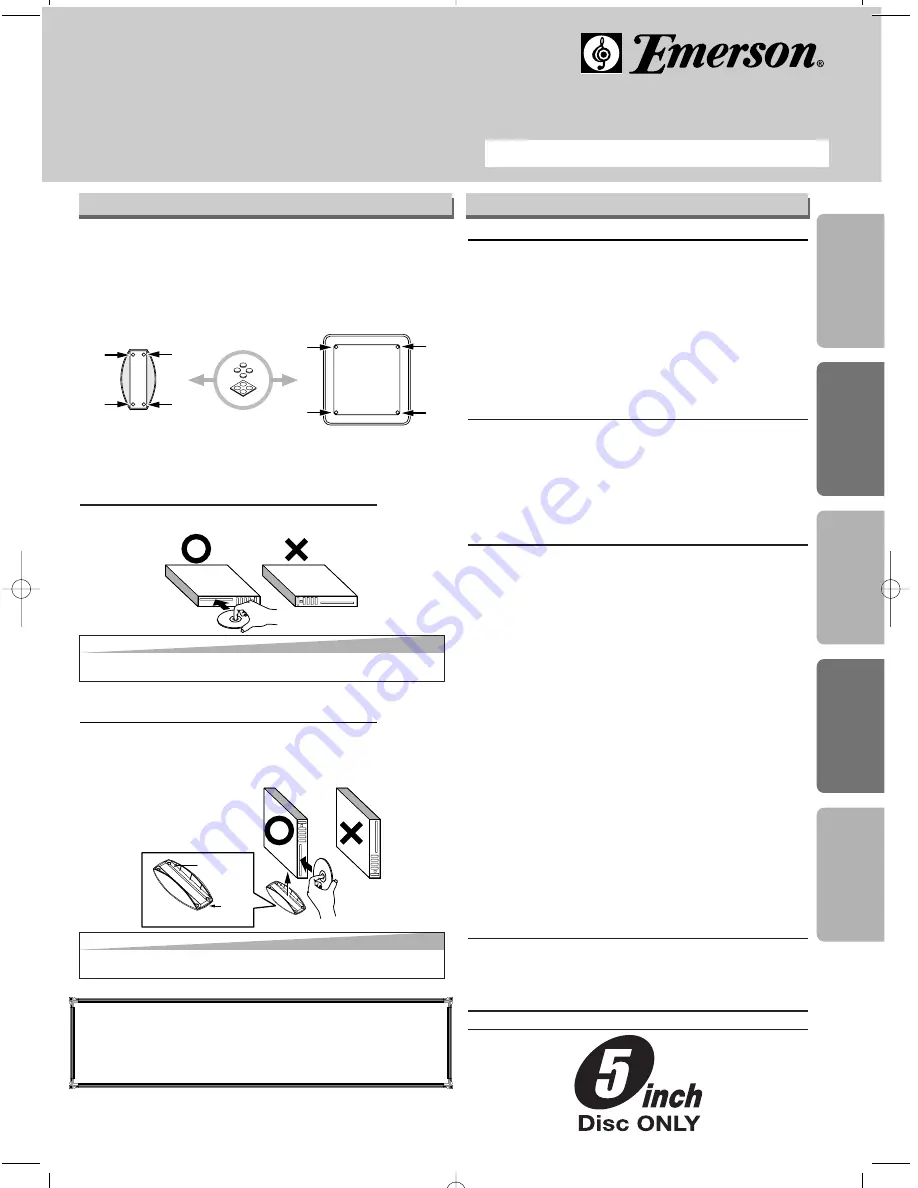
Setting the Main Unit

Catch

Front

label

Stand

label

Bottom of the unit

Foot

(supplied)

Stand

(supplied)

Hint

Hint

Insert a disc with the label facing up.

Hint

Hint

Insert a disc with its label facing to the left.

Vertical installation (standing position):

Place the unit as its dent matches the catch of the
Stand. As you position the unit be sure 

[POWER] 

is

located at the top.

Horizontal installation (laying position):

Place the unit as 

[POWER]

comes on your right.

Owner’s Manual

Please read before using this unit.

DVD/CD Player

EWD71V5SK

INSTRUCCIONES EN ESPAÑOL INCLUIDAS.

EMERSON AND THE G-CLEF LOGO ARE
REGISTERED TRADEMARKS OF 
EMERSON RADIO CORP., PARSIPPANY,
NEW JERSEY, U.S.A.

You can install this unit horizontally or vertically.
Attach the Foot to the bottom of the unit 
(for Horizontal installation) or bottom of the Stand
(for Vertical installation).

E61S6UD_ENSP.qx33  05.7.5  11:07 AM  Page 1

Summary of Contents for EWD71V5SK

Page 1: ...Language 13 Camera Angles 13 Black Level Setting 13 Stereo Sound Mode 13 Virtual Surround 13 DVD Setup 14 LANGUAGE Setting 14 DISPLAY Setting 15 AUDIO Setting 15 PARENTAL Setting 16 OTHERS Setting 16 Reset to the Default Setting Except for PARENTAL Setting 17 Information Troubleshooting Guide 17 Specifications 18 Language List 18 Limited Warranty 18 Español 19 Quick Use Guide Back Cover Table of C...

Page 2: ...G This equipment may generate or use radio frequency energy Changes or modifications to this equipment may cause harmful interference unless the modifications are expressly approved in the man ual The user could lose the authority to operate this equipment if an unauthorized change or modification is made CAUTION TO PREVENT ELECTRIC SHOCK MATCH WIDE BLADE OF PLUG TO WIDE SLOT FULLY INSERT ATTENTIO...

Page 3: ... of the polarized plug 13 Power Cord Protection Power supply cords should be routed so that they are not likely to be walked on or pinched by items placed upon or against them paying particular attention to cords at plugs convenience recep tacles and the point where they exit from the product 14 Lightning For added protection for this product during a lightning storm or when it is left unattended ...

Page 4: ...ild deter gent solution Do not use a solution containing alco hol spirits ammonia or abrasive CLEANING DISCS When a disc becomes dirty clean it with a cleaning cloth Wipe the disc from the center out Do not wipe in a circular motion Do not use solvents such as benzine thinner com mercially available cleaners detergent abrasive cleaning agents or antistatic spray intended for ana log records CLEANI...

Page 5: ... 16 inches 55 mm across it may not play back properly 10 Do not glue paper or put stickers on to the disc These may damage the disc and the unit may not read it correctly Windows Media and the Windows logo are trademarks or registered trademarks of Microsoft Corporation in the United States and or other countries This unit is not compatible with Multiple Bit Rate MBR a file that contains the same ...

Page 6: ...O Sanyo VIDEO Sharp 00 Sony VIDEO1 VIDEO2 VIDEO3 Toshiba TV GAME Zenith 00 RF Modulator Connection If your TV has Antenna in jack only it is still possible to connect this unit to your TV by using a STEREO AUDIO VIDEO RF Modulator commercially available In this case follow the instructions below 1 Connect the AUDIO VIDEO output jacks of this unit to the AUDIO VIDEO input jacks of your RF Modulator...

Page 7: ...2 4 5 1 DIGITAL AUDIO OUT COAXIAL jack Connect an optional coaxial digital audio cable here through the coaxial digital audio in jack of a decoder or audio receiver 2 AUDIO OUT jacks Connect the supplied audio cable red white here through the audio in jacks of a TV or other audio equipment 3 VIDEO OUT jack Connect the supplied video cable yellow here through the TV s video in jack 4 S VIDEO OUT ja...

Page 8: ...MP3 WMA To advance playback one frame at a time To pause disc playback To pause disc playback To stop playback To stop playback To return to the top file of the highest hierarchy in the program and file list MP3 WMA To skip chapters To skip tracks To begin disc playback To begin disc playback To call up the DVD setup menu To call up the DVD setup menu To move the cursor and determine its position ...

Page 9: ...ayback of a two layered disc pic tures may stop for a moment This happens while the 1st layer is being switched to the 2nd layer This is not a malfunction Don t leave the disc exiting halfway from the slot Operations described after this section are mainly based on the remote control use Some operations can be carried out on main unit 1 1 Playback Hint Hint On DVDs set STILL MODE to FIELD in the D...

Page 10: ... ENTER ENTER ENTER When selecting the folder Press B B when you want to go to the next hierarchy Press s s when you want to go back to the previous hierarchy except for the top hier archy MENU MP3 WMA is a method of compressing files You can copy MP3 WMA files on CD R RWs from the computer and play the files on this unit Hint Hint Some selections may take a while to be recognized Press TOP MENU to...

Page 11: ...ess than 10 minutes Press CLEAR to erase the incorrect input at step 2 Hint Hint Depending on the disc being played this function can also be performed by directly entering the desired chapter number with the Number buttons Refer to the manual accompanying the disc For CDs and MP3 WMA Track Search is not available for Programmed or Random Playback Hint Hint The Marker display will disappear in abo...

Page 12: ...during playback Hint Hint Press CLEAR at step 2 to erase the most recently entered track To erase all programmed tracks at once select ALL CLEAR and press ENTER at step 2 While a program is being played back STOP C C works as follows Press STOP C C and PLAY B B next so that the programmed playback restarts CD playback restarts from the current point MP3 WMA playback restarts from the beginning of ...

Page 13: ...an enjoy stereophonic virtual world on your existing 2 channel stereo system WMA WMA WMA MP3 MP3 MP3 CD CD CD DVD V DVD V 2 2 OFF ON Makes the dark areas brighter OFF Shows the original picture as recorded 3 3 RETURN SUBTITLE 2 2 1 1 Natural effect 2 Emphasized effect OFF No effects original sound 3 3 MODE To set subtitle ON OFF 1 ENG 6 2 2 OFF Hint Hint If your language is not shown after press i...

Page 14: ...OFF ON AUDIO DRC ON DOWN SAMPLING ON DOLBY DIGITAL BITSTREAM ENTER DISPLAY TV ASPECT 4 3 LETTER BOX STILL MODE AUTO ENTER ENTER AUDIO ORIGINAL SUBTITLE OFF DISC MENU ENGLISH PLAYER MENU ENGLISH LANGUAGE Select the desired item 1 1 QUICK SETUP PLAYER MENU ENGLISH TV ASPECT 4 3 LETTER BOX DOLBY DIGITAL BITSTREAM ENTER SETUP STOP QUICK SETUP PLAYER MENU ENGLISH TV ASPECT 4 3 LETTER BOX DOLBY DIGITAL ...

Page 15: ...ECT Default 4 3 LETTER BOX See Hint to the right QUICK TV ASPECT 4 3 LETTER BOX 4 3 PAN SCAN 16 9 WIDE TV ASPECT 4 3 LETTERBOX STILL MODE AUTO Select the desired setting or STILL MODE Default AUTO See Hint to the right TV ASPECT 4 3 LETTERBOX STILL MODE AUTO STILL MODE AUTO FIELD FRAME Select the desired setting or 5 5 6 6 To exit the menu SETUP SETUP DRC Dynamic Range Control Default ON Set to ON...

Page 16: ...word except for 4737 or PASSWORD ENTER PARENTAL menu 5 5 OTHERS Setting You can change the other functions Follow steps 1 to 3 in the CUSTOM Menu section on page 14 4 4 Select the desired item E OTHERS menu 6 6 To exit the menu ANGLE ICON Default ON Set to ON to show the angle icon when multiple camera angles are available during DVD playback AUTO POWER OFF Default ON Set to ON to turn this unit o...

Page 17: ...empty AM station so that you hear a lot of noises Then turn the volume up If you hear some signal sound from the radio by pressing buttons on the remote control the remote control is working Buttons do not work or the unit stops To completely reset the unit unplug the AC responding cord from the AC outlet for 5 10 seconds The unit does not respond to some Operations may not be permitted by the dis...

Page 18: ...e is written in bracket Limited Warranty FUNAI CORP will repair this Emerson product free of charge in the USA in the event of defect in materials or workmanship as follows DURATION PARTS FUNAI CORP will provide parts to replace defective parts without charge for one 1 year from the date of original retail purchase Certain parts are excluded from this warranty LABOR FUNAI CORP will provide the lab...

Page 19: ...tivar el nivel del negro Para disponer el orden de reproducción o la reproducción aleatoria Para llamar el Menú en un disco Para llamar el menú inicial en un disco Para volver al archivo superior de la jerarquia más alta en el programa y en la lista de archivo MP3 WMA Para ampliar la imagen de vídeo en DVD x2 x4 Para activar desactivar el ambiental virtual Para activar desactivar el ambiental virt...

Page 20: ...kers To search track To search time CD To set or search the markers CD To clear the markers To cancel the point for A B repeat To cancel the point for A B repeat CD To clear the markers CD To remove status number in program input To clear the numbers entered incorrectly To clear the numbers entered incorrectly To search forward backward through a disc To begin slow forward reverse playback during ...

Reviews: