manualshive.com logo in svg
background image


User’s Manual 


P


P

O

O

S

S

5

5

0

0

A

A

-

-

5

5

B

B

-

-

L

L

X

X

8

8

0

0

0

0


P


P

O

O

S

S

5

5

0

0

A

A

-

-

2

2

B

B

-

-

L

L

X

X

8

8

0

0

0

0


P


P

O

O

S

S

5

5

0

0

A

A

-

-

8

8

B

B

-

-

L

L

X

X

8

8

0

0

0

0


P


P

P

P

C

C

5

5

0

0

A

A

-

-

5

5

B

B

-

-

L

L

X

X

8

8

0

0

0

0


P


P

P

P

C

C

5

5

0

0

A

A

-

-

2

2

B

B

-

-

L

L

X

X

8

8

0

0

0

0


P


P

P

P

C

C

5

5

0

0

A

A

-

-

8

8

B

B

-

-

L

L

X

X

8

8

0

0

0

0


Содержание POS50A-2B-LX800

Страница 1: ...5 5B B L LX X8 80 00 0 P PO OS S5 50 0A A 2 2B B L LX X8 80 00 0 P PO OS S5 50 0A A 8 8B B L LX X8 80 00 0 P PP PC C5 50 0A A 5 5B B L LX X8 80 00 0 P PP PC C5 50 0A A 2 2B B L LX X8 80 00 0 P PP PC C...

Страница 2: ...s and can radiate radio frequency energy and if not installed and used in accordance with the instructions may cause harmful interference to radio communications However there is no guarantee that int...

Страница 3: ...96 EC concerning waste electrical and electronic equipment WEEE The Directive determines the framework for the return and recycling of used appliances as applicable throughout the European Union This...

Страница 4: ...4 LAN Cable 4 Cash Drawer 4 MSR 5 3 3 Adjust View Angle POS 50 series only 6 3 4 Turn on the Device 6 4 Driver and Utility Installation 7 4 1 Before the installation 7 4 2 TouchKit Utility Installati...

Страница 5: ...to Use Event Selector 24 6 I O Definition 25 6 1 Power Connector 25 6 2 Serial Port 25 6 3 PS2 COM 26 6 4 Cash Drawer 26 7 Specification 28 POS50A 5B LX800 28 POS50A 2B LX800 29 POS50A 8B LX800 30 PO...

Страница 6: ...assis 2x USB 2 0 x RS 232 COM 1 2 DB 9 RS 232 Pin 9w RI 5V 12V selectable COM 3 Internal for MSR 10 100 Ethernet port RJ 11 and cash drawer port RJ 11 equipped Microsoft Windows series operation syste...

Страница 7: ...OS50A 2B LX800 POS50A 8B LX800 1 Device X 1 2 Power Adaptor X 1 3 Power Cord X 1 4 Driver and utility CD X 1 PPC50A 5B LX800 PPC50A 2B LX800 PPC50A 8B LX800 1 Device X 1 2 Power Adaptor X 1 3 Power Co...

Страница 8: ...ill glow green when power is on The HDD indicator will blink green when the HDD is accessed The LAN indicator will blink green when transferring data though the LAN Back Panel I O Note For details of...

Страница 9: ...board or USB ODD to USB ports on the back panel of the device LAN Cable Connect one end of RJ 45 LAN cable to the LAN port on the back panel of the device another end to your internet device Cash Draw...

Страница 10: ...Phillips screwdriver 2 Remove the right hinge cover left hinge cover and support cover as shown below 3 Remove the base unit 4 Connect the female connector of the external device to the PS2 COM port...

Страница 11: ...right hinge cover left hinge cover support cover and base unit 3 3 Adjust View Angle POS 50 series only Adjust the device to the proper view angle 3 4 Turn on the Device 1 Make sure all peripherals ar...

Страница 12: ...ndows XP 1 Connect an external USB CDROM drive to the USB port and insert the driver CD and turn on the device The program autoruns and displays the DRIVER BANK screen 2 Click POS50 PPC50 SBOXPC50 Mob...

Страница 13: ...Next go to next screen directly 5 Click Browse to select the start menu folder and then click Next Or you can click Next go to next screen directly 6 This screen displays setting information Click In...

Страница 14: ...low shows after the installation was successful Click OK to complete the installation 4 3 VGA Driver Installation 1 On Desktop right click on the My Computer icon and select Property 2 On the System P...

Страница 15: ...the Video Controller VGA Compatible property sheet select Driver tab and click Update Driver 5 On the welcome screen of Hardware Update Wizard select No not this time and click Next 6 Select Install...

Страница 16: ...elect the location where the driver installed and then click Next The location of the audio driver is D Driver Main Board Driver VGA AMD LX800 XP XPe 8 Click Next 9 After installation completed cluck...

Страница 17: ...1 On Desktop right click on the My Computer icon and select Property 2 On the System Properties property sheet select Hardware tab and click Device Manager 3 On Device Manager double click Multimedia...

Страница 18: ...ware Update Wizard select No not this time and click Next 6 Select Install from a list or specific location Advance and click Next 7 Click Browse to select the location where the driver installed and...

Страница 19: ...8 Click Next 9 After installation completed cluck Finish 4 5 AES Driver Installation 1 On Desktop right click on the My Computer icon and select Property Chapter 4 14...

Страница 20: ...ware tab and click Device Manager 3 On Device Manager double click Entertainment Encryption Description Controller 4 On the Entertainment Encryption Description Controller Properties property sheet se...

Страница 21: ...elect Install from a list or specific location Advance and click Next 7 Click Browse to select the location where the driver installed and then click Next The location of the audio driver is D Driver...

Страница 22: ...9 After installation completed cluck Finish Chapter 4 17...

Страница 23: ...ting dialogue box c Feedback Sound Open the feedback sound setting dialogue box d Power Save Open the power down timer adjustment dialogue box e Calibration Switch to calibration screen f Calibration...

Страница 24: ...ected option will be in black Virtual Button Option Under Virtual Button Option field there are four options Stream Mode Under this mode all mouse button simulation will be disabled Lift off Mode Unde...

Страница 25: ...ner of the screen Automatic Mode Manual Mode Drop down List If the Drag Drop Mode under Virtual Button Option field is select the drop down menu below the Enable On option will be enabled Automatic Mo...

Страница 26: ...value is 0 5 and maximum value is 5 This option defines how long the right button function will be off The minimize value is 0 5 and maximum value is 5 Click the drop down menu to select On or Off to...

Страница 27: ...eep sound will be The minimize value is 10 and maximum value is 50 The selected option will be in black 5 6 Screen Calibration 1 Click the drop menu next to the Calibration button to select calibratio...

Страница 28: ...touch the center of Cross Mark c When the instruction turns into yellow releasing the tapping from the screen d Follow the instruction in green to touch the center of Cross Mark e Repeat Step 2 Step4...

Страница 29: ...ion click No How to Use Event Selector 1 On the desktop of Windows click icon 2 icon change to 3 Now the tapping is simulating right mouse button clicking 4 After one tap on the screen icon change to...

Страница 30: ...ion about all I O ports as followings 6 1 Power Connector PIN Description PIN Description 1 12V 3 GROUND 2 12V 4 GROUND 6 2 Serial Port COM Port 1 2 3 4 PIN Description PIN Description 1 DCD 6 DSR 2 R...

Страница 31: ...Description 1 GND 6 PC_CLK KEYBOARD 11 CTS 2 5V 7 KB_DAT 12 RTS 3 RXD 8 KB_CLK 13 DSR 4 TXD 9 RI 5V 12V 14 DCD 5 PC_DAT KEYBOARD 10 DTR 15 KB_EN 6 4 Cash Drawer Connector PIN Description PIN Descript...

Страница 32: ...Cash Drawer Control Status Address Value Open 280H Bit 4 0 Close 280H Bit 4 1 Read Status 280H Bit 0 0 1 Chapter 7 27...

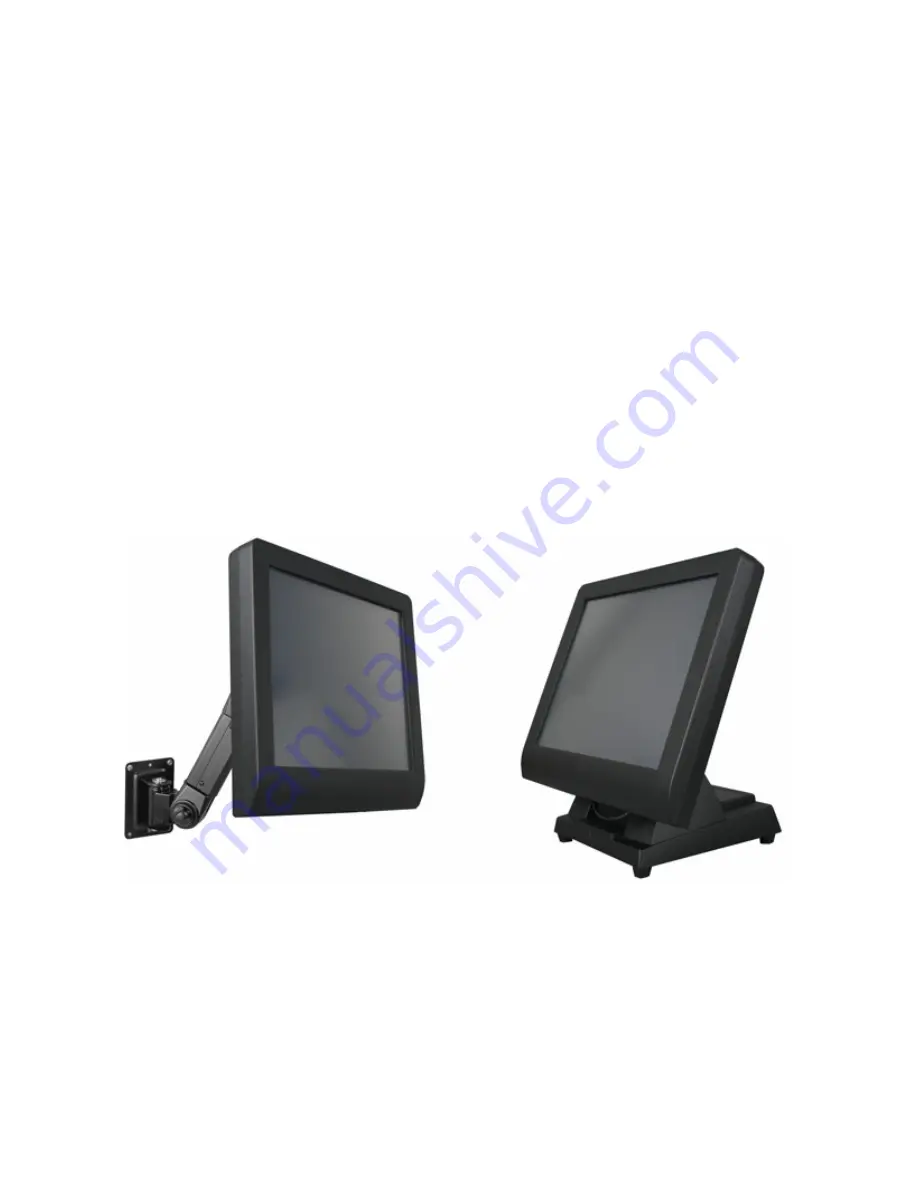
Страница 33: ...7 7 Specification POS50A 5B LX800 Chapter 8 28...

Страница 34: ...POS50A 2B LX800 Chapter 8 29...

Страница 35: ...POS50A 8B LX800 Chapter 8 30...

Страница 36: ...M 1 X IDE 2 0mm 4 HDD 1 x IDE 2 5 Slime Type Not for 8 4 model Compact Flash 1 x Slot Compact Flash Type II I O Ports Serial 3x RS 232 COM 1 2 DB 9 RS 232 Pin 9w RI 5V 12V selectable COM 3 Internal fo...

Страница 37: ...mm 4 HDD 1 x IDE 2 5 Slime Type Not for 8 4 model Compact Flash 1 x Slot Compact Flash Type II I O Ports Serial 3x RS 232 COM 1 2 DB 9 RS 232 Pin 9w RI 5V 12V selectable COM 3 Internal for MSR USB 2 x...

Отзывы: