


Copyright © 2010 Eagle Tree Systems, LLC
http://www.eagletreesystems.com
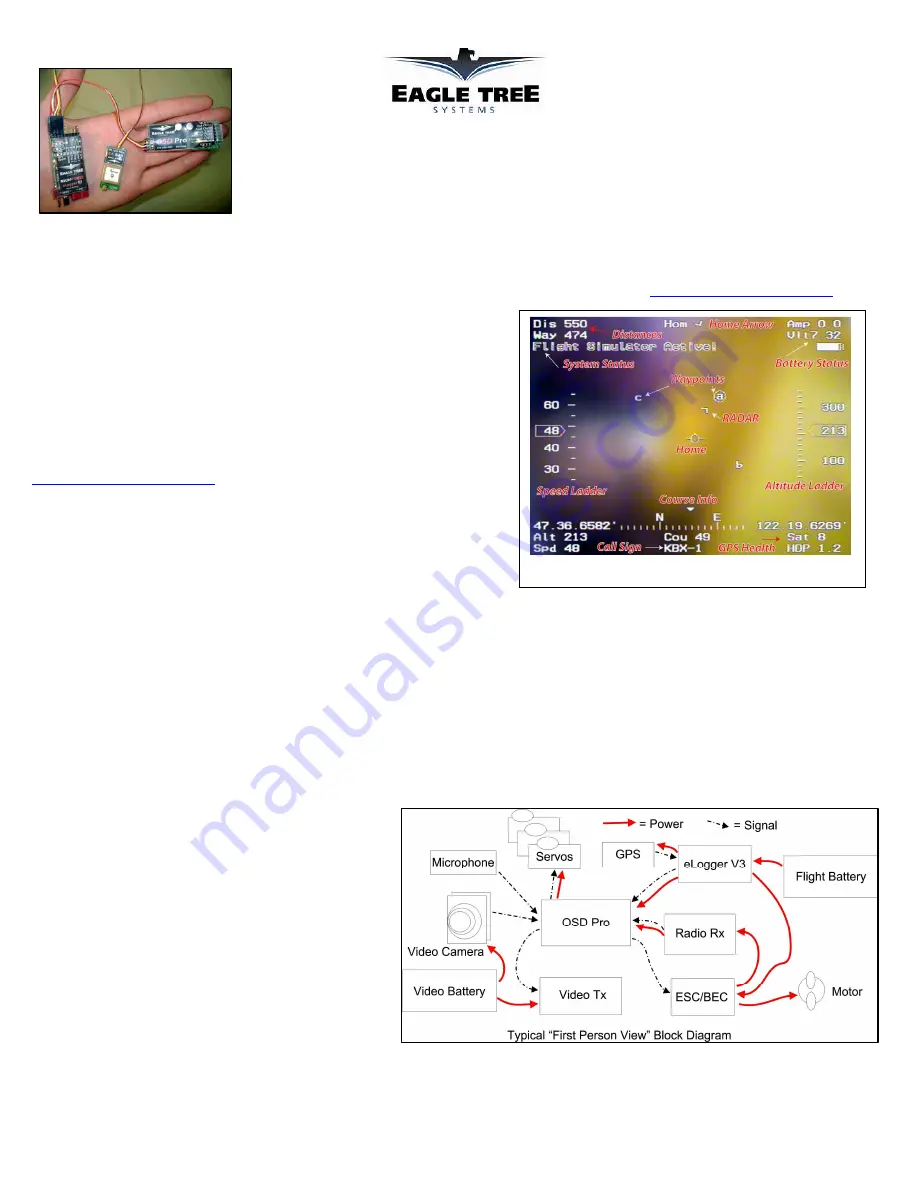
Main Screen
Instruction Manual for OSD Pro Expander
TM
Document Version 3.7
Introduction
Thank you for your purchase! This instruction manual will guide you through the installation and operation of your OSD Pro Expander
TM
(OSD Pro
TM
).
The full color, electronic version of this manual is available in the Product Manuals section of the Support tab on
http://www.eagletreesystems.com
.
The online manual includes any updates that were made after printing. Please read
the entire manual carefully before proceeding.
If, after you read the manual, you have further questions or problems, visit our support
web page for information on how to get answers to your questions, 24 hours a day.
Quick Start Guide
We recommend that most customers start with basic OSD Pro setup, and then proceed
as desired to use more advanced features. A Quick Start Guide, which supplements
this manual, is included with your product. The latest version of the quick start guide
is available in the Product Manuals section of the Support tab on
http://www.eagletreesystems.com
.
Intended Uses
The OSD Pro is intended to be used exclusively in model planes, boats and cars. Any
other use is not supported.
Packing List
Your package should include the following: The OSD Pro Expander, five (5) male to
male servo connectors, the eLogger battery backup cable (with recently shipped units), a printed version of this manual, and a printed version of the Quick
Start Guide.
What the OSD Pro
TM
Does
The OSD Pro is a powerful, modular, fully configurable Video/Audio On-Screen Display (OSD) device, providing graphics, voice announcements, alarms,
acoustic variometer with total energy compensation, Home Arrow, Artificial Horizon, Return to Home, Failsafe, “RADAR”, waypoints, a flight simulator
for testing, and many other features. The information displayed can be as simple or advanced as you like, depending on how you configure the display, and
on which optional Eagle Tree sensors are connected.
To use your OSD Pro, you need the OSD Pro Expander, and the eLogger V3 or Data Recorder. To make full use of the OSD Pro, you also need our GPS
Expander. Several optional sensors and accessories are available from Eagle Tree to further enhance your OSD Pro, such as our barometric altimeter, pitot
airspeed sensor, temperature sensors, and many more. Note that these additional sensors connect to the eLogger V3 or Recorder, rather than directly
connecting to the OSD Pro.
When connected to your eLogger or Data Recorder, the OSD Pro
superimposes Eagle Tree data onto your video feed, displaying
the parameters you want to see on the video screen. The OSD
Pro is normally connected between the composite video output of
your video camera, and the composite video input of your video
transmitter or DVR. The OSD Pro supports NTSC and PAL
video modes – the video mode is automatically detected.
The figure at right shows a typical “FPV” onboard setup. Your
wiring may vary depending on your video hardware, power
system, etc.
General Safety Precautions
In addition to the warnings and other precautions in this manual,
the following precautions should always be observed:


