background image

Copyright © 2003-2010 Eagle Tree Systems, LLC 


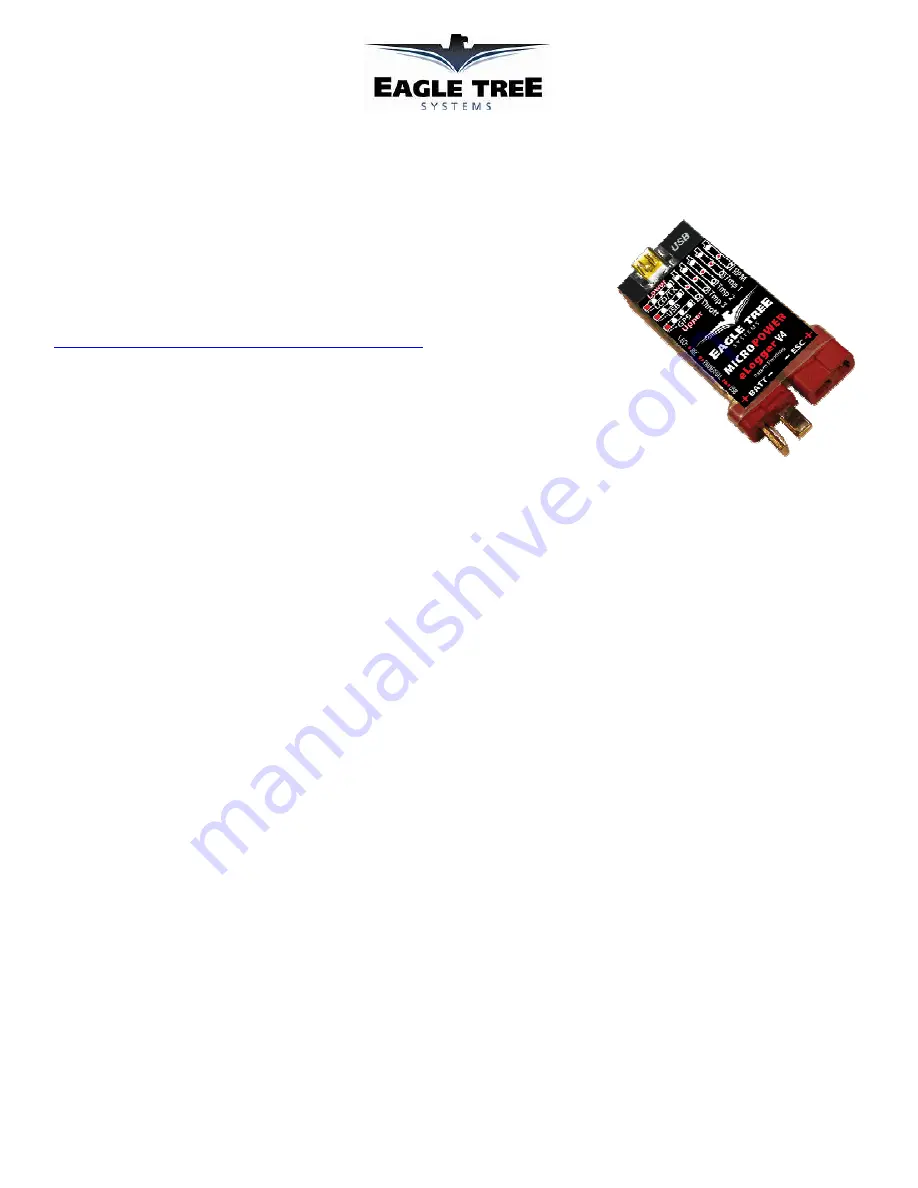
Instruction Manual for the eLogger V4


Document Version 1.1,  Model # MPRV4-CONN-100,  MPRV4-LEADS-100, and MPRV4-LEADS-150 


Thank you for your purchase!   This instruction manual will guide you through the 
installation and operation of your eLogger.   
 
Please read the entire manual carefully before proceeding.    
If, after you read 
the manual (including the Troubleshooting sections!) you have further questions 
or problems, please visit our web support page for additional support options, at 

http://www.eagletreesystems.com/Support/support.html

.    Note that the latest 

version of this manual is available in PDF form from the Support page of our 
website.    
 
Please also fill out the registration form at the end of this manual if you did not 
purchase your eLogger directly from Eagle Tree Systems, so we can send you 
important update information. 


Key Features 

 
Here are a few of the features of the eLogger: 


Logs pack current to +/- 100 amps (150 amps with MPRV4-LEADS-150) and voltage from about 5 volts to 80 
volts  


Current is measured with a true Hall Effects Sensor - NOT a power robbing resistance shunt  


Adjustable logging rate (from 50 samples per second to one sample every 5 minutes) 


16 times the logging space of the standard eLogger V3, and lossless data compression.     Typically logs all 
available sensors for about four hours, at 10Hz. 


All data are logged to permanent memory, which retains the data even when the power is removed 


Fully compatible with our OSD Pro expander 


Includes Y cable for throttle position logging 


Great for bench monitoring of battery charging also!  


Supports the PowerPanel LCD Display 


Accepts optional inexpensive sensors for  three Temperatures,  RPM (brushless, magnetic or optical), Airspeed, 
Altitude, GPS, Servo Current, and more 


Software computes Wattage, mAH, etc. for complete e-flight data.  


Fully Compatible with Windows 7 (32 and 64 bit), Vista, 98SE, ME, Win2K and XP™ 


Weighs about 0.8 oz (22 grams). Versions with Wire Leads may weigh slightly more. 


Comes with our state of the art Windows virtual playback display and graphing software 


Powerful Graphing software has advanced charting features, such as amps vs. volts 


Internet Updatable firmware - as we add new features or (heaven forbid) have a firmware bug, the update is just a 
download away! No need to ship hardware back and forth. 


Full support for English and Metric units.   


Software has built in English, German and Chinese languages. 


Intended Uses 

The eLogger was designed for use in Unmanned Radio Controlled models.   It is intended to be used exclusively in model planes, 
boats and cars.   Using the eLogger for other purposes is not supported.    Further, using the eLogger in situations where its use or 
failure could result in loss of life, bodily injury or property damage is expressly prohibited.   Eagle Tree Systems, LLC, is not 
responsible for your use of this product, or for any damages or injuries you may cause or sustain as a result of its usage. 

Summary of Contents for A21001

Page 1: ...re logged to permanent memory which retains the data even when the power is removed Fully compatible with our OSD Pro expander Includes Y cable for throttle position logging Great for bench monitoring of battery charging also Supports the PowerPanel LCD Display Accepts optional inexpensive sensors for three Temperatures RPM brushless magnetic or optical Airspeed Altitude GPS Servo Current and more...

Page 2: ...ecting the eLogger to Your Model s Power System WARNING High Voltages can cause electric shock Be extremely careful when working with high voltage packs Work with high voltages at your own risk IMPORTANT Never let the sensor USB prongs of the eLogger touch bare battery pack leads exposed parts of your ESC BEC or the motor casing Doing so could destroy the eLogger since these items may have high vo...

Page 3: ...your eLogger Note see the instruction manuals accompanying your sensors or accessories for instructions on how to connect and configure them Measuring Temperature with the eLogger Up to three optional temperature sensors can be connected to the eLogger Eagle Tree offers two types of temperature sensors the Micro temperature sensor and the Loop temperatures sensor The loop sensor is typically insta...

Page 4: ...trong suitable glue It s important that the red line on the magnets faces away from the sensor once the sensor is installed When using two magnets the magnets should be glued 180 degrees apart to keep the shaft in balance WARNING make sure that the magnets are glued sufficiently so that they will not detach and create a hazard and always wear safety glasses when your motor is running It is also a ...

Page 5: ...le Position with the eLogger IMPORTANT Do not use the throttle Y cable if your receiver is powered with greater than 6 Volts Make sure you connect the battery pack to the eLogger only AFTER connecting the throttle Y cable and all other connections to the eLogger The eLogger logs servo positions by measuring the pulses coming from your receiver to the throttle servo via the included Y cable The Y C...

Page 6: ...s to check to see if a newer version of our software is available To install the software just place the CD in the CD ROM drive If AutoPlay is enabled on your PC the setup program should run automatically If it does not run click on My Computer click on the icon for your CD ROM drive and click on the setup exe software icon in the drive window Follow the Setup Wizard to install the eLogger softwar...

Page 7: ...ected to the USB port Windows should automatically install the correct drivers without prompting you If you should receive a Windows prompt however do what it says Windows 98SE and Windows Millennium When the eLogger is first connected to the USB port the New Hardware Wizard will likely appear Follow the steps in the Wizard choosing the options to allow Windows to find the appropriate drivers for ...

Page 8: ...e optional Airspeed MicroSensor Altitude Choose this option if you want to record altitude with the optional Altitude MicroSensor Servo Current Choose this option if you want to record servo current with the optional Servo Current MicroSensor All GPS Parameters Choose this option if you want to record GPS Parameters with the optional GPS Expander Spektrum AR9000 Flight Log Interface Choose this op...

Page 9: ...ature The eLogger Software can display several model parameters in both numeric and instrument format on the main screen Select the parameters you wish the software to display on the PC screen by clicking Software Choose Instruments to Display on the PC Screen In the example below a variety of gauges and numeric instruments have already been chosen The software displays these parameters both for d...

Page 10: ...Copyright 2003 2010 Eagle Tree Systems LLC Page 10 Note Select the Metric checkbox on this dialog if you want values displayed in metric units ...

Page 11: ... installed to ensure that there is no impact on your system Make sure that your antenna down operating range is within the manufacturer s specifications See your Radio owner s manual for the correct procedure for your equipment DO NOT OPERATE IF YOUR MODEL DOESN T PASS THE ANTENNA DOWN RANGE CHECK Additionally you need to make sure that your Model s power system is working correctly after adding a...

Page 12: ...al and or Numeric Temperatures The software can display up to two Temperature readings in either gauge or numeric format Graphical and or Numeric RPM The software displays RPM readings in either gauge or numeric format Graphical and or Numeric Airspeed The software displays airspeed readings in either gauge or numeric format Graphical and or Numeric Temperatures The software displays temperature r...

Page 13: ...dsheet Compatibility The eLogger software has extensive graphing capability built in Just click Data 2D Chart in the software to graph loaded data Note that individual sessions of the file can be graphed separately or side by side by clicking one or more sessions to graph in the Sessions menu Side by side graphing lets you compare performance across different laps or with different log files if th...

Page 14: ...g due to a disconnected sensor etc Set Min Max Value This feature lets you select the Minimum and or Maximum value that will be displayed and charted for a particular parameter This feature is useful to filter out glitches in the data should they occur Setting a maximum value for RPM for example will filter out RPM values above the set value which can improve the visualization of the data when cha...

Page 15: ...s down immediately if the power goes below around 5 volts for more than a few milliseconds and logs this occurrence when the power returns to above 5 volts If your battery s voltage frequently drops this low you may be underpowered and may want to consider getting a bigger battery Issue The Current or Voltage being logged by the eLogger appears incorrect Solutions Make sure that the parameters you...

Page 16: ...e See the Software license agreement for more information on Software restrictions Problems that result from o External causes such as accident abuse misuse or problems with electrical power o Servicing not authorized by us o Usage that is not in accordance with product instructions o Failure to follow the product instructions THIS WARRANTY GIVES YOU SPECIFIC LEGAL RIGHTS AND YOU MAY ALSO HAVE OTH...

Page 17: ... ______________________ Where did you purchase your product _________________________________________________ Where did you hear about our product _______________________________________________ Any features or additions you would like to see _________________________________________ Registering your product means that we can send you important updates and other notifications Please fill out this ...

Reviews: