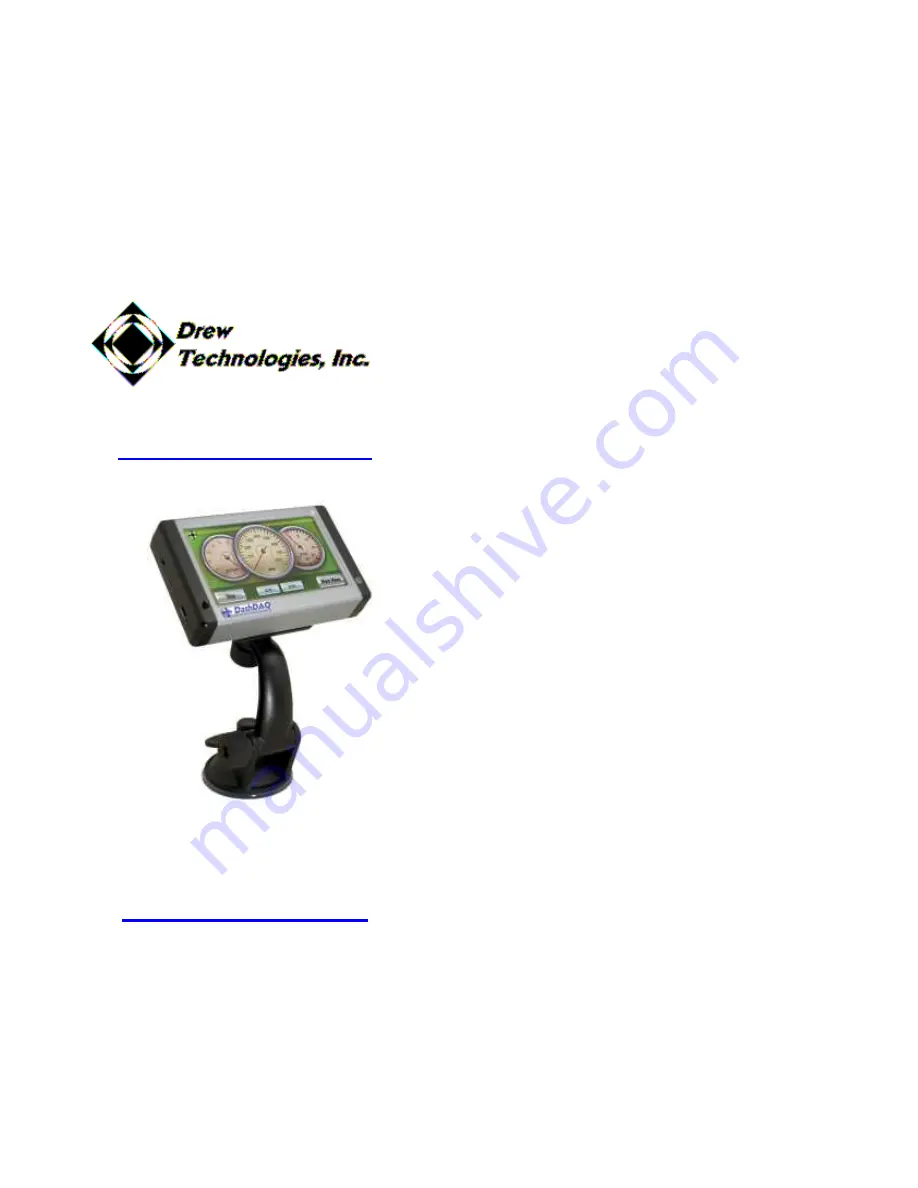
background image


DashDAQ Series II 


Instruction Manual 


Dear Customer, 


Congratulations!  You  have  just  purchased the 

most  powerful,  sophisticated,  and  easy  to  use 
automotive data logger ever created. The DashDAQ 
Series  II  gives  everyone  access  to  the  powerful 
information  embedded  in  their  vehicle.  When  it 
comes  to  automotive  performance,  knowledge  is 
horsepower. 
 

The DashDAQ Series II works with any OBDII 

vehicle.  It  can  also  be  fitted  to  any  other  vehicle 
using optional add-ons. Now you have a device that 
captures information on your new vehicle as well as 
your vintage one.  
 

This 

is 

an 

exciting 

time 

for 

vehicle 

performance,  and  the  more  you  know  about  your 
vehicle  the  more  you  can  get  out  of  it.  The 
DashDAQ gives automotive enthusiasts the edge in 
knowing their vehicle, new or old. 
 

Drew Technologies would like to thank you on 

your  decision  to  buy  the  DashDAQ  Series  II. 
However you use your DashDAQ, we know you will 
be  satisfied  with  all  aspects  of  the  product.  You 
demand the best, we deliver the best. 
 
 
Thank You, 
 
 
Drew Technologies, Inc. 


Summary of Contents for DashDAQ Series II

Page 1: ...fitted to any other vehicle using optional add ons Now you have a device that captures information on your new vehicle as well as your vintage one This is an exciting time for vehicle performance and...

Page 2: ...e High Low Warning 24 3 5 Setting Signal Graph Colors 24 3 6 Data Logging 26 4 DashDAQ Setup Menu 29 4 1 Installed Devices 29 4 2 Clock 33 4 3 Install From SD Card 34 4 4 Backup To SD Card 35 4 5 Star...

Page 3: ...re CD 6 Optional DashDAQ Accessories DashDAQ Accessory Cable for analog and serial connectivity This cable allows you to add two 0 5 volt sensors as well as many other third party data collection devi...

Page 4: ...lated to the item of the equipment purchased Under no circumstances will the SELLER be liable for damages or expenses by reason of use or sale of any such equipment The SELLER assumes no liability reg...

Page 5: ...of the four screws Note Over tightening can possibly damage your DashDAQ Tighten the screws so they are snug no more 1 3 Windshield Mounting Your DashDAQ must be mounted on your windshield in a spot t...

Page 6: ...the steering wheel and any steering column controls Golden Rule If the cable looks to be routed poorly it most likely is 1 6 OBDII Connector The OBDII or data link connector is the basis of DashDAQ o...

Page 7: ...wered off The SD Memory card needs to be inserted with the gold connections facing towards you as you look at the screen Press the card into the DashDAQ until you hear a click If the card sticks out a...

Page 8: ...le the DashDAQ is on The screen will go off but the unit will still be on Press the button again and the DashDAQ will instantly come back on Press and hold the small black button for 3 seconds The scr...

Page 9: ...OBDII vehicle The Setup button gives access to configuration options of the DashDAQ See DashDAQ Setup Menu The Performance button will direct you to 1 4 mile 1 8 mile and 0 60 performance measurement...

Page 10: ...u plug the DashDAQ into a different vehicle If this is not done parameters may show up on the list that don t work and parameters that are available may not be displayed The New Vehicle setup 1 Plug y...

Page 11: ...parameter signal 22 3 2 Assign a Signal to a Gauge Before specifying what signal you would like a gauge to display make sure the New Vehicle procedure has been completed 1 To assign a signal to a gau...

Page 12: ...g The High Low Warning allows users to set the visual representation of redline on a gauge For example If the gauge has a maximum value of 6 000 and you set a High Warning of 5 000 the gauge will visu...

Page 13: ...uge display it can also log and save all information represented on the gauges This information is saved to a Microsoft Excel csv file to an inserted SD memory card This allows you to view and graph s...

Page 14: ...through the various configuration menus until you reach the Logfile Prefix option Tap on the highlighted log in the black box This screen appears 28 3 Enter the desired name of the log file prefix Ex...

Page 15: ...river that is specified in the Installed Devices setup option OBDII analog and third party accessories are specified for use here After a particular driver is loaded the signal s that are specified in...

Page 16: ...ndow 32 To make use of the driver after it has been selected 1 Tap on Gauges from the Main Menu 2 Tap on a gauge you would like to assign the Innovate LC 1 signal to 3 Tap Assign Signal 4 Use the or b...

Page 17: ...permanent 34 4 3 Install From SD Card This setup option allows you to install various user licenses drivers and Config files These files can be saved with the Backup To SD Card option To install any o...

Page 18: ...he Main Menu Using the top or buttons scroll to the Backup To SD Card option 2 Tap on the file you would like to backup When the file is highlighted tap Backup 3 Follow the onscreen prompts to make su...

Page 19: ...ame and tapping Save the new skin will be instantly loaded Gauge layouts will change between various themes When you tap on Gauges from the Main Menu you will notice the gauges are much different The...

Page 20: ...iagnostic Code Reader The DashDAQ comes with software to be a fully functional code reader If your check engine light comes on you can check your vehicles diagnosis of the problem Once you have read t...

Page 21: ...easurements 1 4 mile 1 8 mile and 0 60mph times can be attained with the DashDAQ All that is needed to calculate these measurements is a vehicle speed sensor signal OBDII Aftermarket ECU s or a speed...

Page 22: ...on the fly These two measurements are assignable to any gauge The ability to assign horsepower and torque values to any gauge also allows you to log this information alongside any other available sign...

Page 23: ...Tap Save 8 Tap Save again Tap Save once more at the Installed Device setup window The Dyno Calculator needs 3 signals to calculate horsepower and torque vehicle speed sensor vehicle rpm sensor and veh...

Page 24: ...ulated Torque and tap Save 6 Tap Save again to view the calculation on the gauge 48 8 Fuel Economy Calculator The DashDAQ comes with a driver for calculating Fuel Economy This calculation is based off...

Page 25: ...will be the same for stock OBDII vehicles and are already preset The Vehicle Speed sensor and Mass Air Flow sensor will need to be defined here s how 1 Tap on Parameters from the Main Menu 2 Navigate...

Page 26: ...ebsite for all information concerning third party accessories www dashdaq com 52 11 Updating DashDAQ Your DashDAQ s software is completely up dateable The software necessary to update the DashDAQ is o...

Page 27: ...wse my computer for driver software You will see this message 5 Click on BrowseQ and highlight your CD Rom drive Click Ok Now click Next You will see this screen 6 Click on Install this driver softwar...

Page 28: ...latest firmware for your DashDAQ 4 Take note of what firmware version is being downloaded Click Yes 5 After the download if your DashDAQ is not listed click Refresh List 6 When you see your DashDAQ li...

Page 29: ...speaker USB device port programmable button Vehicle I O CAN J1850VPW GM Class 2 J1850PWM Ford SCP ISO9141 KWP2000 Expansion I O 2 USB Host Ports 2 RS232 Ports 2 0 5V 10 bit analog inputs Add on senso...

Page 30: ...ular purpose Drew Technologies Inc reserves the right to revise or update its products software or documentation without obligation to notify any individual or entity Please direct all inquiries to Dr...

Page 31: ...61...

Reviews: