PostLite™ 1-Year Limited Warranty
D Inc. warrants the PostLite™ to be free from defects in workmanship and material present at the time of shipment from the factory for a period of one year after the date of purchase by the orig-
inal purchaser. We agree to correct such defects without charge or at our option replace with a comparable or superior model if the product is returned to the retailer. To obtain warranty service, you must
present a copy of the receipt as proof of purchase. All costs of removing and reinstalling the product are your responsibility. Damage to any part such as by accident or misuse or improper installation or
by affixing any accessories, is not covered by this warranty. There is no other express warranty. The retailer hereby disclaims any and all warranties, including but not limited to, those of merchantability
and fitness for a particular purpose to the extent permitted by law. The duration of any implied warranty, which cannot be disclaimed, is limited to the time period as specified in the express warranty. Some
states do not allow limitation on how long an implied warranty lasts, so the above limitation may not apply to you. The retailer shall not be liable for incidental, consequential, or special damages arising out
of or in connection with the product use or performance except as may otherwise be accorded by law. Some states do not allow the exclusion of the incidental or consequential damage, so the above exclu-
sion or limitation may apply to you. This warranty gives specific legal rights, and you may also have other rights, which vary from state to state. This warranty supersedes all prior warranties.
PostLite™ Quick Reference
1- The solar panel of the PostLite™ needs exposure to direct sunlight for several hours during the day to
accumulate a sufficient charge to light through the evening. If the operating time of the light is short, try
moving the PostLite™ to an area exposed to sunlight for a longer duration during the day.
2- Ensure that the battery is seated properly and is correctly installed.
The negative side of the battery goes against the spring contact.
Periodically inspect the battery connections for corrosion.
3- If the battery is not charged sufficiently, or if the battery is damaged, the length of time
the PostLite illuminates will be reduced.
4- If the LED does not work, try another LED color to determine if it is the result of
poor battery performance or a burnt out LED. If the alternate LED illuminates, the
battery may require replacement. Use only Ni-Cd or Ni-Mh batteries.
5- If you have a question or a problem has not been adressed here visit www.dockedge.com or call (800) 295-3625
IMPORTANT: For best performance, replace with rechargeable AAA Ni-Cd or Ni-Mh battery.
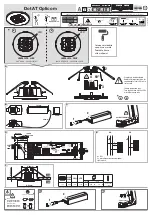
Battery Removal and Installation
1. Unscrew off the top cap with solar panel.
2. Unscrew the two screws holding the circuit board in place.
3. Replace battery with AAA (triple A) rechargeable Ni-Cd or Ni-Mh batteries
4. Reinstall the circuit board and screw the solar cap on snugly to properly
seal your PostLite™!
Winter Storage Tips
Extreme weather conditions can reduce the life and efficiency of your PostLite™.
1. Extreme weather conditions can reduce the life and efficiency of your PostLite™ Ni-Cd or Ni-Mh battery. Remove and store your PostLite indoors if possible during the winter.
2. Remove the set screw from the PostLite™. Romove the PostLite™ and take indoors for winter storage. Unscrew the solar cap and remove the battery for separate storage from the PostLite.
3. If you have glued the base of your PostLite™ a 3-1/4” post or do not wish to remove the entire assembly, you may simply remove the solar top (Electronics Portion) and store the entire
electronic portion of your PostLite indoors. Cover the remaining PostLite™ base with plastic and tie or tape the plastic to the post to protect from the elements and moisture accumulation.
35 Armthorpe Rd., Brampton, Ontario, Canada, L6T 5M4
Toll Free: 800-295-3625
www.dockedge.com
Mounting Instructions
• If your PostLite™ is loose on the post, wrap tape (electrical or
duct) around the post until the PostLite™ has a snug fit on the
post. Secure the PostLite™ to the post with a set screw.
3-1/4” ID Posts
Remove top cap of the post.
Clean the inside edges of the post.
Apply glue if necessary to the inside of the post or drill a hole for a
set screw through the post. Use an appropriate screw to act as a
set screw through the post and into the side of the PostLite™
base. Any one of the adaptors provided with your PostLite™ may
be used for installation in this size of post.
1-5/8”
(41mm)
1-7/8”
(48mm)
2-3/8”
(60mm)
3-1/4” ID Posts
(83mm)
Universal Flat
Surfaces
Changing LED Illumination color
There is no need to replace LEDs with the PostLite™ to change
colors. Remove the threaded solar cap and flip the appropriate switch to the
“ON” position as per the chart below to illuminate the desired color LED.
SWITCH #
COLOR
1
WHITE
2
GREEN
3
BLUE
4
ORANGE
5
YELLOW
6
RED
CAUTION: Contains Nickel-Cadmium batteries. Expired batter-
ies must be recycled or disposed of properly.
22
33
Remove the single screw from
the bottom of the PostLite™
lens and remove the reflector.
Place the lens into the desired
position and secure with a fas-
tener through the single hole in
the bottom. Insert domed
reflector back into the bottom
of the lens and screw the solar
cap back on.
For PostLite™ Service or Warranty contact
IMPORTANT:
PostLites™ are NOT intended for use as navigational lighting.
11
44