


InstallatIon GuIde
V-RC8021 Indoor Video Camera
Description
The DMP V-RC8021 is an indoor wired/wireless video camera that allows live
view and recorded clips through the Virtual Keypad App, as well as email
motion-triggered video clip notification. To install and activate the camera,
you need an active dealer account at vk.securecomwireless.com.
Compatibility
•
Any DMP system with an active Virtual Keypad App
What is Included:
•
V-RC8021 Indoor Camera
•
Camera Mounting Base
•
Antenna for wireless use
•
5V Power Transformer (for 9’ power extender, order V-DCEXT-9 separately)
•
Mounting Screws
Assembling the Camera
1. Attach the camera to the base if necessary for the installation.
2. Attach the antenna if using wireless connectivity.
Camera Configuration Options
The V-RC8021 can be configured to communicate to the SecureCom Video
server in three ways:
Option #1 -
Wired connection
Option #2 -
Wireless connection using DMP V-IP1006RR Wireless Access Point
(WAP) with WiFi Protected Setup (WPS)
Option #3 -
Wireless connection using a WPS enabled WAP
Option #1 Configuration - Wired connection:
1.
IMPORTANT:
Before plugging in power to the
camera, plug an Ethernet cable with an active
internet connection into the Ethernet port.
Recommendation:
We recommend marking the
Ethernet cable from the customer’s router to the
WAP to help in network troubleshooting. If the
end-user is having network issues after the install,
you can instruct them to remove the marked
Ethernet cable and see if the problem still exists.
If it does, then they can contact their Internet service provider.
2. Once the Ethernet is plugged in, plug in the power adapter to the camera and to a power outlet. When the camera
is fully powered on and finds an active network, the power LED turns on solid. The Network LED continues to flash
green to indicate network activity.
The camera is now ready to be activated through vk.securecomwireless.com.
Option #2 Configuration - Wireless connection using DMP V-IP1006RR WAP:
For best results, establish communication while
the WAP and cameras are no more than 20 ft from
each other. After communication is established,
place them in their desired location to ensure
that they are still within wireless range of the
WAP. Multiple WAPs can be installed for larger
installations.
1. Plug in the power adapter to the camera and to
a power outlet. The Power LED continues to flash
until it is paired with the WAP.
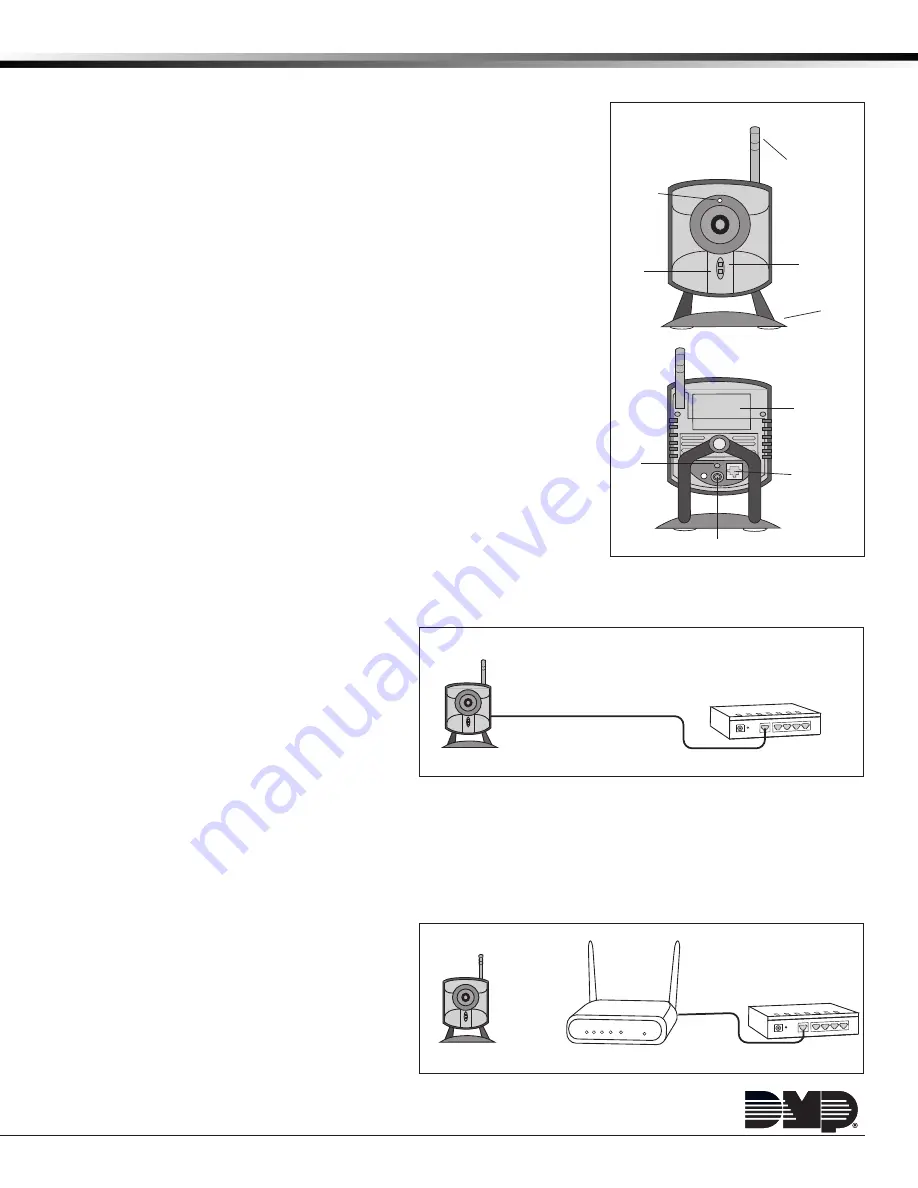
Antenna
Mounting
Base
Power
LED
Network
LED
RC8021 Indoor Camera
FRONT
BACK
MAC Address/
Server Name
Ethernet
Port
Power Input
WPS
Button
Privacy
WAN LAN4 LAN3
LAN2 LAN1
RESET
DC 3.3V
Ethernet Cable
Option One
Camera
DHCP Router
WAN LAN4 LAN3
LAN2 LAN1
RESET
DC 3.3V
Ethernet
Cable
DHCP Router
Wireless Access Point
Option Two
Option Three
WAN LAN4 LAN3
LAN2 LAN1
RESET
DC 3.3V
DHCP & WPS
Router
Camera
Camera
WAN LAN4 LAN3
LAN2 LAN1
RESET
DC 3.3V
Ethernet Cable
Option One
Camera
DHCP Router
WAN LAN4 LAN3
LAN2 LAN1
RESET
DC 3.3V
Ethernet
Cable
DHCP Router
Wireless Access Point
Option Two
Option Three
WAN LAN4 LAN3
LAN2 LAN1
RESET
DC 3.3V
DHCP & WPS
Router
Camera
Camera


