background image

Grinding & Polishing


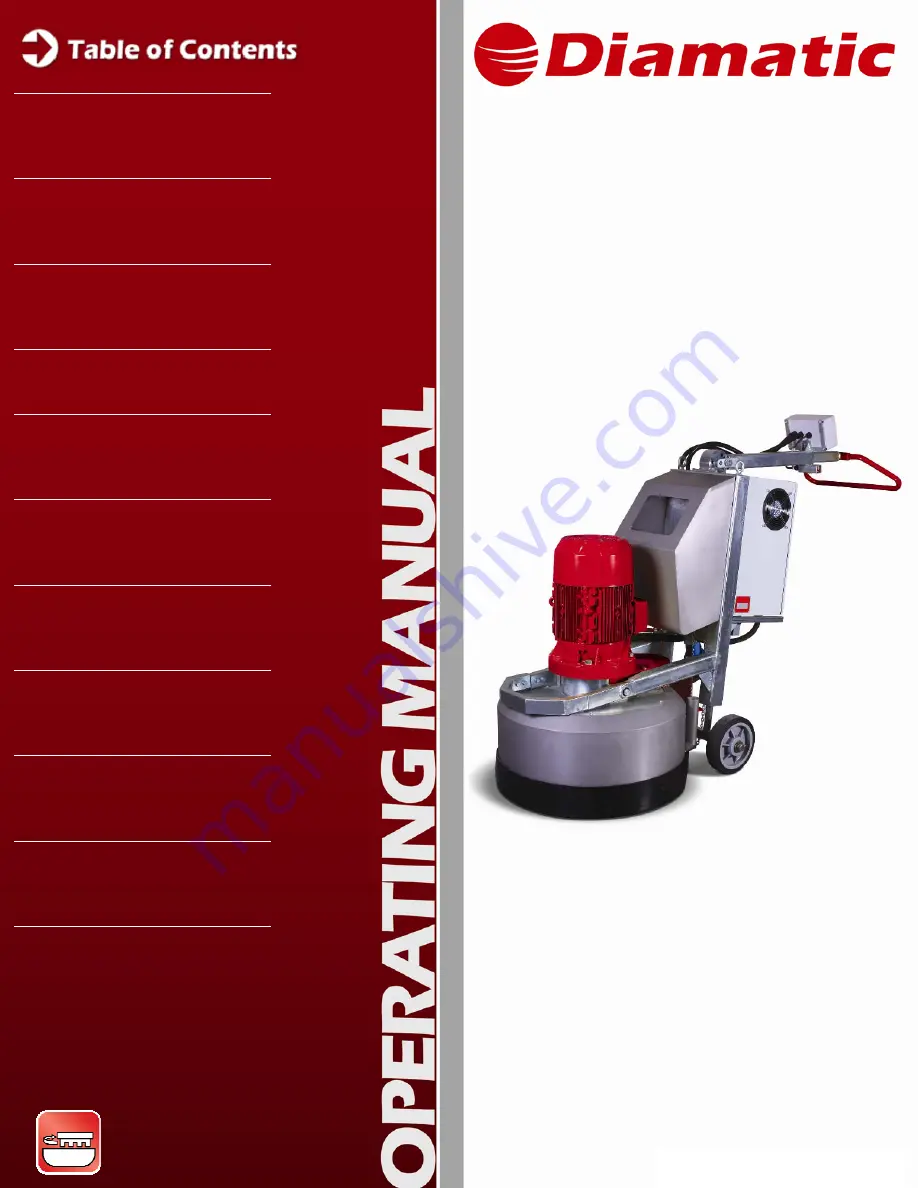
MODEL BMG-780 GRINDER 

SECTION 2 

SAFETY INSTRUCTIONS 


OPERATING MANUAL

JANUARY 2008


Grinding & Polishing


MODEL 

BMG-780 

Planetary Grinder 


Technical Data 


Safety Instructions 


General 3 


Transport 4 


Initial Operation 


Operation 6 


Maintenance 7 


Electrical Systems 


Fault Diagnosis 


Spare Parts 

10 


Summary of Contents for BMG-780 ULTRAPRO

Page 1: ...Y INSTRUCTIONS 1 OPERATING MANUAL JANUARY 2008 Grinding Polishing MODEL BMG 780 Planetary Grinder Technical Data 1 Safety Instructions 2 General 3 Transport 4 Initial Operation 5 Operation 6 Maintenance 7 Electrical Systems 8 Fault Diagnosis 9 Spare Parts 10 ...

Page 2: ...R SECTION 1 TECHNICAL DATA 1 OPERATING MANUAL MARCH 2009 Grinding Polishing 1 1 Rating 1 2 Unit specifications 1 3 Operative range and correct usage 1 4 Stand by power supply 1 5 Machine type designation CONTENTS SECTION 1 ...

Page 3: ... Connected loads 220V Three phase 25 2A Connected loads 440V Three phase 27A Dimensions BMG 780 Length 57 5 in 1460 mm Width 31 5 in 800 mm Height 53 2 in 1350 mm Weight 1080 lbs 490 kg US BV 13201 North Santa Fe Utrechthaven 12 Oklahoma City OK 73114 3433 PN Nieuwegein United States of America THE NETHERLANDS Local 405 478 3440 T 31 0 30 601 88 66 toll free 800 256 3440 F 31 0 30 601 83 33 1 1 RA...

Page 4: ...the user takes responsibility for all risks 1 4 STAND BY SUPPLY GENERATOR If the BMG 780 is to be operated using power from a generator the generator must be operated in accordance with the current U S National Electric Code guidelines or European VDE standards as appropriate this applies but is not limited to the protective earth conductor in particular in order to ensure that all safety devices ...

Page 5: ... 3 Personnel selection and qualification 2 4 Safety precautions applicable to some operating sequences 2 5 Special work within the scope of use of the equipment and maintenance activities as well as repairs during operation 2 6 Definition of the safety off position 2 7 General Safety Considerations 2 8 Electrical engineering regulations CONTENTS SECTION 2 ...

Page 6: ...to all safety precautions that are to be followed to maximize safety and equipment performance Follow these instructions and take special care in these circumstances In addition to these instructions the general safety precautions and accident prevention guidelines are also to be followed Particular details regarding the economical use of the equipment Information instructions and restrictions wit...

Page 7: ...particular working practices for example work organization work procedures and personnel safety Personnel entrusted with working with the machine must read and understand the Operating Instructions before starting work paying specific attention to the Safety information To read these instructions after work has commenced is too late This particularly applies to incidental activities such as settin...

Page 8: ...tablished and remedied This applies in particular to the fitting and adjustment of safety devices Spare parts must comply with the technical requirements specified by the manufacturer This is always guaranteed if original spare parts are used Intervals for recurring checks and inspections specified in these Operating Instructions must be complied with To perform maintenance work correctly it is im...

Page 9: ... may not be complying with the local safety requirements Personnel who are being trained to operate equipment may only use the machine under constant supervision of an experienced person Do not allow any method of working that impairs safety Recognized official procedures have to be used to ensure the machine is operated in the safest and best conditions 2 3 PERSONNEL SELECTION AND QUALIFICATION W...

Page 10: ...ne can be endangered when the machine starts up Do not turn off the dust collector while the machine is running Secure the work area around the machine in public areas providing a safety distance of at least 6 5 feet 2 meters from the machine All persons in the proximity of the machine must wear ear protectors and safety shoes In addition the machine operator must wear close fitting protective clo...

Page 11: ...and work procedures before starting the cleaning process This includes but is not limited to the following Procedures that are related to normal operation Methods of tools adjustment on the machine and its safety devices All ON and OFF functions that have to be carried out according to the operation manual Methods for maintenance and repair If the equipment is switched off in order to carry out ma...

Page 12: ...process materials and replaced parts are disposed of safely and in an environmentally friendly manner Make sure that electrical components used for replacement purposes comply with the original parts and are correctly adjusted if necessary Definition The machine is in a safe condition where it cannot be a hazard Putting the equipment in the Safety off position involves Switching off the machine Sw...

Page 13: ...shooting From time to time check multi meters to ensure that they are operating correctly 2 7 GENERAL SAFETY CONSIDERATIONS Any machine if it is not used according to regulations may be hazardous during operation set up and servicing The machine owner is responsible for compliance with the safety regulations during operation and maintenance and for the use of safety devices supplied with the machi...

Page 14: ...e 3 4 Operating elements 3 5 Electric components 3 6 Upper part 3 7 Lower part 3 8 Tensioner upper belt 3 9 Tensioner lower belt 3 10 Pulley 3 11 Center pulley 3 12 Contra pulley 3 13 Driving pulley 3 14 Diamond tool holder 3 15 Cord Reel Optional 3 16 Cord Reel with Tool Box Optional 3 17 Water Tank and Piping Optional 3 18 Care and maintenance CONTENTS SECTION 3 ...

Page 15: ...ns for the BMG 780 are for example To remove undulated concrete surfaces To prepare the surface for coatings To polish the surface To remove coating defects To remove glue residue Scope of supply of the machine Grinding machine BMG 780 Dust hose Optional Operating manual 1x 3 1 RANGE OF APPLICATION 3 2 SCOPE OF SUPPLY ...

Page 16: ...riving Pulley 5 Frame 12 Upper Drive Lower Plate 19 Tooling Pulley 6 Wheel 13 Cover Housing 20 Diamond Holder 7 Cover Upper Part 14 Metal Dust Ring 21 Lower Tensioner The BMG 780 has a working width of 780 mm and gives excellent performance due to its economic efficiency and easy handling The machine is capable of leveling uneven and undulating floors This process is suitable for an optimization o...

Page 17: ...fitted with several different types of diamond grinding discs The individual tooling heads rotate at approximately 1250 revs min The Lower Housing rotates at approximately 82 revs min Fig 3 2 Before Switching on the BMG 780 the front part of the grinding machine must be lifted by pushing the handgrip 1 down to floor level till the machine is approximately 4 inches 10 cm from the ground The complet...

Page 18: ...shows the amp draw on the motor during operation It will also show faults in the event of a safety not being in place and if any voltage wiring problems occur Start Stop Buttons The green start button turns on the machine The red stop button turns off the machine Run Light The green light will illuminate when the motor is running Fault Light The fault light will illuminate when a fault condition o...

Page 19: ...switch must be changed when the head is not rotating if it is changed during operation it could result in damage to the machine or to the work surface Speed Control Knob With the speed control you can control the speed this is necessary for the different kind of work like heavy medium or light duty work Hour Counter Not Shown The hour counter simply monitors the number of hours the machine has bee...

Page 20: ...d and drive to the center pulley Upper Belt item 8 in Figure 3 4 is set using an electronic belt tension meter at the factory and set somewhere between 200 215 Hz The Housing Drive belt located inside the Motor Housing item 6 is also set using an electronic belt tension meter at the factory and set somewhere between 160 170 Hz Fig 3 4 1 Motor 5 Spider bearing 9 Tensioner upper belt 2 Coupling 6 Mo...

Page 21: ...lectric motor Between the driving pulley and the driven pulley there is the main drive belt This belt is tensioned at approximately 55 60 Hz with an electronic belt tension meter Under the pulleys there are the tool holders on which the diamond discs can be fitted The pulleys are covered by a protective housing which also turns Fig 3 5 1 Tooling Pulley 4 Tensioner lower belt 2 Driving pulley 5 Dia...

Page 22: ...ng Polishing The upper belt tensioner keeps the upper belt tight By taking off the cover of the upper part the tensioner can be accessed Fig 3 6 1 Axle 5 Flat Head Socket Cap Screw 2 Retaining ring 6 Flat Washer 3 Bearing 7 Socket Head Cap Screw 4 Tensioner plate 3 8 LOWER PART ...

Page 23: ... off one of the two inspection hole covers at the bottom of the lower plate the tensioner can be accessed Fig 3 7 1 Retaining ring 6 Flat head socket cap screw 11 Hexagon head bolt 2 Bearing 7 Hexagon head bolt 12 Hexagon nut 3 Retaining ring 8 Flat washer 13 Tensioner plate 4 Pulley 9 Socket Head Cap Screw 5 Axle 10 Tensioner 3 9 TENSIONER LOWER BELT ...

Page 24: ... pulleys in the machine Under these pulleys the diamond discs are fixed The pulley is driven by the driving pulley through a belt The pulley is fixed on the lower housing with screws Fig 3 8 1 Bearing 4 Pulley 7 Bearing House 2 Bearing house 5 Key 8 Bearing 3 Taper bush 6 Retaining ring 9 Axle 3 10 PULLEY ...

Page 25: ...2009 Grinding Polishing The center pulley will slow down the speed of the lower housing The six head cap screws connect the pulley with the lower housing Fig 3 9 1 Sprocket 4 Retaining ring 2 Pulley 5 Retaining ring 3 Bearing 6 Socket Head Cap Screw 3 11 CENTER PULLEY ...

Page 26: ...duction of speed to the lower housing The belt pulley is driven by a belt from the motor pulley Fig 3 11 1 Axle 6 Ring 11 Key 2 Bearing House 7 Bearing 12 Flat Washer 3 Belt Pulley 8 Retaining Ring 13 Flat Washer 4 Flange 9 Retaining Ring 14 Socket Head Cap Screw 5 Pulley 10 Key 15 Hex Head Cap Screw 3 12 CONTRA PULLEY ...

Page 27: ...re is a coupling which is driven by the electric motor The driving pulley drives the three pulleys with a belt The pulley is fixed on the lower housing with screws Fig 3 11 1 Retaining ring 5 Driving axle 9 Bearing house 2 Retaining ring 6 Pulley 10 Bearing 3 Bearing 7 Taper bush 4 Bearing house 8 Key 3 13 DRIVING PULLEY ...

Page 28: ... The diamond tools are designed for use on concrete floors These tools can be used to prepare a floor prior to coating or as initial steps in a polishing process PCD Diamonds PCD s can be used for removing epoxy coating and other floor coatings Polishing Resins Polishing resins are used in the final step of a polishing process 3 14 DIAMOND TOOLING For questions about the right set for the right fl...

Page 29: ...MODEL BMG 780 GRINDER SECTION 3 GENERAL 28 OPERATING MANUAL MARCH 2009 Grinding Polishing 3 15 CORD REEL OPTIONAL 3 16 WATER TANK AND PIPING OPTIONAL 3 17 FRONT SUPPORT CASTER OPTIONAL ...

Page 30: ... technician seems not possible without damages Only use genuine parts Generally the grinding machine BMG 780 requires very little special attention regarding its maintenance Verify that any wastes or fiber residues do not remain in the area of the grinding disc Depending upon the use of the machine the pulley should be checked about every 200 hours Before using the machine you should always verify...

Page 31: ...0 GRINDER SECTION 3 GENERAL 30 OPERATING MANUAL MARCH 2009 Grinding Polishing ________________________________________________________________ Notes ________________________________________________________________ ...

Page 32: ......

Page 33: ...tions 4 2 Manual mode of moving the machine 4 3 Transport with cranes or lifts 4 4 Transport of the machine with vehicle 4 5 Operation of the machine while grinding Model BMG 780 Dimension inches 57 5 x 31 5 x 53 2 Dimensions mm 1460 x 800 x 1350 Weight 1080 lbs 490 kg CONTENTS SECTION 4 4 1 UNIT SPECIFICATIONS ...

Page 34: ... of the machine see fig 4 1 until the front part rises off the ground and the machine is well balanced It can now be pushed around on its wheels The machine should only be moved around after attachments are disconnected such as Generator if being employed Dust collection unit optional extra Fig 4 1 4 2 MANUAL MODE OF MOVING THE MACHINE ...

Page 35: ... are also suitable as a fixing point for fastenings or tie downs to be used during transportation of the machine on a vehicle When transporting the machine in a vehicle always drive carefully and in a manner to avoid the machine shifting Secure the machine with a tightening load strap over the lower frame 3 as shown in figure 4 1 Use at least two load straps and tighten down to the body of the veh...

Page 36: ...MODEL BMG 780 GRINDER SECTION 5 INITIAL OPERATION 35 OPERATING MANUAL MARCH 2009 Grinding Polishing 5 1 Preparation for initial operation 5 2 Initial operation CONTENTS SECTION 5 ...

Page 37: ...inding machine and the dust collector unit with the flexible dust hose Use hose clamps at the connections Make sure the dust bin of the dust collector unit is empty Before start up all operating personnel must be familiar with the safety regulations given in this manual If problems with the BMG 780 arise during the assembly or start up call a qualified person for help Work on electrical equipment ...

Page 38: ...t until the Current display 3 reads READY Put the safety cord on to your wrist and make sure the other end is inserted into the safety switch Turn the SPEED control knob 10 to zero Press down both handgrips 2 until the front part rises approximately 4 inches 10 cm from the ground Using the FWD REV selector switch 9 determine the head rotation direction Press the START button 5 to start the machine...

Page 39: ...itching off the grinding machine Push down on the handgrips 2 Push the STOP button 4 on the operator control panel In case of emergency push the Emergency Stop button 8 ________________________________________________________________ Notes ________________________________________________________________ ...

Page 40: ...ION 39 Grinding Polishing OPERATING MANUAL MARCH 2009 6 1 Operation 6 2 Switching off the machine 6 3 Trouble shooting 6 4 Safety shutdown 6 5 Restarting after a fault 6 6 Proceedings before and after a stationary period CONTENTS SECTION 6 ...

Page 41: ... liquid on the surface Any obstructions in the surface to be treated like concrete reinforcing steel or other objects should be removed from the work surface to prevent damage to the machine seals and diamond discs 6 1 OPERATION These Operating Instructions are to be kept with the machine and must be within reach at all times Only trained personnel may be employed Note the statutory minimum age Sp...

Page 42: ...tart up of the BMG 780 for daily operation Verify that the electric cable and dust hose are clear from vehicle traffic such as forklifts and other equipment Fig 6 1 To switch off the machine push the red STOP button on the operator control panel 4 If there are any doubts as to how to start up the machine read Sections 5 1 and 5 2 of this operating manual 6 2 SWITCHING OFF THE MACHINE ...

Page 43: ...e such as vibrations or loud noises switch the machine off immediately by pushing the Emergency Stop E Stop button on the operator control panel 8 6 4 SAFETY SHUTDOWN Before performing inspection or maintenance work make sure that all moving machine parts are stopped Observe the Safety off position Section 2 6 6 5 RESTARTING AFTER A FAULT The results of all electrical repair work must be verified ...

Page 44: ...otect the machine during storage per the following Clean the machine and cover it with a tarp Protect the electric motors from moisture heat dust and impacts Remove flexible couplings from machine to keep from warping which can cause uneven grind After a long stationary period Follow the steps listed in Section 5 1 Initial Operation of this manual 6 6 PROCEEDINGS BEFORE AND AFTER STATIONARY PERIOD...

Page 45: ... GRINDER SECTION 6 OPERATION 44 Grinding Polishing OPERATING MANUAL MARCH 2009 ________________________________________________________________ Notes ________________________________________________________________ ...

Page 46: ...Polishing 7 1 Recommendations 7 2 Maintenance and inspection list 7 3 Repairing 7 4 Grinding tool replacement assembly 7 5 Upper Part 7 6 Lower part 7 7 Pulley maintenance 7 8 Other maintenance 7 9 Recommended Spares for Stock 7 10 Influences on the Grinding Pattern CONTENTS SECTION 7 ...

Page 47: ...r of working hours is not achieved during the corresponding period the period can be extended However a full overhaul must be carried out at least once a year Due to different working conditions inspection and maintenance intervals may vary Prepare a suitable inspection schedule considering known working conditions and experience Our specialists will be happy to assist with more advice Prior to an...

Page 48: ...e Check the dust collector hose for damage Check the optional water tank and system for damage if applicable Check grinding disk coupling and remove any foreign material and debris Check the grinding disc and the coupling for wear Check the countersunk head screw of the grinding disc for tightness Check the tension of the V belt adjust as is required Check the brush dust seal Quarterly Clean the m...

Page 49: ... replace wear parts will be described If parts or components are to be replaced the following sequence s of maintenance must be followed It is advisable to stock all spare or wear parts that cannot be obtained quickly As a rule production standstill periods are more expensive than the cost for carrying the corresponding spare part Screws that have been removed must be replaced with those of the sa...

Page 50: ...ing forward during change over 3 Unscrew the three countersunk head screws 3 4 Remove the grinding disc downwards 4 Assembly 5 Clean the diamond holder thorough 5 6 Adjust the grinding disc in the centering 4 7 Set in and tighten the countersunk head screw 3 8 Tilt the machine forwards 7 4 GRINDING DISC REPLACEMENT ASSEMBLY When replacing the grinding disc also check the condition of the drive pul...

Page 51: ... 11 can be removed by taking out the bolts 10 Unscrew the bolt 12 this will allow the under plate 13 to be removed Unscrew the bolts 14 and the bolt 15 to enable the rings 16 and the contra pulley 17 to be taken out of the upper drive Remove the belt 18 The center pulley 20 can be removed by unscrewing bolt 19 The coupling 21 must be taken off before you can disassembled the lower part Assembly As...

Page 52: ...lower tensioner 6 to enable the belt 7 to be removed Unscrew the bolts 8 on the upper side to enable the pulleys 9 the tensioner 6 the v seal 13 and the rings 10 to be removed Unscrew the bolts 11 and 12 to enable the driving pulley 14 to be removed Assembly Assemble the parts in the reverse order that they have been disassembled Prior to any repair work being carried out on the machine or its dri...

Page 53: ...6 the key 8 and the pulley 7 Take off the retaining rings 9 Remove the bearing housing 12 Take off the retaining ring 11 and the bearing 12 Assembly Make sure that the bearing 9 and bearing housing 6 are clean and rub the bearing 9 with a few drops of Loctite 609 Assemble the parts in the reverse order that they have been disassembled 7 7 PULLEY Prior to any repair work being carried out on the ma...

Page 54: ...ns from the machine This will ensure that there is no damage caused to the surrounding workspace and consequently saves additional cleanup charges from the job client Clean the machine with a damp cloth Apply Oil to the adjusting pin of the operating lever and other moving parts with clean oil can at regular intervals 7 8 OTHER MAINTENANCE Do not use high pressure water or compressed air for clean...

Page 55: ...s use the left right switch of the machine every 330 sq ft 100m2 to change the rotation of the grinding head This will also provide a longer life of the diamond tools since they will wear down more equally Please note that this is NOT recommended for polishing applications Changing the rotation of the heads will result in large scratches that are difficult to remove In the last 2mm of the diamond ...

Page 56: ... MARCH 2009 8 1 Directions for electrical engineering 8 2 Electrical Schematic 230V 50 and 60 HZ 8 3 Control Panel Layout and Device Settings 230V 50 and 60 HZ 8 4 Electrical Schematic 460V 50 and 60 HZ 8 5 Control Panel Layout and Device Settings 460V 50 and 60 HZ CONTENTS SECTION 8 ...

Page 57: ...erating materials may only be performed by a skilled electrician or by trained persons under the guidance and supervision of a skilled electrician as well as in accordance with the electrical engineering regulations The results of all electrical repair work must be verified using the appropriate measurement techniques per the regulations stated in the European VBG4 and VDE 0701 standards or per th...

Page 58: ...MODEL BMG 780 GRINDER SECTION 8 MAINTENANCE 57 Grinding Polishing OPERATING MANUAL MARCH 2009 8 2 ELECTRICAL SCHEMATICS 23OV 50 AND 60 HZ ...

Page 59: ...MODEL BMG 780 GRINDER SECTION 8 MAINTENANCE 58 Grinding Polishing OPERATING MANUAL MARCH 2009 8 3 CONTROL PANEL LAYOUT FOR 23OV 50 AND 60 HZ ...

Page 60: ...ERATOR 21 1 P004961 MALE INSERT 80 AMP 4 GND 22 1 P004962 FEMALE INSERT 80 AMP 4 GND 23 1 P003515 BULKHEAD MOUNTING 24 1 P004957 HOOD SIDE ENTRY PG 29 25 2 5 P001042 CONDUIT FLEX 1 PG29 26 2 P001053 CONNECTOR PG29 90 DEG ELBOW 27 1 P004992 LOCKNUT PG29 NICKEL PLATED BRASS 28 2 P001044 CONNECTOR 1 2 STRAIGHT 29 6 25 P001040 CONDUIT FLEX 1 2 PG16 PER FOOT 30 2 P002208 CONNECTOR 1 2 90 DEGREE 31 2 P0...

Page 61: ...MODEL BMG 780 GRINDER SECTION 8 MAINTENANCE 60 Grinding Polishing OPERATING MANUAL MARCH 2009 8 4 ELECTRICAL SCHEMATIC 460V 50 AND 60 HZ ...

Page 62: ...MODEL BMG 780 GRINDER SECTION 8 MAINTENANCE 61 Grinding Polishing OPERATING MANUAL MARCH 2009 8 5 CONTROL PANEL LAYOUT FOR 460V 50 AND 60 HZ ...

Page 63: ... O ACTUATING KEY 18 1 P004791 SWITCH SAFETY ACTUATING KEY W TETHER 19 1 P004991 POTENTIOMETER 20 1 P004905 POTENTIOMETER OPERATOR W MOUNTING COLLAR FOR SHAFT 21 1 P004959 MALE INSERT 22 1 P004960 FEMALE INSERT 23 1 P003515 BULKHEAD MOUNTING 24 1 P004957 HOOD SIDE ENTRY PG 29 25 2 5 P001042 CONDUIT FLEX 1 PG29 26 2 P001053 CONNECTOR PG29 90 DEG ELBOW 27 1 P004992 LOCKNUT PG29 NICKEL PLATED BRASS 28...

Page 64: ...MODEL BMG 780 GRINDER SECTION 9 FAULT DIAGNOSIS 63 OPERATING MANUAL MARCH 2009 Grinding Polishing 9 1 Troubleshooting grinding machine 9 2 Troubleshooting electrical system CONTENTS SECTION 9 ...

Page 65: ... the coupling Check the bearing on the axle drive shaft and replace if necessary Check the tension of the belt replace the belt if necessary Change the motor Clean the coupling Reduced or no grinding performance Grinding tools have reached the maximum permissible wear Inappropriate grinding tool for the application Too low tension of the belt Replace the worn parts Replace the grinding tools with ...

Page 66: ...rload Motor protector switch tripped because of low or under voltage condition Motor defective Reduce additional load or increase extension cord wire size Increase extension cord wire size Have motor checked by a trained professional to confirm 9 2 TROUBLESHOOTING ELECTRICAL SYSTEM Work on electrical equipment or operating materials may only be performed by a skilled electrician or by trained pers...

Page 67: ...INDER SECTION 9 FAULT DIAGNOSIS 66 OPERATING MANUAL MARCH 2009 Grinding Polishing ________________________________________________________________ Notes ________________________________________________________________ ...

Page 68: ...MODEL BMG 780 GRINDER SECTION 10 SPARE PARTS 67 Grinding Polishing OPERATING MANUAL MARCH 2009 10 1 Spares Parts BMG 780 CONTENTS SECTION 10 ...

Page 69: ...MODEL BMG 780 GRINDER SECTION 10 SPARE PARTS 68 Grinding Polishing OPERATING MANUAL MARCH 2009 Frame 10 1 SPARE PARTS BMG 780 ...

Page 70: ...JUSTABLE PART 1 9 PG 10140 STEER 1 10 PG 10286 WATER TANK IMPERIAL 1 11 PG 10139 WELDMENT AXLE 1 12 PA 10623 GLIDE BUSHING 2 13 CP 10096 WHEEL 2 14 CP 10103 BOTTLE JACK 1 15 BG11860 WATER TAP 1 16 BG11752 HINGE BOLT 2 17 NA NA NA 18 CP 10036 15MM RETAINING RING EXTERNAL 2 19 800812 HEX BOLT 3 4 10 UNC X 5 1 4 L 2 20 800813 WASHER NARROW 3 4 2 21 800810 HHCS M10 1 5 X 25 FULL THREAD 8 22 800791 M10...

Page 71: ...MODEL BMG 780 GRINDER SECTION 10 SPARE PARTS 70 Grinding Polishing OPERATING MANUAL MARCH 2009 Upper Part ...

Page 72: ...ED COUPLING 1 15 800789 M14 X 2 0 X 30 HEX HEAD CAP SCREW 1 16 BG11797 SEAL 1 17 BG11780 KEY 1 18 800847 M8 X 1 25 X 110MM SOCKET HEAD CAP SCREW 6 19 BG007809 MOTOR PLATE 1 20 BG11980 BELT 1 21 PG 10047 CENTER PULLEY ASSEMBLY 1 22 BG007834 LOWER PLATE UPPER DRIVE 1 23 PG 10048 CONTRA PULLEY ASSEMBLY 1 24 800848 LOCK WASHER M8 ZINC 4 25 800796 M8 X 1 25 X 40 SOCKET HEAD CAP SCREW 4 26 800779 M6 X 1...

Page 73: ...MODEL BMG 780 GRINDER SECTION 10 SPARE PARTS 72 Grinding Polishing OPERATING MANUAL MARCH 2009 Lower Part ...

Page 74: ...OVER 2 13 BG11829 V RING SEAL 3 14 PA 10252 FORK 3 15 PG 10050 DIAMOND HOLDER 3 16 P002973 COUPLING MORFLEX 3 17 800774 FLAT WASHER 6MM NARROW 78 18 800798 FLAT WASHER 12MM NARROW 5 19 800775 FLAT WASHER 8MM NARROW 6 20 800779 M6 X 1 0 X 16 SOCKET HEAD CAP SCREW 36 21 800786 M6 X 1 0 X 25 FLAT HEAD SOCKET CAP SCREW 3 22 800797 M6 X 1 0 X 25 SOCKET HEAD CAP SCREW 36 23 800799 M12 X 1 75 X 30 SOCKET...

Page 75: ...MODEL BMG 780 GRINDER SECTION 10 SPARE PARTS 74 Grinding Polishing OPERATING MANUAL MARCH 2009 Upper Belt Tensioner ...

Page 76: ...nsioner ITEM NO PART NUMBER DESCRIPTION QTY 1 BG005831 TENSION PLATE 1 2 BG005830 AXLE 1 3 BG11911 BEARING 2 4 CP 10040 RETAINING RING 20MM EXT DIN 471 1 5 800790 M10X1 5X30MM SOCKET HEAD CAP SCREW 1 6 800791 FLAT WASHER M10 1 7 800792 M10 X 1 5 X 30MM FLAT HEAD SOCKET CAP SCREW 1 8 4774800 LOCK WASHER M10 1 ...

Page 77: ...MODEL BMG 780 GRINDER SECTION 10 SPARE PARTS 76 Grinding Polishing OPERATING MANUAL MARCH 2009 Lower Belt Tensioner ...

Page 78: ...2 0 X 80 HEX HEAD CAP SCREW 2 3 05 73905 M14 X 2 0 HEX NUT 2 4 BG007833 TENSIONER 1 5 BG007837 AXLE 1 6 BG007836 PULLEY 1 7 BG11884 BEARING 2 8 800785 M8 x 1 25 x 30 FLAT HEAD SOCKET HEAD CAP SCREW 2 9 CP 10040 RETAINING RING 20MM EXTERNAL 2 10 800803 M8 X 1 25 X 20 SOCKET HEAD CAP SCREW 2 11 800775 FLAT WASHER 8MM NARROW 2 12 800790 M10X1 5X30 SOCKET HEAD CAP SCREW 2 13 800791 FLAT WASHER M10 2 ...

Page 79: ...MODEL BMG 780 GRINDER SECTION 10 SPARE PARTS 78 Grinding Polishing OPERATING MANUAL MARCH 2009 Tooling Pulley Assembly ...

Page 80: ...ey Assembly ITEM NO PART NUMBER DESCRIPTION QTY 1 BG007819 BEARING HOUSE 1 2 PA 10689 PULLEY 1 3 CP 10123 TAPER LOCK BUSHING 1 4 CP 10050 KEY 1 5 CP 10043 RETAINING RING 40MM EXTERNAL 4 6 BG007817 BEARING HOUSE 1 7 PA 10693 TOOLING DRIVE AXLE 1 8 CP 10054 DOWEL PIN 3 9 BG11871 BEARING 1 10 BG11887 BEARING 1 ...

Page 81: ...MODEL BMG 780 GRINDER SECTION 10 SPARE PARTS 80 Grinding Polishing OPERATING MANUAL MARCH 2009 Center Pulley ...

Page 82: ...H 2009 Center Pulley ITEM NO PART NUMBER DESCRIPTION QTY 1 BG007812 SPROCKET 1 2 PG 10161 PULLEY W CENTER SECTION 1 3 BG11984 BEARING 1 4 CP 10045 RETAINING RING EXTERNAL 50MM 1 5 CP 10044 RETAINING RING INTERNAL 90MM 1 6 CP 10053 V SEAL 1 7 800847 M8 X 1 25 X 110MM SOCKET HEAD CAP SCREW 6 ...

Page 83: ...MODEL BMG 780 GRINDER SECTION 10 SPARE PARTS 82 Grinding Polishing OPERATING MANUAL MARCH 2009 Contra pulley ...

Page 84: ... 4 BG007804 FLANGE 1 5 BG007805 PULLEY 1 6 BG007807 RING 1 7 BG11881 BEARING 2 8 CP 10047 RETAINING RING INTERNAL 52MM 4 9 CP 10051 RETAINING RING EXTERNAL 25MM 1 10 CP10048 KEY 1 11 CP 10046 KEY 1 12 800775 FLAT WASHER 8MM NARROW 4 13 800795 WASHER 6MM EXTRA WIDE 2 14 800796 M8 X 1 25 X 40 SOCKET HEAD CAP SCREW 4 15 800839 M6 X 1 0 X 25 HEX HEAD CAP SCREW 2 16 5037600 LOCK WASHER M6 2 17 800848 L...

Page 85: ...MODEL BMG 780 GRINDER SECTION 10 SPARE PARTS 84 Grinding Polishing OPERATING MANUAL MARCH 2009 Driving Pulley ...

Page 86: ...lley ITEM NO PART NUMBER DESCRIPTION QTY 1 PA 10694 DRIVING AXLE 1 2 BG007815 BEARING HOUSE 1 3 BG11867 PULLEY 1 4 BG11868 TAPER BUSHING 1 5 BG11871 BEARING 1 6 BG11933 BEARING 1 7 CP 10042 KEY 1 8 BG007817 BEARING HOUSE 1 9 CP 10049 RETAINING RING INTERNAL 80MM 2 10 CP 10043 RETAINING RING EXTERNAL 40MM 3 ...

Page 87: ...MODEL BMG 780 GRINDER SECTION 10 SPARE PARTS 86 Grinding Polishing OPERATING MANUAL MARCH 2009 Diamond Plate Holder ...

Page 88: ... 10252 FORK 1 2 800775 FLAT WASHER M8 3 3 800803 M8 X 1 25 X 20MM SOCKET HEAD CAP SCREW 3 4 800804 FLAT WASHER NARROW M8 8 5 800805 7 16 14 UNC X 2 5 LONG HEX HEAD BOLT 4 6 P002973 MORFLEX COUPLING 502 1 7 BG11807 MAGNET 3 8 BG11808 MAGNET HOLDER 3 9 PA 10254 DIAMOND HOLDER 1 10 BG11811 CENTERING STAR 3 11 800811 M6 X 1 0 X 12 FLAT HEAD SOCKET CAP SCREW 6 ...

Reviews: