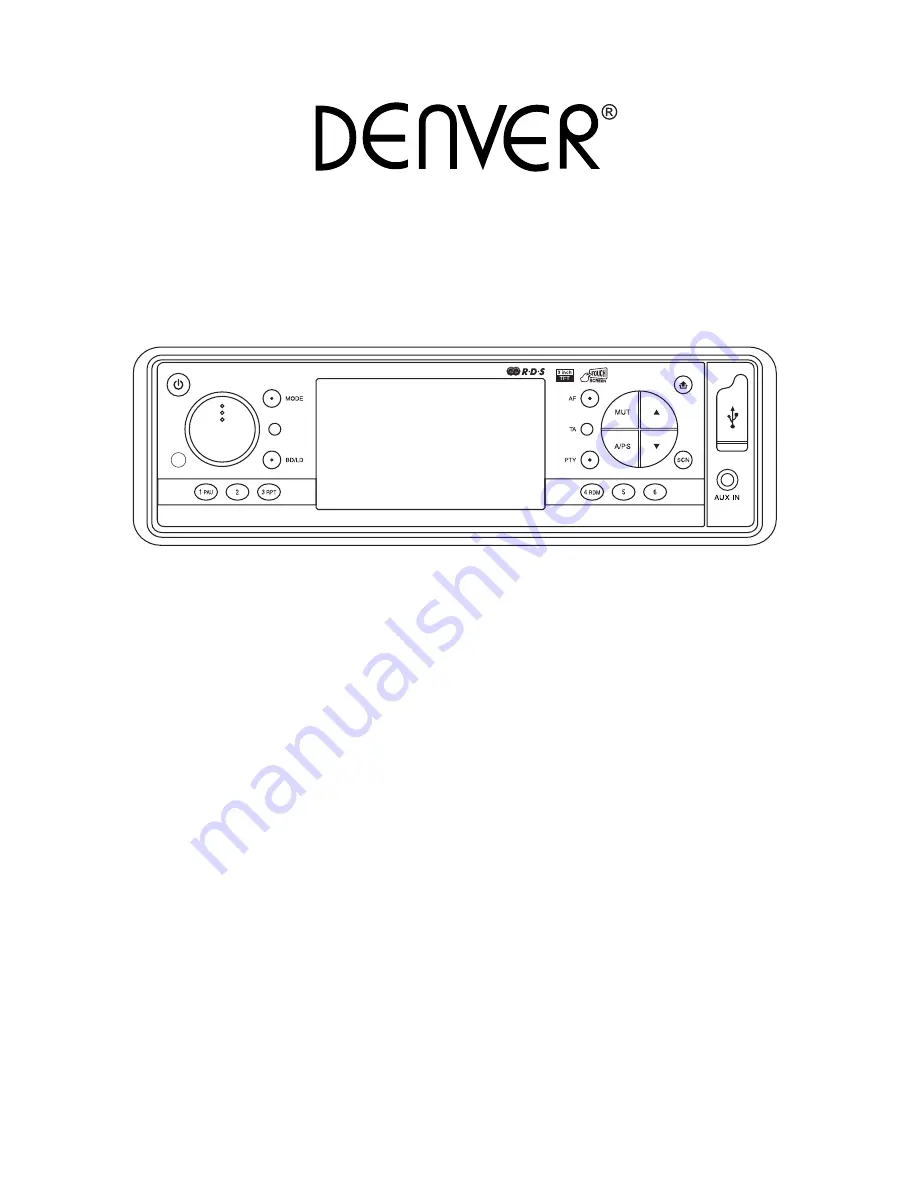
background image

3

(1-3)

3

(4-6)

1

8

4

16

5

12

15 23

10 11

7 9

2

RESET

22

21

AUX IN

17

18

19

6

14

20

13

24

INSTRUCTION MANUAL

Car Stereo 

MP3/WMA/MPEG4 Player

with PLL FM Stereo Radio

Radio Data System

3 Inch TFT-LCD Display

USB / SD/MMC Card Input

Front AUX IN

Touch Screen Control 

Flip Down/Detachable Front Panel

CUT-301

Summary of Contents for CUT-301

Page 1: ...SET AUX IN 17 18 19 6 14 20 13 24 INSTRUCTION MANUAL Car Stereo MP3 WMA MPEG4 Player with PLL FM Stereo Radio Radio Data System 3 Inch TFT LCD Display USB SD MMC Card Input Front AUX IN Touch Screen Control Flip Down Detachable Front Panel CUT 301 ...

Page 2: ...fore detaching the front panel be sure to press the button 1 OFF first Then press the button let the Front Panel arrive in horizontal position and detach the panel by pulling it towards you as illustrated Notes Do not press the front panel hard against the unit when attaching it It can be easily attached by pressing it lightly against the unit When you carry the front panel with you put it in the ...

Page 3: ...hould be connected to high voltage DRIVING WITHOUT VIDEO DISPLAY Follow the installation below so when the car is in motion no video will come out from the LCD screen Only sound can be heard from speaker Note Only sound can be heard when car is in motion Refer and follow your country s law regarding driving with video Caution Do not attempt to install it by yourself if the instruction is not clear...

Page 4: ...o guide the driver CONNECTOR A 4 MEMORY 12V 5 AUTO ANTENNA OUTPUT 7 12V TO IGNITION KEY 8 GROUND NOTE connector A no 7 must be connected by car ignition key in order to avoid that car battery becomes weak when the car will be not used for long period CONNECTOR B 1 REAR RIGHT SPEAKER 2 REAR RIGHT SPEAKER 3 FRONT RIGHT SPEAKER 4 FRONT RIGHT SPEAKER 5 FRONT LEFT SPEAKER 6 FRONT LEFT SPEAKER 7 REAR LE...

Page 5: ... AUTO SEEK TUNING 12 MUTE BUTTON MUT 13 SCAN AUTOMATIC TUNING CONTROL SCN 14 AUTO SEEK SEARCH TUNING A PS 15 PANEL RELEASE BUTTON 16 TFT LCD DISPLAY 17 PLAY PAUSE BUTTON 18 REPEAT BUTTON 19 RANDOM BUTTON 20 10 TRACK SEARCH DOWN UP 21 RESET BUTTON 22 SD MMC CARD SLOT 23 USB PORT 24 FRONT AUX IN 3 1 3 3 4 6 1 8 4 16 5 12 15 23 10 11 7 9 2 RESET 22 21 AUX IN 17 18 19 6 14 20 13 24 3 1 3 3 4 6 1 8 4 1...

Page 6: ...Slide the tray out on the back of the remote control and insert the battery with the and minus poles pointing in the proper direction When use for the first time pull out the film protruding the tray CAUTIONS Remove the battery if the remote control is not used for a month or longer Do not recharge disassemble heat or dispose the battery on fire Do not store the battery with metallic materials In ...

Page 7: ...OUT and VIDEO OUT port at the back of head unit to the LINE IN of external AV device 2 Press and hold MODE Select memory card or USB source 3 Press DUAL key on remote control to select which mode you want to control T TUNER C CARD U USB Note You will need to connect an external portable TV or monitor when using this feature RESET Reset button is placed on the housing To reset use a sharp point obj...

Page 8: ...ations Note Program type will flash when searching for stations OPERATIONS COMMON FOR MP3 WMA MPEG4 10 Tracks Down 10 tracks Up 1 Press 10 button to jump 10 tracks backward starting from currently played track 2 Press 10 button to jump 10 tracks forward starting from currently played track Specifying particular track During playback all track file names under a folder will be displayed on the scre...

Page 9: ...rt Plug your USB memory stick directly into the USB cable Playback starts automatically IMPORTANT INFORMATION BECAUSE OF THE GREAT VARIETY OF PRODUCTS WITH USB SD AND MMC CARD PORTS AND THEIR SOMETIMES QUITE MANUFACTURER SPECIFIC FUNCTIONS WE CAN NEITHER GUARANTEE THAT ALL DEVICES WILL BE RECOGNIZED NOR THAT ALL OPERATING OPTIONS THAT ARE POS SIBLE IN THEORY WILL ACTUALLY WORK Front Aux In Conveni...

Page 10: ...playback 1 Each time you press Step button on remote control you move ahead one frame To return to normal playback press PAL NTSC P N Press and hold P N button to switch between PAL NTSC system Customizing Audio Video Settings AUDIO SETUP 1 Press VOL knob to enter AUDIO setup Selected item will be highlighted You can set BASS TREBLE BALANCE FADER TA VOLUME 2 Press or button to select item Rotate V...

Page 11: ...Saturation Sharpness Options NTSC PAL AUTO ON OFF 4 3PS 4 3LB 16 9 Setup password Setup rating level Restore to factory settings Select preferred options appear on screen Use navigation keys on remote control to setup desired level Setting Rating Password 1 Press Setup on the remote control 2 Using Navigation keys select System Setup Password and press Enter 3 Enter the default password 0000 and p...

Page 12: ...ble modification without notice due to improvements Instructions on environment protection Do not dispose of this product in the usual household garbage at the end of its lifecycle hand it over at a collection point for the recycling of electrical and electronic appliances The symbol on the product the instructions for use or the packing will inform about the methods for disposal The materials are...

Reviews: