MODEL NUMBER: 1441 SERIES
Customer Service: 561-274-2110
www.decolav.com
LET YOUR DREAMS COME ALIVE, YOUR PASSIONS BECOME
REALITY, BE THE ENVY OF YOUR NEIGHBORS
®
1
•260511•
1. Prior to installation, unpack your new DECOLAV
®
product and inspect it. Keep the product in its original package until you
are ready to install it.
2. The wall must be square, plumb and level.
3. Shut the water supply off when replacing an existing fi xture. Preparation of the fl oors and walls, including all additional wall
supports, may be required.
4.
Observe all local plumbing and building codes.
5. It is recommended that this installation be done with a minimum of two people. Do not install this fi xture alone.
Dear Valued Customer,
DECOLAV
®
would like to take this opportunity to thank you for your purchase – It is our sincere hope that you are completely
satisfi ed with your new product. We welcome and look forward to helping you create another unique look for your next
bathroom project.
Prior to installation, please take a moment to review all provided materials and hardware. For assistance with your new product,
please contact our dedicated DECOLAV
®
customer service staff .
Sincerely,
Robert H. Mayer
Chief Executive Offi
cer and President
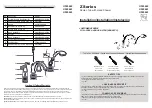
• DECOLAV
®
9295 Grid Drain or
• DECOLAV
®
9297 Push Button Closing Umbrella Drain
CHANGING THE WAY YOU VIEW THE BATHROOM
®
PRODUCT DESCRIPTION
PRODUCT MEASUREMENTS
RECOMMENDED ACCESSORIES
THANK YOU
BEFORE YOU BEGIN
MODEL NUMBER: 1441 SERIES
Montallegro
®
• Classically Redefi ned
TM
Collection
• 15 inches Round (38.1 cm)
• Vitreous China with Overfl ow
• High-Gloss Ceramic Finish
• For Above Counter Use
• Diameter:
15.375 inches
(39.0525 cm)
• Height:
6
inches
(15.24 cm)