

ToTal daTa and sofTware on lapTop musT be
less Than capaciTy of new ssd.
before you start, refer to your computer’s documentation
to determine whether your system supports serial aTa
(saTa) on the motherboard and the location of the saTa
connectors.
This kit assumes that your current laptop drive is a saTa
drive. This kit and ssd drive will noT work as a replace-
ment for a paTa drive.*
disk drives are fragile and very sensitive to static
electricity. To protect you and your system, take the
following precautions:
• Turn off the power of the host system prior to
attempting installation, but leave the power plug
connected.
• Keep the drive in the protective anti-static
container until you are ready to install the ssd.
• Wear a wrist strap and connect the ground strap to
the computer case to minimize static electricity.
• Handle the drive with care. Do not touch the
connectors.
• Do not remove the encasement or disassemble the
drive, as such actions void the warranty.
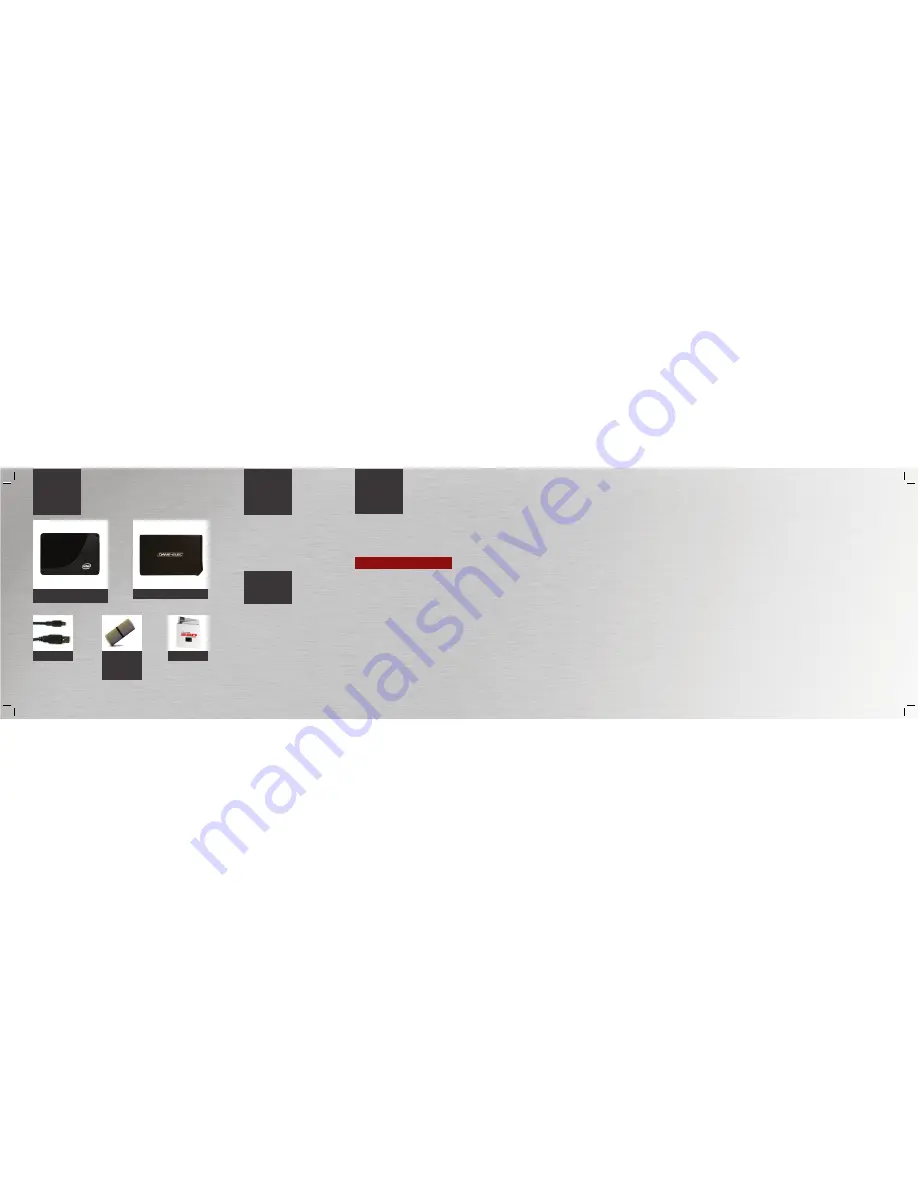
PACKAGING
CONTENTS
intel® X25-m saTa solid-state drive
with frame and screws
2.5” dane-elec enclosure
GETTING
STARTED
HANDLING
PRECAUTIONS
The saTa laptop ssd migration kit includes not only
the saTa solid-state drive to replace your slow exist-
ing saTa spinning hard drive; the kit also includes a
complete external usb drive case to make the migration
possible and then to repurpose the old drive as an
external drive after the migration. The migration software
is included on a usb flash drive that can also be reused
for other purposes after the migration.
before you begin, obtain the steps from your laptop
manufacturer on removing the old hard drive and gather
the tools necessary. final assembly of the migration kit
itself requires a small phillips-head screwdriver.
MIGRATION
STEPS
FOR MICROSOFT WINDOWS
A. Prepare the new SSD drive for migration.
This assembly is temporary for the cloning process and
does not require the screws that will be used to secure
the final assembly if the old drive will be reused as an
external drive.
1. open the included usb case by sliding the case face-
plate and circuit board out of the case.
2. align the new saTa ssd drive with the saTa connec-
tor on the circuit board and gently complete the saTa
connection.
3. slide the circuit board and ssd assembly back into
the case. This will protect the electronics of the circuit
board from accidental contact during the cloning. There
is no need to screw the case together at this point.
B. Clone the old drive to the new SSD.
1. after windows is running as normal, attach the includ-
ed usb flash drive and run the acronis migrate easy
installation from that drive. The installation program may
require the system to be rebooted and reQuires in-
ternet access for activation. The serial number required
for software activation is printed on the warranty and
copyright page of the Quickstart Guide.
2. after the installation, remove the usb flash drive, and
attach the temporary external ssd usb drive created in
ssd preparation steps.
3. run the acronis migrate easy software from the win-
dows start menu.
4. The migration software will walk you through the “disk
cloning” process. read each step carefully.
5. when ready, the migrate easy will instruct you to
reboot the system to begin the actual cloning of the old
drive to the new drive.
6. upon completion, you will be instructed to shut down
the system.
Important: Do not remove your old hard drive
until the cloning process is complete.
C. Replace the old hard drive with the new SSD drive.
1. follow the instructions from your laptop manufacturer to
remove the old hard drive.
2. remove the new ssd from the temporary external ssd
usb drive assembly.
3. set both drives on a flat surface close to each other and
compare the height or thickness. if the new ssd drive is
substantially thinner, use the included frame and longer
screws to make the new ssd closer to the same thickness.
4. install the new ssd in the laptop and reassemble the
laptop according to the instructions from your laptop
manufacturer.
5. start your laptop as normal. your system bios may note a
configuration change that requires your confirmation.
D. Repurpose your old internal hard drive
1. pull out the circuit board with plug from the enclosure.
2. slip your old internal hard drive onto the plug
3. secure your old hard drive by inserting one of the screws
in each of the side and bottom mounting holes.
4. insert the hard disk onto enclosure.
5. secure enclosure by locking screws.
FOR APPLE MAC OS X
A. Prepare the new SSD drive for migration.
This assembly is temporary for the cloning process and
does not require the screws that will be used to secure
the final assembly if the old drive will be reused as an
external drive.
1. open the included usb case by sliding the case face-
plate and circuit board out of the case.
2. align the new saTa ssd drive with the saTa connec-
tor on the circuit board and gentry complete the saTa
connection.
3. slide the circuit board and ssd assembly back into
the case. This will protect the electronics of the circuit
board from accidental contact during the cloning. There
is no need to screw the case together at this point.
B. Partition the new SSD.
for maximum reliability:
a. partition the new drive on your mac before cloning.
b. do not run any other application during any part of
the migration process.
c. disable any antivirus software during the migration
process.
d. remove all other usb devices.
e. Do not use the Keyboard USB port for the USB Flash
or ssd drive.
1. attach the temporary ssd usb drive created in the
ssd preparation steps.
2. start the “disk utility” found in applications/utilities.
3. select the new external ssd drive hardware in the disk
utility’s sidebar.
4. click on the “partition” tab.
5. use disk utility to divide the new drive as needed,
which will most likely be as a single large partition. use
“mac os extended (Journaled)” as the format type and
name the new drive the exact same name as the drive
being replaced.
6. click “options”.
7. choose the partition scheme (Guid for intel-based
macs, apple partition map for power pc macs) and
accept the page.
8. click “partition”.
C. Clone the old drive to the new SSD.
1. run superduper! from the included usb flash drive.
The serial number required for software activation is
printed on the warranty and copyright page of the
Quickstart Guide.
2. choose to copy the old drive to the new ssd drive.
read each step carefully.
3. click “copy now”.
4. upon completion, shut down the system.
D. Replace the old hard drive with the new SSD
drive.
1. follow the instructions from apple to remove the old
hard drive.
2. remove the new ssd from the temporary external
ssd usb drive assembly.
3. set both drives on a flat surface close to each other
and compare the height or thickness. if the new ssd
drive is substantially thinner, use the included frame and
longer screws to make the new ssd closer to the same
thickness.
4. install the new ssd in the laptop and reassemble the
laptop according to the instructions from apple.
5. start your laptop as normal.
D. Repurpose your old internal hard drive
1. pull out the circuit board with plug from the enclosure.
2. slip your old internal hard drive onto the plug
3. secure your old hard drive by inserting one of the
screws in each of the side and bottom mounting holes.
4. insert the hard disk onto enclosure.
5. secure enclosure by locking screws.
64mb usb drive
with acronis®
migrate easy 7.0
and superduper!
for mac, v2.5
Quick start Guide
usb cable 1.1/2.0
*
If your PC does not have SATA connectors, you will
need to purchase a SATA host adapter that is com-
patible with your computer and operating system.
Then, using the host adapter manufacturer’s installa-
tion instructions, you will need to install the adapter
with the corresponding driver. You will also need the
following items:
• Four 6-32 UNC mounting screws and a screw-
driver. (2.5” Form factor only)
• A SATA interface cable with a maximum length
of 1 meter. (Desktop usage model only)
• A SATA-compatible (2.5” Form factor) or micro-
SATA (1.8” Form factor) power cable or adapter.
(Desktop usage model only)


