background image


Before You Begin 

Make sure you have all the necessary information and equipment on hand before beginning the 
installation. 

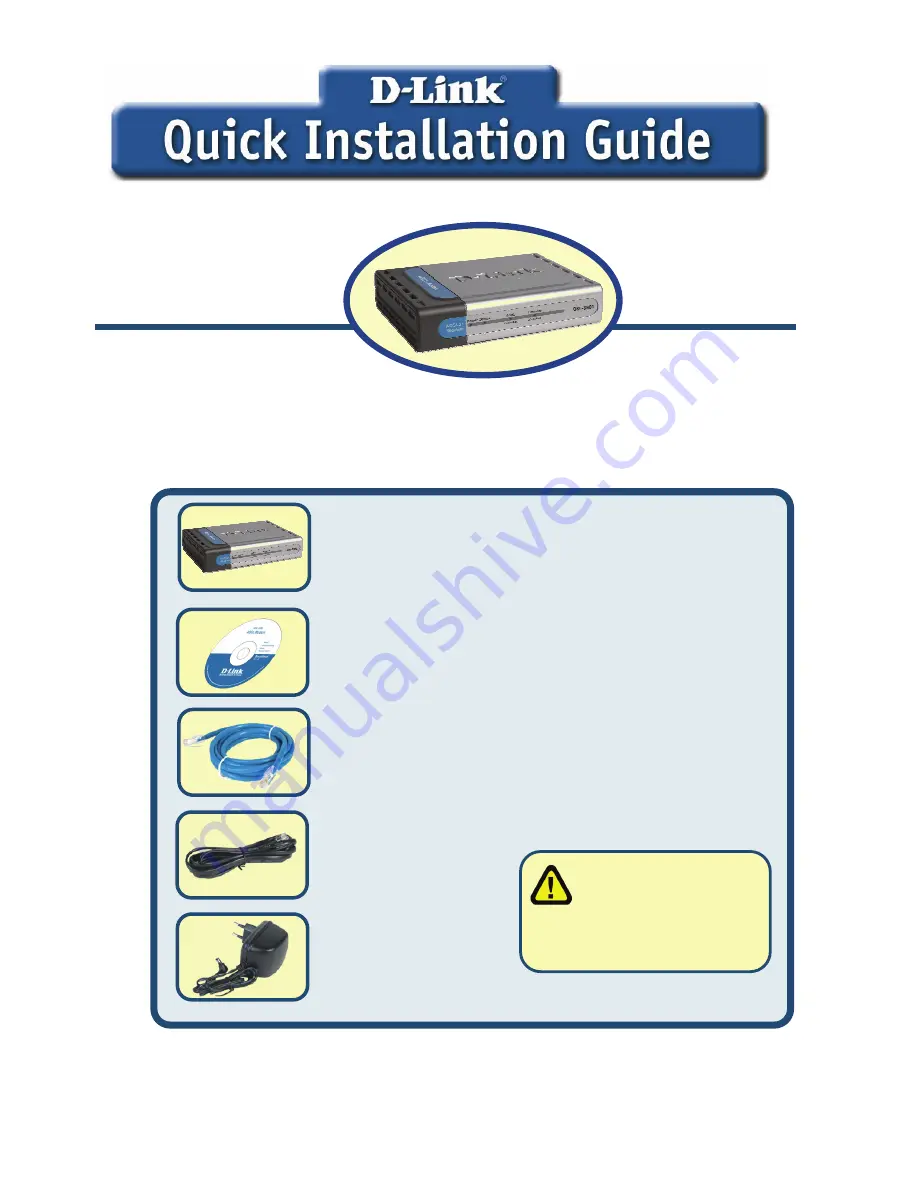
Check Your Package Contents 


If any of the above items are missing, please contact your reseller.

This product can be set 
up using any current web 
browser, e.g., Internet 
Explorer 6 or Netscape 
Navigator 6.2.3.


DSL-380T 

ADSL Modem 


Using a power supply   
with a different voltage 

rating will damage and void 
the warranty for this product.


DSL-380T ADSL Modem 


CD-ROM (containing Manual) 


Ethernet (CAT5 UTP) Cable 


Telephone Cable 


Power Adapter 
 

Summary of Contents for DSL-320T

Page 1: ...ms are missing please contact your reseller This product can be set up using any current web browser e g Internet Explorer 6 or Netscape Navigator 6 2 3 DSL 380T ADSL Modem Using a power supply with a different voltage rating will damage and void the warranty for this product DSL 380T ADSL Modem CD ROM containingManual Ethernet CAT5 UTP Cable Telephone Cable Power Adapter ...

Page 2: ...oper operation B Insert one end of the cable into the Ethernet port on the back panel of the DSL 380T and the other end of the cable to an Ethernet Adapter or available Ethernet port on your computer C Insert the ADSL telephone cable included with the Modem into the ADSL port and then connect the cable to your telephone line ADSL Port Connect to ADSL line Ethernet Port Connect to Ethernet cable Re...

Page 3: ...f you are using Windows XP and do not know how to change your network settings skip ahead to Appendix A and read the instructions provided You may also read the User Manual for instructions on changing IP settings for computers running Windows operating systems Type admin for the User Name and admin in the Password field Click OK Open your Web browser and type http 192 168 1 1 into the URL address...

Page 4: ...g the Setup Wizard window opens Most users will be able to use the Setup Wizard to establish the ADSL connection to your ISP To begin using the Setup Wizard click on the Run Wizard button in the middle of the web page The first pop up Setup Wizard window opens Click on the Run Wizard button ...

Page 5: ...l need to enter information provided by your ISP If you have not been given information about the connection type the VPI and VCI numbers as well as other information related to the connection type you will not be able to complete the setup The first Setup Wizard window lists a summary of the steps required to complete the setup Click the Next button to begin setup Click the Next button ...

Page 6: ...Setup Wizard and contact your ISP for the information The Setup Wizard window that appears when you click the Next button depends on what connection type you select The connection types available in the Setup Wizard window are PPPoE PPPoA Static IP Address and Bridge Mode Follow the instructions below for the type of connection you are using Select the Connection Type used for your ADSL service Cl...

Page 7: ...ed to change the VPI number and VCI number type in the new values Select the Connection Type used for encapsulation specific to your service Click Next when you are ready to continue to the Setup Completed window Type the User Name and Password for your ISP account Change the VPI and VCI numbers as instructed by your ISP Type the new values in the spaces provided here Select the Connection Type as...

Page 8: ...f you have been instructed to change the VPI number and VCI number type in the new values Click Next when you are ready to continue to the Setup Completed window Select the Connection Type as instructed by your ISP Change the VPI and VCI numbers as instructed by your ISP Type the new values in the spaces provided here Type the IP addresses for the WAN IP Address WAN Subnet Mask ISP Gateway Address...

Page 9: ...ructed to change the VPI number and VCI number type in the new values Click Next when you are ready to continue to the Setup Completed window Select the Connection Type as instructed by your ISP Click the Next button Skip ahead to the Setup Completed window below Change the VPI and VCI numbers as instructed by your ISP Type the new values in the spaces provided here ...

Page 10: ...ow completed Click the Restart button to save the new settings and restart the Modem It will take about two minutes to restart the Modem The window pictured on the right appears during the save and restart process Please do not turn off the Modem while it is still displayed Click the Restart button ...

Page 11: ...ted on the CD ROM Configuring IP Settings in Windows XP Use the following steps to configure a computer running Windows XP to be a DHCP client 1 From the Start menu on your desktop go to Control Panel 2 In the Control Panel window click Network and Internet Connections Click Network and Internet Connections From the Start menu go to Control Panel ...

Page 12: ...w click Network Connections 4 In the Network Connections window right click on Local Area Connection then click Properties Right click on the Local Area Connection icon and select the Properties option from the pull down menu Click Network Connections ...

Page 13: ...the following items by clicking on it once Click on the Properties button 6 Select Obtain an IP address automatically by clicking once in the circle Click the OK button Your computer is now ready to use the Modem s DHCP server Click Properties Select Obtain an IP address automatically in the Internet Protocol TCP IP Properties window ...

Page 14: ...ed Kingdom Ireland D Link UK Ireland Technical Support over the Telephone 08456 12 0003 United Kingdom 44 8456 12 0003 Ireland Lines Open 8 00am 10 00pm Mon Fri 10 00am 7 00pm Sat Sun D Link UK Ireland Technical Support over the Internet http www dlink co uk ftp ftp dlink co uk For Customers within Canada D Link Canada Technical Support over the Telephone 1 800 361 5265 Canada Mon to Fri 7 30AM to...

Page 15: ...on PPPoE Informazione importante riguardante la registrazione in internet Per gli utenti che sottoscrivono un abbonamento Internet broadband limitato o a pagamento per il traffico dati effettuato Nelle impostazioni della configurazione WAN c è un parametro chiamato Maximum idle timer Questo parametro controlla i secondi di inattività prima di chiudere la connessione ad Internet L impostazione di d...

Page 16: ...e Verbindung manuell aktivieren Connect on Demand Bei einer Verbindungsanfrage aus Ihrem LAN baut der Router die Verbindung zum Internet automatisch auf DSL Produkte siehe auch Hinweis Î Maximum Idle Time Connect On Demand Bei einer Verbindungsanfrage aus Ihrem LAN baut der Router die Verbindung zum Internet automatisch auf Wird dieser Funktion nicht aktiviert dann bleibt das Gerät ständig mit dem...

Page 17: ... sich an Ihren Fachhändler DSL 380T ADSL Modem CD ROM mit Handbuch Ethernet Kabel CAT5 UTP Telefonkabel Netzteil Dieses Produkt kann mit den folgenden Webbrowsern eingerichtet werden Internet Explorer 6 oder höher und Netscape Navigator 6 2 3 oder höher DSL 380T ADSL Modem Die Verwendung eines Netzteils mit abweichender Spannung führt zur Beschädigung des Geräts und zum Erlöschen der Garantie ...

Page 18: ...zeige leuchtet auf und zeigt damit den ordnungsgemäßen Betrieb des Geräts an B Verbinden Sie das eine Ende des Kabels mit einem Ethernet Anschluss auf der Rückseite des DSL 380T und das andere Ende mit einem Ethernet Adapter oder einem verfügbaren Ethernet Anschluss an Ihrem Computer ADSL Anschl uss zur ADSL Leitung Ethernet Anschl uss für Ethernet Kabel Reset Taste Stromeingang für das Netzteil ...

Page 19: ...n und nicht wissen wie Sie die Netzwerkeinstellungen ändern können fahren Sie mit den Anweisungen im Anhang fort Weitere Informationen zur Änderung der IP Einstellungen bei Computern mit Windows Betriebssystemen finden Sie auch im Benutzerhandbuch Tragen Sie unter User name Benutzername und Password Kennwort jeweils admin ein Starten Sie den Webbrowser und geben Sie in das Adressfeld http 192 168 ...

Page 20: ...n Fällen kann die ADSL Verbindung zum Internetdienstanbieter mit dem Setup Assistenten hergestellt werden Um den Setup Assistenten zu starten klicken Sie in der Mitte der Webseite auf die Schaltfläche Run Wizard Assistenten starten Das erste Fenster des Setup Wizard Setup Assistenten wird angezeigt Klicken Sie auf die Schaltfläche Run Wizard Assistent starten ...

Page 21: ...nen Ihres Internetdienstanbieters eingeben Ein Abschluss der Konfiguration ist ohne Informationen zum Verbindungstyp zu den VPI und VCI Werten oder anderen Informationen zum Verbindungstyp nicht möglich Im ersten Fenster des Setup Assistenten finden Sie eine Zusammenfassung aller erforderlichen Schritte Klicken Sie auf die Schaltfläche Next Weiter um die Konfiguration zu starten Klicken Sie auf Ne...

Page 22: ... Sie sich an Ihren Internetdienstanbieter Wenn Sie auf Next Weiter klicken wird eine Seite des Setup Assistenten angezeigt die je nach gewählter Verbindung unterschiedliche Informationen enthält Im Menü können Sie zwischen folgenden Verbindungen wählen PPPoE PPPoA Static IP Address Statische IP Adresse und Bridge Mode Bridge Modus Folgen Sie den nachstehend aufgeführten Schritten entsprechend Ihre...

Page 23: ...n ein Wählen Sie unter Connection Type den Verbindungstyp für die jeweilige Kapselung Ihres Dienstes Klicken Sie auf Next Weiter um zum Fenster Setup Completed Setup abgeschlossen zu gelangen Geben Sie in den Feldern User Name und Password den Benutzernamen und das Kennwort für Ihr ISP Konto ein Geben Sie die neuen VPI und VCI Werte die Sie von Ihrem Internetdienstanbieter erhalten haben in die da...

Page 24: ...VPI oder VCI Werte zu ändern geben Sie die neuen Daten ein Klicken Sie auf Next Weiter um zum Fenster Setup Completed Setup abgeschlossen zu gelangen Klicken Sie auf Next Weiter Fahren Sie mit dem Fenster Setup Completed Setup abgeschlossen fort below Geben Sie die neuen VPI und VCI Werte die Sie von Ihrem Internetdienstanbieter erhalten haben in die dafür vorgesehenen Felder ein Wählen Sie unter ...

Page 25: ...Sie die neuen Daten ein Klicken Sie auf Next Weiter um zum Fenster Setup Completed Setup abgeschlossen zu gelangen Klicken Sie auf Next Weiter Fahren Sie mit dem Fenster Setup Completed Setup abgeschlossen fort Geben Sie die neuen VPI und VCI Werte die Sie von Ihrem Internetdienstanbieter erhalten haben in die dafür vorgesehenen Felder ein Wählen Sie unter Connection Type den Verbindungstyp gemäß ...

Page 26: ...altfläche Restart Neu starten um die Einstellungen zu speichern und das Modem neu zu starten Der Neustart dauert etwa zwei Minuten Während des Abspeicherns und des Neustarts erscheint das rechts abgebildete Fenster Schalten Sie das Modem auf keinen Fall aus solange das Bild angezeigt wird Klicken Sie auf die Schaltfläche Restart Neu starten ...

Page 27: ...buch auf der CD ROM IP Einstellungen unter Windows XP konfigurieren Führen Sie die folgenden Schritte aus um einen Computer mit Windows XP als DHCP Client zu konfigurieren 1 Klicken Sie auf dem Desktop im Menü Start auf Systemsteuerung 2 Klicken Sie im Fenster Systemsteuerung auf Netzwerk und Internetverbindungen Klicken Sie auf Netzwerk und DFÜ Verbindungen Wählen Sie unter Start die Option Einst...

Page 28: ...n Sie im Dialogfeld Netzwerkverbindungen mit der rechten Maustaste auf LAN Verbindung und anschließend auf Eigenschaften Klicken Sie mit der rechten Maustaste auf das Symbol LAN Verbindung und wählen Sie in der Dropdown Liste die Option Eigenschaften Klicken Sie auf Netzwerkverbindungen anzeigen ...

Page 29: ...s dazu einmal an Klicken Sie auf die Schaltfläche Eigenschaften 6 Wählen Sie IP Adresse automatisch beziehen indem Sie einmal auf das Optionsfeld klicken Klicken Sie auf die Schaltfläche OK Der Computer ist nun so konfiguriert dass der DHCP Server des Modems verwendet wird Klicken Sie auf Eigenschaften Wählen Sie im Fenster Eigenschaften von Internetprotokoll TCP IP die Option IP Adresse automatis...

Page 30: ...support dlink de Telefon 49 1805 2787 0 12 Min aus dem Festnetz der Deutschen Telekom Telefonische technische Unterstützung erhalten Sie Montags bis Freitags von 09 00 bis 17 30 Uhr Unterstützung erhalten Sie auch bei der Premiumhotline für D Link Produkte unter der Rufnummer 09001 475767 Montag bis Freitag von 6 22 Uhr und am Wochenende von 11 18 Uhr 1 75 Min aus dem Festnetz der Deutschen Teleko...

Page 31: ...e revendeur Ce produit est compatible avec les navigateurs Web suivants Internet Explorer version 6 ou supérieure et Netscape Navigator version 6 2 3 ou supérieure DSL 380T ModemADSL L utilisation d une alimentation électrique d une tension différente risque d endommager ce produit et entraînera la nullité de la garantie Modem ADSL DSL 380T CD ROM contenantlemanuelutilisateur Câble Ethernet UTP CA...

Page 32: ... allume pour indiquer que le système fonctionne correctement B Branchez l une des extrémités du câble Ethernet sur le port Ethernet situé sur le panneau arrière du DSL 380T et l autre extrémité sur un adaptateur Ethernet ou un port Ethernet disponible de votre ordinateur Port ADSL A brancher sur la ligne ADSL Port Ethernet A brancher sur le câble Ethernet Bouton de réinitialisation Alimentation A ...

Page 33: ...dows XP et ne savez pas comment modifier vos paramètres réseau vous pouvez passer directement aux instructions de l annexe Vous pouvez également vous reporter au manuel utilisateur pour apprendre à modifier les paramètres IP des ordinateurs fonctionnant sous Windows Saisissez admin dans les champs User name Nom d utilisateur et Password Mot de passe Cliquez sur OK Ouvrez votre navigateur Web et ta...

Page 34: ...tion s ouvre La plupart des utilisateurs pourront établir la connexion ADSL à leur FAI grâce à cet Assistant Pour le lancer cliquez sur le bouton Run Wizard Exécuter l assistant situé au milieu de la page Web La première fenêtre instantanée Setup Wizard Assistant de configuration s ouvre Cliquez sur le bouton Run Wizard Exécuter l assistant ...

Page 35: ...net vous devez saisir les informations de votre FAI Si vous n avez pas reçu d informations relatives au type de connexion entres autres les numéros VPI et VCI vous ne pourrez pas procéder à l installation La première fenêtre de l assistant de configuration résume les étapes nécessaires à la configuration Pour commencer la configuration cliquez sur le bouton Next Suivant Cliquez sur le bouton Next ...

Page 36: ...e cas contraire cliquez sur le bouton Next Suivant La fenêtre de l assistant de configuration dépend alors du type de connexion sélectionné Les types de connexion disponibles dans l assistant de configuration sont PPPoE PPPoA Static IP Address Adresse IP statique et Bridge Mode Mode pont Suivez les instructions ci dessous pour le type de connexion que vous utilisez Sélectionnez le type de connexio...

Page 37: ...entrez les nouvelles valeurs Sélectionnez le type de connexion utilisé pour l encapsulation spécifique à votre service Cliquez sur Next Suivant lorsque vous êtes prêt à passer à la fenêtre Setup Completed Configuration terminée Renseignez les champs User Name Nom d utilisateur et Password Mot de passe à l aide des informations de votre compte FAI Modifiez les numéros VPI et VCI selon les instructi...

Page 38: ... vous avez reçu l instruction de modifier les numéros VPI et VCI entrez les nouvelles valeurs Cliquez sur Next Suivant lorsque vous êtes prêt à passer à la fenêtre Setup Completed Configuration terminée Modifiez les numéros VPI et VCI selon les instructions de votre FAI Tapez les nouvelles valeurs dans les champs ci contre Sélectionnez le type de connexion indiqué par votre FAI Saisissez les adres...

Page 39: ...s numéros VPI et VCI entrez les nouvelles valeurs Cliquez sur Next Suivant lorsque vous êtes prêt à passer à la fenêtre Setup Completed Configuration terminée Sélectionnez le type de connexion indiqué par votre FAI Cliquez sur le bouton Next Suivant La fenêtre Setup Completed Configuration terminée s affiche Modifiez les numéros VPI et VCI selon les instructions de votre FAI Tapez les nouvelles va...

Page 40: ...is Cliquez sur Restart Redémarrer pour enregistrer les nouveaux paramètres et redémarrer le modem Cette dernière opération prend environ deux minutes La fenêtre ci contre s affiche lors du processus d enregistrement et de redémarrage N éteignez surtout pas le modem tant que cette fenêtre est ouverte Cliquez sur Restart Redémarrer ...

Page 41: ...ous Windows XP Sous Windows XP les étapes de configuration d un ordinateur comme client DHCP sont les suivantes 1 Dans le menu Start Démarrer sur le bureau sélectionnez Control Panel Panneau de configuration 2 Dans la fenêtre Control Panel Panneau de configuration cliquez sur Network and Internet Connections Connexions réseau et Internet Dans le menu Start Démarrer sélectionnez Control Panel Panne...

Page 42: ...nexions réseau cliquez à l aide du bouton droit de la souris sur Local Area Connection Connexion au réseau local puis cliquez sur Properties Propriétés Cliquez à l aide du bouton droit de la souris sur l icône Local Area Connection Connexion au réseau local et sélectionnez l option Properties Propriétés dans le menu déroulant Cliquez sur Network Connections Connexions réseau ...

Page 43: ...Protocole Internet TCP IP puis sur le bouton Properties Propriétés 6 Sélectionnez Obtain an IP address automatically Obtenir une adresse IP automatiquement puis cliquez sur le bouton OK Votre ordinateur est prêt à utiliser le serveur DHCP du modem Cliquez sur Properties Propriétés Dans la fenêtre Internet Protocol TCP IP Properties Propriétés de Protocole Internet TCP IP sélectionnez Obtain an IP ...

Page 44: ...ort technique destiné aux clients établis en France Assistance technique D Link par téléphone 0 820 0803 03 Assistance technique D Link sur internet http www dlink fr e mail support dlink fr Support technique destiné aux clients établis au Canada Assistance technique D Link par téléphone 800 361 5265 Lun Ven 7h30 à 21h00 HNE Assistance technique D Link sur internet http support dlink ca e mail sup...

Page 45: ...ntes de iniciar la instalación Comprobación del contenido del paquete Si falta alguno de estos componentes contacte con su proveedor Este producto puede configurarse con los siguientes navegadores Internet Explorer 6 o superior Netscape Navigator 6 2 3 o superior DSL 380T MódemADSL El uso de una fuente de alimentación con distinto voltaje puede ser perjudicial y anular la garantía de este producto...

Page 46: ...El LED de alimentación se encenderá para indicar que la operación se ha realizado correctamente B Introduzca un extremo del cable Ethernet en un puerto Ethernet del panel trasero del DSL 380T y el otro extremo del cable en un adaptador Ethernet o puerto Ethernet disponible del ordenador Puerto ADSL Para conectar la línea ADSL Puerto Ethernet Para conectar el cable Ethernet Botón Reset Entrada de a...

Page 47: ...ordenador para que sea un cliente DHCP Si usa Windows XP y no sabe cómo cambiar los parámetros de red consulte el Apéndice y siga las instrucciones En el Manual del usuario también encontrará instrucciones para cambiar los parámetros IP en ordenadores con otros sistemas operativos Windows Escriba admin en User Name y admin en Password Haga clic en OK Abra el navegador web y escriba http 192 168 1 ...

Page 48: ...etup Wizard La mayoría de usuarios podrán usar el asistente de configuración para establecer la conexión ADSL al ISP Para empezar a usar el asistente de configuración haga clic en el botón Run Wizard en el centro de la página web Se mostrará un menú emergente es el menú Setup Wizard Haga clic en Run Wizard ...

Page 49: ...nternet necesitará introducir la información que le haya proporcionado el ISP Si no dispone de información sobre el tipo de conexión ni sobre los números VPI y VCI no podrá completar la configuración La primera página del asistente de configuración muestra un resumen de los pasos necesarios para completar la configuración Haga clic en el botón Next para iniciar la configuración Haga clic en Next ...

Page 50: ...u ISP para que le dé información al respecto La página del asistente de configuración que aparecerá al hacer clic en el botón Next depende del tipo de conexión que haya seleccionado Los tipos de conexión disponibles en el menú del asistente de configuración son PPPoE PPPoA Static IP Address dirección IP estática y Bridge Mode modo bridge Siga las instrucciones para establecer el tipo de conexión S...

Page 51: ... se le ha indicado que cambie el número VPI y el número VCI escriba los nuevos valores Seleccione el tipo de conexión Connection Type usado para este servicio Haga clic en Next cuando esté listo para continuar y vaya a la página Setup Completed Escriba el Username y el Password de su cuenta con el ISP Cambie los números VPI y VCI si se lo ha indicado su ISP Escriba los nuevos valores Seleccione el...

Page 52: ...o le haya indicado su ISP Seleccione el tipo de conexión usado para la encapsulación Si se le ha indicado que cambie el número VPI y el número VCI escriba los nuevos valores Haga clic en Next cuando esté listo para continuar y vaya a la página Setup Completed Seleccione tipo de conexión según indicaciones del ISP Cambie los números VPI y VCI si se lo ha indicado su ISP Escriba los nuevos valores E...

Page 53: ...e le ha indicado que cambie el número VPI y el número VCI escriba los nuevos valores Haga clic en Next cuando esté listo para continuar y vaya a la página Setup Completed Seleccione el tipo de conexión según indicaciones del ISP Haga clic en el botón Next Vaya al menú Setup Completed Cambie los números VPI y VCI si se lo ha indicado su ISP Escriba los nuevos valores ...

Page 54: ...a conexión ADSL Haga clic en el botón Restart para guardar los nuevos parámetros y reiniciar el módem El módem tardará unos dos minutos en reiniciarse Mientras se guarda la configuración y se reinicia el módem aparece esta pantalla No apague el módem mientras se muestre esta pantalla Haga clic en Restart ...

Page 55: ...ción de los parámetros IP en Windows XP Siga estos pasos a fin de configurar un ordenador con Windows XP para que sea un cliente DHCP 1 Desde el menú Start del escritorio vaya a Control Panel 2 En la ventana Control Panel haga clic en Network and Internet Connections Haga clic en Network and Internet Connections Desde el menú Start vaya a Control Panel ...

Page 56: ...s 4 En la ventana Network Connections haga clic con el botón de la derecha en Local Area Connection y luego en Properties Haga clic con el botón de la derecha en el icono de Local Area Connection y seleccione la opción Properties en el menú desplegable Haga clic en Network Connections ...

Page 57: ...g items para seleccionarlo Haga clic en el botón Properties 6 Seleccione Obtain an IP address automatically para ello haga clic en el círculo Haga clic en el botón OK El ordenador está listo para usar el servidor DHCP del módem Haga clic en Properties Seleccione Obtain an IP address automatically en la venta Internet Protocol TCP IP Properties ...

Page 58: ...rante el periodo de garantía del producto Los clientes españoles pueden ponerse en contacto con la asistencia técnica de D Link a través de nuestro sitio web o por teléfono Asistencia Técnica de D Link por teléfono 902 304545 de Lunes a Viernes desde las 9 00 hasta las 14 00 y de las 15 00 hasta las 18 00 Asistencia Técnica de D Link a través de Internet http www dlink es email soporte dlink es ...

Page 59: ...contattare il rivenditore Il presente prodotto può essere configurato con un qualunque browser Web aggiornato come Internet Explorer versione 6 o superiore e Netscape Navigator versione 6 2 3 o superiore DSL 380T ModemADSL L utilizzo di un trasformatore con voltaggio differente danneggia il prodotto e compromette la validità della garanzia Modem ADSL DSL 380T CD ROM conmanuale Cavo Ethernet CAT5 U...

Page 60: ...dicare il corretto funzionamento B Collegare le due estremità del cavo Ethernet rispettivamente alla porta Ethernet LAN sul pannello posteriore del dispositivo DSL 380T e all adattatore porta Ethernet del computer Porta ADSL per la connessione della linea ADSL Porta Ethernet per la connessione di un cavo Ethernet Pulsante di Reset Connettore alimentatore Per la connessione di un trasformatore ...

Page 61: ...ezionando l opzione Ottieni automaticamente un indirizzo IP La procedura per modificare le impostazioni di rete in ambiente Windows XP è descritta nell Appendice del presente manuale rapido d installazione Per altri sistemi operativi Windows consultare il manuale utente Inserire admin nei campi User Name e Password Cliccare su OK Aprire il browser Web e digitare http 192 168 1 1 nel campo Indirizz...

Page 62: ...casi è possibile utilizzare il programma Setup Wizard per instaurare la connessione ADSL con il proprio ADSL Internet Service Provider ISP Per avviare il programma Setup Wizard cliccare sul pulsante Run Wizard al centro della pagina web Il sistema visualizza il menu del programma Setup Wizard Cliccare sul pulsante Run Wizard ...

Page 63: ...e all ISP alcuni dati tra cui il tipo di connessione e altre informazioni correlate e i valori dei parametri VPI e VCI In mancanza di queste indicazioni non è possibile portare a termine la procedura di configurazione La prima pagina del programma Setup Wizard elenca i passi da effettuare per completare la configurazione Cliccare sul pulsante Next per cominciare la configurazione Cliccare sul puls...

Page 64: ...Wizard e contattare l ISP Cliccando sul pulsante Next il programma Setup wizard visualizza la pagina successiva in funzione del tipo di connessione selezionata I tipi di connessione selezionabili dal menu del programma Setup Wizard sono PPPoE PPPoA Static IP Address e Bridge Mode Seguire le istruzioni relative al tipo di connessione da utilizzare Selezionare il tipo di connessione utilizzata per i...

Page 65: ...all ISP Se richiesto modificare i parametri VPI e VCI digitando i valori corretti Nel campo Connection Type inserire il tipo di connessione specifico per il servizio Cliccare su Next per accedere alla pagina Setup Completed Nei campi Username e Password inserire nome utente e password dell account fornito dall ISP Modificare i parametri VPI e VCI inserendo nei relativi campi i valori forniti dall ...

Page 66: ... selezionare il tipo di connessione per l incapsulamento Se richiesto modificare i parametri VPI e VCI digitando i valori corretti Cliccare su Next per accedere alla pagina Setup Completed Nel campo Connection Type inserire il tipo di connessione specificato dall ISP Modificare i parametri VPI e VCI inserendo nei relativi campi i valori forniti dall ISP Inserire gli indirizzi IP per la connessione...

Page 67: ...nnessione per l incapsulamento Se richiesto modificare i parametri VPI e VCI digitando i valori corretti Cliccare su Next per accedere alla pagina Setup Completed Nel campo Connection Type inserire il tipo di connessione specificato dall ISP Cliccare sul pulsante Next per accedere alla pagina Setup Completed Modificare i parametri VPI e VCI inserendo nei relativi campi i valori forniti dall ISP ...

Page 68: ...tati Cliccare sul pulsante Restart per salvare le impostazioni e riavviare il modem operazione che richiederà alcuni minuti Durante la procedura di salvataggio e riavvio viene visualizzata la finestra illustrata in figura Non spegnere il modem durante la visualizzazione di questa finestra Cliccare sul pulsante Restart ...

Page 69: ... CD ROM Configurazione delle impostazioni IP in ambiente Windows XP Per configurare come client DHCP un computer dotato di sistema operativo Windows XP la procedura è la seguente 1 Dal menu Start sul desktop selezionare Pannello di Controllo 2 Nella finestra Pannello di Controllo cliccare su Rete e Connessioni Internet Cliccare su Rete e Connessioni Internet Dal menu Start selezionare Pannello di ...

Page 70: ...ella finestra Connessioni di rete cliccare su Connessioni alla rete Locale col tasto destro del mouse Cliccare su Proprietà Col tasto destro del mouse cliccare sull icona Connessioni alla rete Locale e selezionare l opzione Proprietà dal menu a cascata Cliccare su Connessioni di rete ...

Page 71: ...sione utilizza i componenti seguenti Cliccare sul pulsante Proprietà 6 Selezionare l opzione Ottieni automaticamente un indirizzo IP Cliccare sul pulsante OK Il computer è pronto per utilizzare il server DHCP del Modem Cliccare su Proprietà Nella finestra Proprietà del Protocollo Internet TCP IP selezionare l opzione Ottieni automaticamente un indirizzo IP ...

Page 72: ... sito D Link Supporto tecnico per i clienti residenti in Italia D Link Mediterraneo S r L Via N Bonnet 6 B 20154 Milano Supporto Tecnico dal lunedì al venerdì dalle ore 9 00 alle ore 19 00 con orario continuato Telefono 02 39607160 URL http www dlink it supporto html Email tech dlink it ...

Reviews: