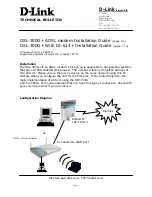
background image


DSL-302G 

ADSL Modem


User’s Guide


Third Edition  

July 2003 


Summary of Contents for DSL-302G

Page 1: ...DSL 302G ADSL Modem User s Guide Third Edition July 2003 i ...

Page 2: ...n und oder das Gehäuse ist beschädigt f Wenn das Gerät deutliche Anzeichen eines Defektes aufweist 16 Bei Reparaturen dürfen nur Orginalersatzteile bzw den Orginalteilen entsprechende Teile verwendet werden Der Einsatz von ungeeigneten Ersatzteilen kann eine weitere Beschädigung hervorrufen 17 Wenden Sie sich mit allen Fragen die Service und Repartur betreffen an Ihren Servicepartner Somit stellen...

Page 3: ...S D LINK MAKES NO WARRANTY THAT ITS SOFTWARE PRODUCTS WILL WORK IN COMBINATION WITH ANY HARDWARE OR ANY APPLICATION OR SYSTEM PLATFORM SOFTWARE PRODUCT PROVIDED BY ANY THIRD PARTY EXCEPTING ONLY SUCH PRODUCTS AS ARE EXPRESSLY REPRESENTED IN D LINK S APPLICABLE PRODUCT DOCUMENTATION AS BEING COMPATIBLE D LINK S OBLIGATION UNDER THIS WARRANTY SHALL BE A REASONABLE EFFORT TO PROVIDE COMPATIBILITY BUT...

Page 4: ...on This equipment has been tested and found to comply with the limits for a Class B digital device pursuant to part 15 of the FCC Rules These limits are designed to provide reasonable protection against harmful interference in a residential installation This generates uses and can radiate radio frequency energy and if not installed and used in accordance with the instructions may cause harmful int...

Page 5: ...g IP Settings on Your Computer 9 Accessing the Modem s Web Configuration Manager 16 Configure the Internet Connection ADSL Service Connection 18 Configure PPPoA and PPPoE Connections 18 Configuring the Modem for a Bridged or an IPoA Connection 19 Web based Configuration 27 Quick Configuration 28 System View 29 System Time 30 Changing the LAN IP Settings 30 DHCP Modes 31 DHCP Server 32 DHCP Relay 3...

Page 6: ...Diagnostics 54 Technical Specifications 55 Ethernet Diagnostic Utility 56 Uninstalling the Modem Software 62 Low Pass Filters 64 ...

Page 7: ...he modem until you have finished all of the steps to install the USB driver and your computer has restarted Installation Requirements Information you will need from your ADSL service provider Username This is the Username that is used to log on to your ADSL service provider s network It is commonly in the form user isp com Record your info here Password This is the Password that is used in conjunc...

Page 8: ...l need about your LAN or computer Ethernet NIC If your computer has an Ethernet NIC you can connect the DSL 302G to this Ethernet port using an Ethernet cable You can also use the Ethernet port on the DSL 302G to connect to other Ethernet devices such as a Wireless Access Point Record your info here USB port If your computer has an available USB port you can connect the DSL 302G to this USB port u...

Page 9: ...y See the DSL 302G User s Guide for instructions on how to change the IP settings on your computer so you can access the modem s management and configuration software from your Internet browser IMPORTANT If you will use the DSL 302G s USB port to connect to your computer do not connect the USB cable to the modem until you have finished all of the steps to install the USB driver and your computer h...

Page 10: ...DSL 302G ADSL Ethernet Modem User s Guide 1 Click the Next button in the first InstallShield dialog box 2 Enter your name and company information and click Next 4 ...

Page 11: ...or Browse to choose a different location 4 Click Next to use the folder listed or enter a different folder name 5 The Installation software is now installing the necessary drivers and diagnostic tools for your Operating System This may take up to 2 minutes depending on your computer 5 ...

Page 12: ...r cord as instructed Click Next 7 For Ethernet installation please now connect the Ethernet cable Then click Next 8 If you are using USB DO NOT connect your modem until this installation is finished and your PC has restarted For now just click Next to continue 6 ...

Page 13: ...r if using an Ethernet connection For a USB connection simply connect the USB ports as shown below 11 Upon restart or installation you will find two new icons displayed on your computer s desktop as shown below 1 If you are using an Ethernet connection please double click on the DSL 302G Ethernet diagnostics icon and continue reading 2 If you are using a USB connection please double click on the D...

Page 14: ...n If using an IPoA Bridge connection please use the Web Browser interface only See Using the Web Browser below For further instructions please read the DSL 302G User Guide 12 The first time you click the DSL 302G Ethernet Diagnostics icon you will be prompted for your username and password Please enter these as shown in the above using the username and password given to you by your ISP 13 Click on...

Page 15: ...ernet port enter http 10 1 1 1 default Ethernet IP address of the DSL 302G 2 If you wish to access the configuration software through the USB port double click on the icon below or enter http 10 1 1 2 default USB IP address of the DSL 302G 3 Press the Enter key and the following prompt will appear Note Be sure that the web browser on your computer is not configured to use a proxy server in it s In...

Page 16: ...ion settings Connection Type PPPoA VC Mux VPI 8 VCI 35 Security Protocol CHAP Do not change any of these settings unless you have been instructed to do so and you have the correct settings as supplied by your ADSL service provider The available connection types are PPPoA VC Mux PPPoA LLC PPPoE VC Mux PPPoE LLC 6 Once you have completed the settings click on the Save Reboot button to save the setti...

Page 17: ...ensitive used for your ADSL account 8 You should now be successfully connected to your ADSL service provider Please launch your Web Browser and test by going to http www dlink com au 9 You can also use the System View display to check the full status of the DSL 302G Web based Manager First Time Log On 11 ...

Page 18: ...elect the type of Security Protocol used by your ADSL service provider This is the method used to verify your Username and Password 4 Type in the Username or account number used to access the service provider s network 5 Type in the Password for your account used to access the service provider s network Quick Configuration Save Reboot When you have defined the Quick Configuration settings click th...

Page 19: ... pair telephone line with standard RJ 11 connectors Low Pass Filters Since ADSL and telephone services share the same copper wiring to carry their respective signals a filtering mechanism may be necessary to avoid mutual interference A low pass filter device can be installed for each telephone that shares the line with the ADSL line These filters are easy to install passive devices that connect to...

Page 20: ...tain the Internet connection is stored in the Modem In this case it is not necessary to install software on your computer Account Information User Name and Password Most users will need to supply a user name and password used to access the service provider s network and ultimately the Internet This information is stored either in the Modem s memory or on your computer depending on the type of ADSL...

Page 21: ...ultaneous virtual connections for a single ADSL account Supports T1 413 issue 2 G dmt and G lite standards Auto handshake and rate adaptation for different ADSL flavors Widest range of DSLAM interoperability Supports bridged Ethernet over ATM RFC 2684 Built in MIBs for SNMP management Upgradeable firmware through TFTP Packing List Open the shipping carton and carefully remove all items In addition...

Page 22: ...ocess has been settled Blinking green light indicates an active WAN session Ethernet Link Act Steady green light indicates a valid Ethernet connection Blinking green indicates an active Ethernet session USB Link Act Steady green light indicates a valid USB connection Blinking green indicates an active USB session Rear Panel All cable connections to the Modem are made at the rear panel The factory ...

Page 23: ...rs Note The LED indicators can also be viewed on the desktop of your computer if you install the Ethernet Diagnostic Utility software shipped with the device Connecting the ADSL Line Use the twisted pair ADSL cable standard telephone cable included with the Modem to connect it to your telephone line Simply plug one end of the cable into the ADSL port RJ 11 receptacle on the rear panel of the Modem...

Page 24: ...ndicate a valid connection The rules governing Ethernet cable lengths apply to the LAN to Modem connection Be sure that the cable connecting the LAN to the Modem does not exceed 100 meters Powering up the Modem To power on the device 1 Insert the AC Power Adapter cord into the power receptacle located on the back of the Modem and plug the adapter into a nearby power source 2 You should see the Pow...

Page 25: ... port to connect the modem to your computer the USB driver you installed above will now find the modem and establish the connection Once the connection is made the USB connection will appear in the Windows Control Panel as an Ethernet NIC 5 If you are using the Ethernet port to connect the modem to your computer the connection will now be active 6 Change the IP settings of your computer so you can...

Page 26: ...l Identifier VCI below to identify the data path between your ADSL service provider s network and your computer VCI This is the Virtual Channel Identifier VCI It is used in conjunction with the VPI above to identify the data path between your ADSL service provider s network and your computer Information you will need about your DSL 302G ADSL modem Modem Username This is the Username you will be pr...

Page 27: ...our DSL 302G ADSL modem Configuring IP Settings on Your Computer In order to configure your system to receive IP settings from the Modem it must first have the TCP IP protocol installed If you have an Ethernet port on your computer it probably already has TCP IP protocol installed If you are using Windows XP the TCP IP is enabled by default for standard installations Below is an illustrated exampl...

Page 28: ...ndows XP for DHCP Use the following steps to configure a computer running Windows XP to be a DHCP client 1 From the Start menu on your desktop go to click on Control Panel 2 In the Control Panel folder click on Network and Internet Connections 10 ...

Page 29: ...he Network and Internet Connections folder click on Network Connections 4 In the Network Connections folder highlight the Local Area Connection icon by clicking on it once A new option is revealed under Network Tabs in the left side panel 11 ...

Page 30: ... settings of the connection under Network Tabs 6 In the General Tab of the Local Area Connection Properties menu highlight Internet Protocol TCP IP under This connection uses the following items by clicking on it once Click on the Properties button 12 ...

Page 31: ...display as an installed component click Install 6 In the Select Network Component Type dialog box select Protocol and then click Add 7 Select Internet Protocol TCP IP in the Network Protocols list and then click OK 8 You may be prompted to install files from your Windows 2000 installation CD or other media Follow the instructions to install the files 9 If prompted click OK to restart your computer...

Page 32: ...n 2 In Network and Dial up Connections window right click the Network icon and then select Properties 3 In the Network Properties dialog box select TCP IP and then click Properties 4 In the TCP IP Settings dialog box click the Obtain and IP address automatically option 5 Double click OK twice to confirm and save your changes and then close the Control Panel Your computer is now ready to use the Mo...

Page 33: ...plays a list of currently installed network protocols If the list includes TCP IP then the protocol has already been enabled Skip to Configure IP Information 5 If TCP IP does not display as an installed component click Add 6 In the Select Network Protocol dialog box select TCP IP and then click OK You may be prompted to install files from your Windows NT installation CD or other media Follow the i...

Page 34: ...s the management software The default LAN IP address of the Modem is used in the Address bar of your web browser window If you are using an Ethernet NIC to connect your computer to the modem type in http followed by the default IP address 10 1 1 1 in the address bar of the browser The URL in the address bar should read http 10 1 1 1 If you are using a USB port to connect your computer to the modem...

Page 35: ...e Quick Configuration menu to change the Modem s configuration settings as instructed by your ISP You will then need to save or the settings to the flash memory and reboot the Modem IMPORTANT If you are using IPoA or a bridged Ethernet connection RFC 1483 you cannot use the Quick Configuration menu to establish the connection Please read the next chapter for instructions for using IPoA and bridged...

Page 36: ...ection 1 Choose the Connection Type Select PPPoA LLC PPPoA VC Mux PPPoE VC Mux PPPoE LLC from the pull down menu 2 If necessary change the VPI VCI values Many users will use the default values VPI 8 and VCI 35 3 Type in the Username or account number used to access the service provider s network 4 Type in the Password for your account used to access the service provider s network Quick Configurati...

Page 37: ... are nearly the same as the steps required to configure the modem for Bridge mode Follow the steps below and watch for the IPoA heading Configuring the DSL 302G for a Bridged EoA or IPoA ADSL Connection The DSL 302G ADSL modem is shipped from the factory with PPPoA as the default operating mode To ensure that the DSL 302G configuration is set to it s factory default settings you should reboot the ...

Page 38: ...l open the ATM VC Interface Modify menu as shown below Enter the VPI VCI and Mux Type settings as provided by your ADSL service provider Most users will use LLC Mux Type Click the Submit button to make the changes current A screen will appear to confirm the change in the ATM VC interface Next open the WAN folder and click on the PPP link This will open the Point to Point Protocol PPP Configuration...

Page 39: ...ent Configuring the Modem for Bridge Mode EoA To configure the DSL 302G ADSL modem to operate in Bridge mode Ethernet over ATM EoA follow these instructions Open the WAN folder and then click on the EOA link This will open the RFC1483 Ethernet over ATM EoA Config menu as shown below Click the Add button to open the EOA Interface Add menu as shown below 21 ...

Page 40: ...FC1483 Ethernet over ATM EoA Config menu This will now display the new protocol assignment as shown below Next you need to disable Network Address Translation NAT on the modem Open the WAN folder if it is not already open and click on the NAT link This will open the Network Address Translation NAT Configuration menu as shown below 22 ...

Page 41: ...Add button A confirmation screen will appear briefly to confirm the addition of the new bridge configuration Finally you will need to open the Admin folder and then click on the Save Reboot link to open the Save Reboot menu and finally click the Save button to enter the settings into the modem s permanent memory Now you can setup your computer to use the IP address assigned to you by your ADSL ser...

Page 42: ...ce Add menu as shown below Enter the IPoA configuration information supplied to you by your ADSL service provider In the example above the ADSL service provider assigned an IP address of 203 1 1 2 a netmask of 255 255 255 252 and a gateway IP address of 203 1 1 1 Click the Submit button to make the change current A confirmation screen will appear to confirm the changes Close the IPoA Interface Add...

Page 43: ...wn below Simply click the Add button You will see the No Low I F entry change to aal5 0 as shown below Close the IPoA Interface Map menu When the configuration manager reappears click the Refresh button to update the information on the IP over ATM IPoA Configuration screen It should look something like this 25 ...

Page 44: ...then click the Submit button to make the change current Finally you will need to open the Admin folder and then click on the Save Reboot link to open the Save Reboot menu and finally click the Save button to enter the settings into the modem s permanent memory You will need to set your computer to Obtain IP address automatically to connect to your ADSL service provider s network and the Internet I...

Page 45: ... to access configuration and management menus The LAN folder is used for assigning LAN IP settings to the Ethernet and USB interfaces The WAN folder is used to configure settings that allow the Modem to operate on the service provider s network If you have a bridged Ethernet or IPoA connection find the EOA and IPOA hyperlinks in the WAN folder to configure the settings for these connection types T...

Page 46: ... The Quick Configuration displays the settings you are most likely to need to change when you first set up the Modem These settings are explained briefly below Refresh Rate Select the time interval from the drop down menu The screen will be updated refreshed at this interval If you do not want the page to automatically refresh choose No Refresh Connection Type Select PPPoA LLC PPPoA VC Mux PPPoE V...

Page 47: ...d performance statistics for the DSL line WAN Interface Displays the names and settings for the device WAN interfaces that communicate with your ISP via DSL such as a PPP EOA or IPoA interface Most users will use a single connection labeled ppp 0 Multiple software defined interfaces may be configured to use the DSL connection Click on the interface names to view the configuration menus for these i...

Page 48: ... in the task bar 5 Click Save to save your changes to permanent memory System Modify Changing the LAN IP Settings The LAN IP address identifies the LAN port eth 0 as a node on your network that is its LAN IP address must be in the same subnet as the computers on your LAN You can change the default LAN IP address and Net Mask for both the Ethernet and the USB port to suit the IP address arrangement...

Page 49: ... Mask The USB Network mask identifies which parts of the USB IP Address refer to your network as a whole and which parts refer specifically to nodes on the network Type in the Subnet Mask for the USB interface Default 255 0 0 0 Click the Submit button to save the settings in temporary memory If you are changing the IP address you will need to login again to access the web manager If you are gettin...

Page 50: ...tton to save the settings in temporary memory When you are done making changes to the configuration settings open the Commit Reboot menu and click the Commit button to save your changes to permanent memory DHCP Server In order to use more than one DHCP server it will be necessary to define one or two sets of parameters for each IP address pool First use the DHCP Server menu to define new DHCP serv...

Page 51: ...th the Start IP Address and End IP Address fields NetMask Type in a subnet mask IP address Domain Name Enter a domain name for the network group or leave blank Gateway Address Type in the Default Gateway IP Address that will be assigned to and used by the DHCP clients DNS Address Enter any Internet DNS server IP address available through the WAN connection or use the DNS settings supplied by your ...

Page 52: ...reason you do not want to make them available to your network you can exclude them from the pool Click the Submit button to save the settings in temporary memory When you are done making changes to the configuration settings open the Commit Reboot menu and click the Commit button to save your changes to permanent memory View current DHCP address assignments When the Modem acts as a DHCP server it ...

Page 53: ...P Relay Some ISPs perform the DHCP server function for their customers home small office networks In this case you can configure the Modem as a DHCP relay agent When a computer on your network requests Internet access the Modem contacts your ISP to obtain an IP address and other information and then forwards that information to the computer Follow these instructions to configure DHCP relay First o...

Page 54: ...rent information on the DSL line configuration parameters and performance statistics as following DSL Status Table Refresh Rate Set the rate of automatically refresh the screen Clear Reset all counters to zero DSL Param Display data about the configuration of the DSL line Stats Display DSL line performance statistics Refresh Redisplay the page with newly accumulated values DSL Param The DSL Parame...

Page 55: ...DSL line performance statistics as below DSL Line Performance Statistics The DSL Statistics page reports error data relating to the last 15 minute interval the current day and the previous day At the bottom of the page the Detailed Interval Statistic table displays links you can click on to 37 ...

Page 56: ... existing PPP configuration click the pencil icon for that set When you choose to add a new set a new menu appears To delete an existing PPP configuration click the trashcan for that set To check the detail PPP configuration information click for that set PPP Configuration You can configure the following settings on the PPP Configuration page Inactivity TimeOut mins The time in minutes that must e...

Page 57: ... received on a private interface are subject to a less restrictive set of protections because they originate within the network The term DMZ de militarized zone in Internet networking terms refers to computers that are available for both public and in network accesses such as a company s public Web server Protocol The type of PPP protocol used Your ISP may use PPP over Ethernet PPoE or PPP over AT...

Page 58: ...twork service providers that sell DSL services often use the EOA protocol for data transfer with their customers DSL Modems EOA is implemented to create a bridged connection between a DSL Modem and the ISP In a bridged connection data is shared between the ISP s network and their customer s as if the networks were on the same physical LAN Bridged connections do not use the IP protocol EOA can also...

Page 59: ...ed in the software and identify the type of traffic that can be supported such as data or voice Internet data services typically use an AAL5 type interface If you are adding a new VCC Interface choose the AAL5 set you want to define from the pull down menu Add menu only Conf IP Address The IP address you want to assign to the interface Netmask The netmask you want to assign to the interface Use DH...

Page 60: ... need to specify IP information If you enable DHCP for this interface then the Configured IP address will serve only as a request to the DHCP server The actual address that is assigned by the ISP may differ if this address is not available Some ISPs use static IP settings that are manually assigned to each account If your service provider instructs you to configure a Static IP Address type in the ...

Page 61: ...efers to computers that are available for both public and in network accesses such as a company s public Web server RFC 1577 Specifies whether the IPoA protocol to be used complies with the IEFT specification named RFC 1577 Classical IP and ARP over ATM contact your ISP if unsure Lower Interface The name of the lower level interfaces on which IPoA interface will operate The low level interface nam...

Page 62: ...6 below then the IP address you enter here will serve as a requested address the remote computer may assign another address if necessary 6 If the remote your ISP provides a DHCP server you can click the Enable radio button in the Use DHCP field to have the IP address dynamically assigned from the server 7 If you want to enable the IP Unnumber function you can click the Enable radio button 8 If you...

Page 63: ...the establishing state where the connection is being set up the active state where the connection is being used to transfer data and the closing state in which the connection is being shut down When a NAT rule is in effect on a TCP session in the active state the session will timeout if no packets are received for the time specified in TCP Idle Timeout When in the closing state the session will ti...

Page 64: ...es It is recommended that you select rule IDs as multiples of 5 or 10 so that in the future you can insert a rule between two existing rules Once a data packet matches a rule the data is acted upon according to that rule and is not subjected to higher numbered rules IF Name Typically NAT rules are used for communication between your LAN and the Internet Because the device uses the WAN interface wh...

Page 65: ...anslation rule to apply to accesses to the specified server type at the specified IP address or network Bridge Configuration The Modem can be configured to act as a bridging device between your LAN and your ISP Bridges are devices that enable two or more networks to communicate as if they are two segments of the same physical LAN This section describes how to configure the Modem to operate as a br...

Page 66: ...ch you want to bridge data and then enable bridging mode by clicking the Enable option Click the Submit button to save the settings in temporary memory When you are done making changes to the configuration settings open the Commit Reboot menu and click the Commit button to save your changes to permanent memory Note If you enable bridging on an interface that has already been assigned an IP address...

Page 67: ...figuration Manager and then click the ATM VCC button in the Bridging folder The ATM VCC Configuration page displays as shown below ATM VC Configuration Menu Additional Virtual Connections In order to use more than one PVC setting it will be necessary to define one or two set of parameters for each virtual connection First use the ATM VC Configuration menu to define new AAL5 settings All additional...

Page 68: ...ce provider for this additional service Add or Modify PVC 1 Choose the AAL5 set you want to define from the pull down menu Add menu only 2 Select PVC from the pull down menu 3 Type in the new VPI and VCI values for a new VC Interface or changing the existing values 4 Select VC Mux or LLC from pull down menu 5 Type the number of MAX Proto per AAL5 The default value of VC Mux mode is 1 and LLC is 2 ...

Page 69: ...g the Manager Password The first time you log into the Web Configuration Manager use the default user ID and password admin and admin The system allows only one user ID and password Access the User Configuration menu in the Admin folder Change User Password To change user name and password used for management privileges log into the Configuration Manager click on the Add button and change these se...

Page 70: ...nly saved until the device is reset or turned off You must Commit the changes to saves them permanently Use the Save Reboot menu to commit changes to permanent storage After you have submitted all the configuration changes you want to make for this session click on the Save Reboot button in the Admin folder to view the Commit Reboot page Save and Reboot To save current configuration settings as th...

Page 71: ...rror message informs you to try the upload again Check the filenames and attempt to upload again If the file still will not load reboot the device and try again Image Firmware Upgrade Upgrade File Type in the full path and file name of the firmware file to be uploaded Alternatively you may click the Browse button to search for the file on your system Alarms The Configuration Manager can be used to...

Page 72: ...gnostics feature executes a series of test of your system software and hardware connections Use this feature when working with your ISP to troubleshoot problems Diagnostics Table Select the Virtual Circuit and click Submit A message will appear informing you if the loop test succeeded or failed The diagnostics utility will run a series of test to check whether the device s connections are up and w...

Page 73: ...ream up to 512 Kbps MEDIA INTERFACE EXCHANGE RJ 11 port ADSL telephone line connection RJ 45 port for 10 100 BASE T Ethernet connection USB 1 1 Type B connector to host PHYSICAL AND ENVIRONMENTAL DC INPUTS POWER ADAPTER 120 VAC to 230 VAC 60Hz 24W 9 V AC 1 0A POWER CONSUMPTION 9 Watts Max OPERATING TEMPERATURE 0 to 40 C 32 to 104 F HUMIDITY 5 to 95 non condensing DIMENSIONS 142 mm x 117 mm x 31 mm...

Page 74: ...ain IP settings from the built in DHCP server It is not necessary to install this software to use the Modem To install the software insert the Installation CD into the CD ROM drive of your computer and click the Install DSL 302G link on the pop up menu Follow the instructions as they are presented Be sure that the Ethernet Diagnostics option is selected in the Select Components dialog box When you...

Page 75: ...Modem in near real time To access the Ethernet Diagnostic Utility click the Setup button a new dialog box appears The first tab of the Diagnostic menu presented is the User Details tab Here you can change your ADSL account user name and password If you need to change this information just enter the new user name and password click on the Save button The new information will be saved and the modem ...

Page 76: ...ble is connected firmly at both ends and verify that the Modem is configured with the correct VPI VCI settings Click the Connection tab to display the ADSL connection settings VPI VCI and connection type used for the Modem The Connection tab displays basic connection information about the Modem If necessary this menu can be used to change the basic connection settings To change the VPI VCI or Enca...

Page 77: ...e adding a new virtual connection type in a unique Channel number to identify the connection Numbers 1 8 are valid identifiers used for the Channel value Any new virtual connections must have a VPI VCI combination that is unique to the device Use the values assigned by your ADSL service provider Select the Encapsulation method used for the connection and click the OK button to add the new Channel ...

Page 78: ...DSL 302G ADSL Modem User s Guide Basic performance information including the ADSL mode or flavor used by the device is listed in the ADSL menu tab The ATM menu tab displays ATM cell data 60 ...

Page 79: ...ADSL Modem User s Guide The AAL5 menu tab displays still more performance data pertinent to AAL5 ATM Adaptive Layer 5 transport The Ethernet menu tab displays data packet statistics for the Ethernet interface 61 ...

Page 80: ... software To launch the automatic uninstall program that will remove the DSL 302G Ethernet Diagnostics Utility and the USB device driver 1 From the Start menu go to Programs and find the D Link DSL Family folder Double click on Uninstall DSL302G Diagnostic and USB Driver 2 Follow the instructions as they appear in the dialog boxes that appear on your desktop First you are asked to confirm that you...

Page 81: ...DSL 302G ADSL Modem User s Guide 4 You may restart the computer immediately or choose to restart later by selecting the appropriate option Click the Finish button to complete the removal 63 ...

Page 82: ... split your telephone line into two separate lines one for regular telephone service and the other for ADSL then you do not need to use any type of filter device Follow the instructions given to you by your ADSL service provider ISP or telephone company about where and how you should connect the Modem to the ADSL line In Line Filters Two common styles of low pass filters are shown in this section ...

Page 83: ...The splitter has three RJ 11 ports used to connect to the wall jack the Modem and if desired a telephone or telephone device The connection ports are typically labeled as follows Line This port connects to the wall jack ADSL This port connects to the Modem Phone This port connects to a telephone or other telephone device The diagram below illustrates the proper use of the split line style filter S...

Page 84: ...rror Bookmark not defined Installation and Connection Establishment Instructions Error Bookmark not defined USB Installation One time only Error Bookmark not defined Ethernet Installation Error Bookmark not defined Uninstall Instructions Error Bookmark not defined Driver and USB Modem uninstall Error Bookmark not defined Removal of previously created Network Interfaces Error Bookmark not defined 1...

Page 85: ...SX 10 1 5 Mac OSX 10 2 Installation and Connection Establishment Instructions Make sure you have Administrator rights for your account as you will need to authenticate as such Unlike Mac OS9 Mac OSX allows several network adapters to be bound to TCP IP at the same time In order to avoid routing problems the following instructions assume your computer is stand alone and NOT connected to any network...

Page 86: ...refreshed automatically after decompression If you do not see the Installer icon at this point drag the file 302G sit to the Trash this is an intermediate decompression file which is not needed later in the installation anyway and this will force OSX to refresh the Window contents causing the Installer icon to appear 6 After that you will find the folder 302G_Mac on your Mac Desktop 7 Double click...

Page 87: ...DSL 302G ADSL Modem User s Guide 9 At the Welcome screen click Next then enter your username and password to Authenticate as a user with Administrative rights and click OK 4 ...

Page 88: ... Finish If you selected Restart Later make sure to RESTART THE COMPUTER before you attempt to use the driver the installation will not be complete until restarting the system 12 If you have not done so yet connect the DSL 302G USB Modem to the computer now using the proper USB Device cable Connect the DSL line to the USB Modem as well 13 Open the System Preferences and select the Network Preferenc...

Page 89: ...rom Refresh Rate pull down menu select No Refresh 21 Enter your ADSL account details into Username eg user isp com au and Password boxes 22 Click Save Reboot Wait for a minute or so 23 You might need to refresh the Quick Configuration page Select Refresh Rate back to 5 Seconds and you could check your Connection Status at the bottom of the Quick Configuration page If it shows Connected you are now...

Page 90: ...structions Driver and USB Modem uninstall 1 Run the uninstaller application located at Applications D Link DSL 302G Uninstall 2 Select Yes remove the software from my computer and click Next 3 Authenticate entering an administrator Name password 7 ...

Page 91: ...nu select Active Network Ports Highlight the interface you created during driver configuration i e Ethernet Adaptor en1 Click Delete and confirm deletion in the following pop up dialogue 4 OSX may not allow you to completely remove the interface If that s the case the checkbox was removed from the Network interface but the interface itself was not deleted you may need to Restart the system and the...

Page 92: ...em Version Compatibility Error Bookmark not defined Installation and Connection Establishment Instructions Error Bookmark not defined USB Installation One time only Error Bookmark not defined Ethernet Installation Error Bookmark not defined Uninstall Instructions Error Bookmark not defined Driver and USB Modem uninstall Error Bookmark not defined 9 ...

Page 93: ...on Compatibility This driver was developed for Operation for Mac OS 9 x Installation and Connection Establishment Instructions USB Installation One time only 24 Insert the Driver CD into your Mac CD ROM then you can find the Icon DLINK_DSL302G_DRIVER on your Mac Desktop 25 Double click on the icon DLINK_DSL302G_DRIVER then on the folder Driver there is the folder Mac 26 Double click on the icon Ma...

Page 94: ...in Folder Stuffit Expander Stuffit Expander by double clicking on it 29 Click File Expand on Stuffit Expander s task bar and choose the file 302G SIT then click on the button Open 30 After that you will find the folder 302G_Mac on your Mac Desktop 31 Double click on the icon 302G_Mac there is the file Installer app 32 Double click the Installer icon i e Installer app 11 ...

Page 95: ...DSL 302G ADSL Modem User s Guide 33 At the Welcome screen click Next 34 A License Agreement will show up click Accept to continue 12 ...

Page 96: ...allation will not be complete until restarting the system 36 If you have not done so yet connect the DSL 302G USB Modem to the computer now using the proper USB Device cable Connect the DSL line to the USB Modem as well 37 Open the Control Panel TCP IP Windows 38 A window should pop up indicating the TCP IP settings 39 From the Connect via pull down menu select the new port i e Ethernet slot 0 40 ...

Page 97: ...k your Connection Status at the bottom of the Quick Configuration page If it shows Connected you are now connected to the Internet else check all the cable connections username and password again steps 20 to 22 If you have further enquiry please contact your ADSL service provider Ethernet Installation 7 If you prefer to use Ethernet connection instead of USB you could simply connect up the Etherne...

Page 98: ... remove the software from my computer and click Next 7 Unplug the USB cable from your DSL 302G 8 Select Restart Now and click Finish If you select Restart later please remember to do it later the Uninstallation will not be completed until then 15 ...

Page 99: ... Pty Ltd 1 Giffnock Avenue North Ryde NSW 2113 Sydney Australia URL www dlink com au E MAIL support dlink com au info dlin T 2F No 119 Pao Chung Rd TEL 886 2 2910 2626 FAX 886 2 2910 1515 URL w E MAIL dssqa tsc dlinktw com tw U 4 th Floor Merit House Edgwa TEL 44 0 20 8731 5555 FAX 44 0 20 8731 5511 BBS 44 0 181 235 5511 URL www dlink co uk E MAIL info dlink co uk U 53 Discovery Drive Irvine TEL 1...

Reviews: