HI_AXU-WR6415_02
AXU-WR6415
MANUAL DEL USUARIO / USER’S MANUAL
DAS Audio Group, S.L.
www.dasaudio.com
Garantía
Todos nuestros productos están garantizados por un periodo de 24
meses desde la fecha de compra. Las garantías sólo serán válidas si son por
un defecto de fabricación y en ningún caso por un uso incorrecto del
producto. La reparación en garantía cubre la reposición de las partes
defectuosas. Otros cargos como portes y seguros, son a cargo del
comprador en todos los casos. Para solicitar reparación en garantía es
imprescindible que el producto no haya sido previamente manipulado e incluir
una fotocopia de la factura de compra.
Warranty
All our products are warrantied against any manufacturing defect for a
period of 2 years from date of purchase. The warranty excludes damage from
incorrect or misuse of the product. All warranty repairs must be exclusively
undertaken by the factory or any of its authorized service centers. To claim a
warranty repair, do not open or intend to repair the product. Return the
damaged unit, at shippers risk and freight prepaid, to the nearest service
center with a copy of the purchase invoice.
C/ Islas Baleares, 24 - 46988 - Fuente del Jarro. Valencia - SPAIN - Tel. 96 134 05 25 - Tel. Intl. +34 96 134 08 60 - Fax +34 96 134 06 07
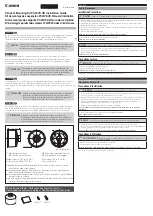
Instrucciones de montaje
1.-
Posicionar el soporte en la
pared y marcar los puntos de anclaje
(A).
2.-
Colocar el
AXU-WR6415
haciendolo coincidir con los puntos
marcados anteriormente y anclarlo a la
pared.
3.-
Posicionar la caja entre los
brazos del
AXU-WR6415
seleccionando
la ranura adecuada (B) para la
orientacion deseada y teniendo en
cuenta el speakon trasero.
4.-
Atornillar sin llegar a fijar la
caja al soporte utilizando la tortillería
(C) suministrada.
5.-
Direccionar la caja en la
posición adecuada y, finalmente,
apriete de los tornillos (C).
Mounting instructions
1.-
Position the bracket on the wall
and mark the fixing points (A).
2.-
Position the
AXU-WR6415
on
the marks made before and fix it.
3.-
Position the enclosure
between the bracket arms selecting
the appropriate slot and angle (B)
depending on the desired orientation
and clearance for the rear Speakon
connector.
4.-
Insert the screws supplied (C)
between the enclosure and the
bracket. Do not tighten yet.
5.-
Aim the enclosure for optimum
coverage and permanently tighten the
screws (C).
Precauciones de Seguridad
Los tacos suministrados son para
uso en paredes de ladrillo, para
cualquier otro material deberá
proveerse de los tacos adecuados.
DAS Audio Group
no se
r e s p o n s a b i l i z a r á d e u s o s n o
recomendados de este soporte, ya sea
la no utilización de los tacos o tornillos
suministrados, o la sujeción de la caja
a superficies que no tengan suficiente
resistencia a la tracción, como son
escayola y yeso, por ejemplo, o a la
falta de resistencia de las estructuras
de las que se suspendan los equipos.
Compruebe periódicamente la
perfecta conservación de los anclajes y
recintos acústicos, sustituyendo los
elementos en los cuales se observen
deterioros. Afloje los tornillos antes de
reorientar las cajas, nunca fuerce los
elementos de volado.
Es altamente recomendable, y en
una gran parte del mundo obligatorio,
asegurar la caja a la estructura
mediante un cable de seguridad
apropiado.
Si tiene cualquier duda, contacte
con un instalador especializado antes
de proceder al montaje.
Safety Precautions
Wall plugs provided are to be
used in brick walls only. For other wall
materials, source the suitable wall plug
before use.
DAS Audio Group
is not
responsible for use other than the
recommended or whether it be the
result of insufficient strength of the
support structure. Use only the screws
and wall plugs supplied on surfaces
that will provide sufficient support. Do
not use on surfaces such as plaster,
and gypsum. It is highly recommended
and in most parts of the world
mandatory, that a safety cable be used
to secure the enclosure to the
structure.
To ensure optimum safety, the
installation should be checked
thoroughly at regular intervals replacing
all deteriorated elements.
Loosen the screws before
reorienting the speaker. Never force the
rigging elements.
Contact a licensed rigger if there
is any doubt.
Introducción
El
AXU-WR6415
está diseñado
para
WR-6415
y sus diferentes
versiones
Introduction
The
AXU-WR6415
is designed for
WR-6415
and different versions
B
C
C
A
A
Contenido
1x AXU
4x tornillo M10x40 DIN 7380
4x arandela M10 DIN 7980 (grower)
4x arandela M10 DIN 125A
2x tornillo ø5x25 DIN 7505B
6x tornillo ø8x38 DIN 7976
6x arandela M8 DIN 125A
6x taco Nylon nº10
1x llave Allen nº5
1x llave Allen nº6
Contents
1x
AXU
4x M10x40 DIN 7380 screw
4x M10 DIN 7980 (grower) washer
4x M10 DIN 125A washer
2x ø5x25 DIN 7505B screw
6x ø8x38 DIN 7976 screw
6x M8 DIN 125A washer
6x n. 10 wall plug
1x n. 5 Allen wrench
1x n. 6 Allen wrench