DMP-720p
Digital Media
Player
Operation Manual
DMP-720P
8
9. Appendix 1
9.1 Specifications
Input ports:
USB2.0/SD/MMC3.2/MS
Output ports:
Y(CVBS)Pb/Pr-SV-R/L stereo
Power Supply:
5V/1A DV (US/EU standards, CE/FCC/UL certified)
Remote Control:
Discrete IR remote
Dimensions (mm):
100(W) x 64(D) x 18.5(H)
Weight(g):
95
Chassis Material:
Plastic
Silk Skin Color:
White/Gray
Operating Temperature: Operating from 0
o
C ~ 70
o
C
10. Appendix 2
MPEG1 and MPEG2
1. VCD MPEG1 1150 Kbps + MP2 224 Kbps (VCD standard with file only
compatibility test)
2. SVCD MPEG2 VBR ~1150 Kbps (max 2520 Kbps) + MP2 224 Kbps (SVCD
standard with file only compatibility test)
3. KVCD MPEG2 VBR ~1150 Kbps (ma max 9800 Kbps) + MP2 192 Kbps
(modified MPEG2 KVCD with file,only compatibility test)
Microsoft MPEG4
1. DivX 3 + MP3 CBR (DivX3 compatibility test)
2. DivX 3 Bitrate Crash Test + MP3 CBR 750/1500/3000/6000 kbps
MPEG4 ASP
1. MPEG4 ASP 4CC DivX + MP3 CBR ((simple DivX codec compatibility
test))
2. MPEG4 ASP 4CC XviD + MP3 CBR (simple XviD codec compatibility test)
3. MPEG4 ASP Bframe mes + MP3 CBR Write down the number of b-frame
mes supported (1/2/3)(multi-bframe without packet bitstream
compatibility test)
4. MPEG4 ASP Bframe mes packet bit MP3 CBR Write down the
numb mber of b-frames supported(1/2/3) (multi-bframe with packet
bitstream compatibility test)
5. MPEG4 ASP Custom MP3 CBR (custom matrix compatibility test)
6. MPEG4 ASP Qpel + MP3 CBR (Qpel compatibility test)
7. MPEG4 ASP GMC 1 WP & 3 WP + MP3 CBR Write down the numb mber
of warp supported: 0/1/3(GMC 1 & 3 warp points (DivX & XviD)
compatibility test))
8. MPEG4 ASP Bitrate Crash Test + MP3 CBR CBR 750/1500/3000/4500 kbps
1
Preface
This user manual teaches you about the Digital-Media-Player (DMP-720p) and
how to make full use of its features. Information contained in this manual has
been carefully checked for accuracy; however, no guarantee is given to the
correctness of the contents. The information in this document is subject to
change without notice.
Safety information
Do not disassemble the DMP-720p. Touching the product's internal parts could
result in injury. In the event of a malfunction or if the DMP-720p is accidentally
broken open, take the product to an authorized service center for inspection.
1. Introduction
The Cypress Digital Media Player is a reliable multimedia player that handles
display and playback of compelling, rich digital media-including high
definition for entertainment and other company product content-across
on-premise digital signage displays. The Digital Media Player is fully
manageable as a standalone device with cute palm-size and abilities to
output quality photos and movies to large size display (up scaling to 720p
high resolution). This unit supports sophisticated functionality including a fully
customizable and dynamic play list; photo slide show with MP3; MPGE1 &2
video playbacks from memory card/USB device.
2. Main Features
●
Supports OSD (On-Screen-Display) menu operation
●
Supports high resolution output up to 720p
●
Supports image formats: JPEG/BMP/GIF/PNG/TIF
●
Supports audio formats: MP3/WMA
●
Supports video formats*: DivX(AVI)/MPEG 1/MPEG2
●
Supports image rotation/Zoom for single page
●
Slide show with Music
●
Memory Card: Secure Digital Card (SD Card)/Multi-Media Card
(MMC3.2)/Memory Stick Pro(MS)
●
Embedded USB 2.0 host controller for USB flash drive connection
●
USB only support FAT32 but not support NTFS
●
IR remote control
●
Easy to install and simple to operate
* Please refer Appendix 2 for reference testing table.
3. Package Contents
1. DMP-720p main body
2. Remote control with Batteries
3. Power Adaptor
4. S-Video Cable
Y(CVBS)Pb/Pr-SV-R/L
5. Documentation (User manual, warranty card)
7
Press [OK] to enter the folders.
Press [
/
] to select the sub-folder.
Press [OK] to enter the sub-folder and select play file.
When play the file, press [Exit] to return to the previous folder. Or
Press [
] to return to previous page.
8.4 Picture mode
Press [Picture] the camera logo will be highlighted and the system only
shows JPEG/BMP/GIF/PNG/TIF formats.
Press [OK] to enter the folders.
Press [
/
] to select the sub-folder.
Press [OK] to enter the sub-folder and select play file.
Press [Exit] to return to previous page.
8.5 Music mode
Press [Music] the CD logo will be highlighted and the system only shows
MP3/WMA formats.
Press [OK] to enter the folders.
Press [
/
] to select the sub-folder.
Press [OK] to enter the sub-folder and select play file.
Press [Exit] to return to previous page.
8.6 Movie mode
Press [Movie] the start filming logo will be highlighted and the system only
shows DivX(AVI)/MPEG 1/MPEG2 formats.
Press [OK] to enter the folders.
Press [
/
] to select the sub-folder.
Press [OK] to enter the sub-folder.
Press [Exit] to return to previous page.
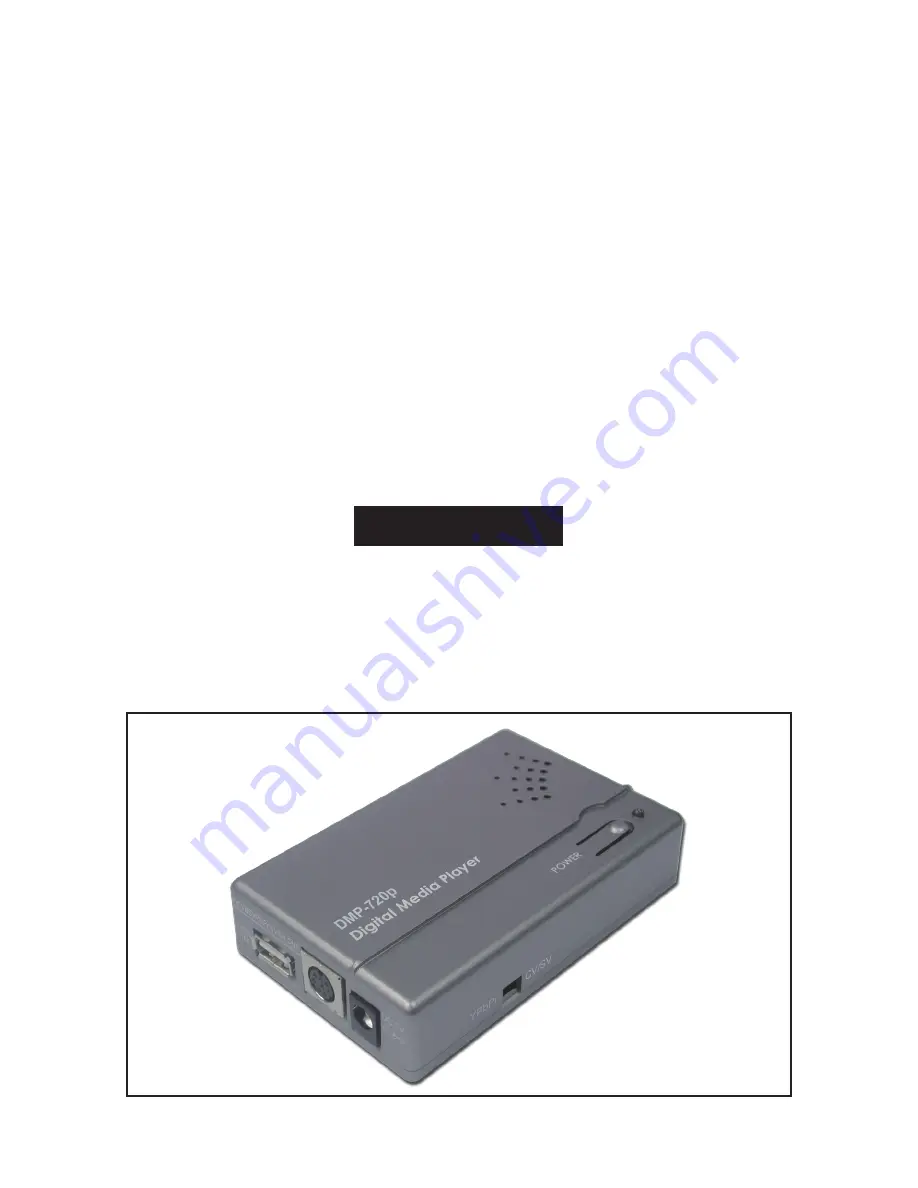
4. Hardware Description
The following sections describe the hardware components of the DMP-720p
4.1.
Front Panel 4.2. Rear Panel
4.3.
Side Panel
To switch between YPbPr or CV/SV output.
5. Overview of the Remote Control
1 . Default: Display all file formats
2 . Power: Press to turn power ON and OFF
3 . Picture: Display JPEG/BMP/GIF/PNG/TIF formats
4 . Music: Display MP3/WMA formats
5 . Movie: Display DivX(AVI)/MPEG 1/
MPEG2 formats
6 . Pic-menu: Picture thumbnail display
7 . Toolbar: Press to display menu bar
8 . Exit: Exit and return to previous page
9 . l
: Press to go to previous picture/music/
movie file
10. l l: Pause current process at the first press
11.
l: Press to go to next picture/music/movie file
12.
: Simultaneous press it to increase the
fast-backward speed: x1~x4
13.
: Play the selection file or play the file after the
pause current process at first press
14.
: Simultaneous press it to increase the
fast-forward speed: x1~x4
15. Movie Repeat: Repeat current movie or press again to release the
repeat feature
16. OSD: Press to view the OSD menu
17.
/
/
/
: Move the cursor up/down/left/right or press left to return to
previous page, press right to enter the folder
2
IR
SD / MMC / MS
USB
IN
Y(CVBS)/Pb/Pr-SV-LR OUT
DC 5V
YPbPr
CV/SV
Pic-menu
Prev
Movie-
Repeat
Music-
Repeat
Pic-
Rotate
OSD
Toolbar
Exit
Pause
Next
Scan
Play
Scan
Power
OK
CR-38
Default
File-Sel
Picture
Music
Movie
1
3
6
9
12
15
17
19
2
5
4
8
11
14
16
20
7
10
13
18
3
18. OK: Enter/Confirm the selection
19. Music Repeat: Repeat current music or press again to release the
repeat feature
20. Picture Rotate: Photo rotate 90
o
/180
o
/270
o
/360
o
6. Using the DMP-720p
After connecting the DMP-720p to the TV and Power on, you are ready to
start to use this unit. This chapter describes how to turn on the device and
how to control On-Screen Display (OSD) menu to configure the device
settings.
7. Turning on Power
Connecting the power adapter to the DMP-720p and press the POWER
button on the remote control to turn on the DMP-720p. Press the button
again to turn the device off.
8. Using the OSD Menu
Press [OK] to enter device folders.
Press [OK/
] to enter the folder/sub-folder.
Press [
] to return to previous page.
6
8.1.6 Change TV Output Mode
Press [
/
] to select the selection.
Press [OK] to enter the TV output mode selection.
Press [
/
] to select the TV output resolution and press [OK] to confirm the
selection.
Press [
] to return to previous page.
8.2 Toolbar
After play the picture/music/movie files, press [Toolbar] to display Toolbar.
Each mode was having different toolbar functions. Below are the function
display logos.
Press [OK] to stop/play the picture/music/movie. In Default mode, when
user simultaneous playing the photo and music, the [OK] key only can
stop/play the music.
Press [OK] to stop playing the current file and then return to previous
page.
l
Press [OK] to go to previous picture/music/movie file.
Simultaneous press [OK] to increase the fast-backward speed: x1~x4.
Simultaneous press [OK] to increase the fast-forward speed: x1~x4.
l Press [OK] to go to next picture/music/movie file.
Press [OK] to display file's sub-title information.
Press [OK] to display file's title information.
Press [OK] to rotate photo at 90
o
/180
o
/270
o
/360
o
.
Press [OK] to zoom the photo/movie: x2~x5.
Press [OK] to view the picture thumbnail.
8.3 Default files mode
When three logo are been highlighted that means the system will show all
the file formats.
Initial set up is in default mode, or press [Default] to display all the file
formats
"IMPORTANT":
When play music and photo simultaneously, the
JPEG/BMP/GIF/PNG/TIF/ MP3/WMA need to be in the same folders.
LANGUAGE
Picture Play Mode
Slideshow Model
Multi Display Screen
Version
Change TVOutPut Mode
TVOUTPUTMODE:720P
TVOUTPUTMODE:480P
TVOUTPUTMODE:576P
4
8.1 OSD menu
Press [OSD] to display OSD setup menu.
8.1.1 Language
Press [OK] to enter the language selection.
Press [
/
] to select the language (Traditional Chinese and English) and
press [OK] to confirm the selection.
Press [
] to return to previous page.
8.1.2 Picture Play Mode
Press [
/
] to select the selection.
Press [OK] to enter the picture play mode selection.
Press [
/
] to select the way to display pictures and press [OK] to confirm
the selection.
Press [
] to return to previous page.
8.1.3 Slideshow Mode
Press [
/
] to select the selection.
Press [OK] to enter the slideshow mode selection.
Press [
/
] to select the slideshow speed and press [OK] to confirm the
selection.
LANGUAGE
Picture Play Mode
Slideshow Model
Multi Display Screen
Version
Change TVOutPut Mode
繁體中文
English
LANGUAGE
Picture Play Mode
Slideshow Model
Multi Display Screen
Version
Change TVOutPut Mode
Normal
Random
Bottom_Top
Top_Bottom
Left_Right
Right_Left
5
Press [
] to return to previous page.
8.1.4 Multi Display Screen
Press [
/
] to select the selection.
Press [OK] to enter the multi display screen selection.
Press [
/
] to select the picture thumbnail display format and press [OK] to
confirm the selection.
Press [
] to return to previous page.
8.1.5 Version
Press [
/
] to select the selection.
Press [OK] to view the software version.
Press [
] to return to previous page.
LANGUAGE
Picture Play Mode
Slideshow Model
Multi Display Screen
Version
Change TVOutPut Mode
Fast
Normal
Slow
LANGUAGE
Picture Play Mode
Slideshow Model
Multi Display Screen
Version
Change TVOutPut Mode
4X3
8X6
LANGUAGE
Picture Play Mode
Slideshow Model
Multi Display Screen
Version
Change TVOutPut Mode