SOFT CLOSE, QUICK
RELEASE TOILET SEAT
(J-X49 HINGE BARREL)
CONTACT DETAILS
Croydex
Central Way
Andover
Hampshire
SP10 5AW
UK
Tel: +44 (0)1264 365881
Email: [email protected]
www.croydex.com
Please follow all assembly and product care instructions to ensure that your product
is assembled safely and retains it's high quality finish.
PLEASE RETAIN THIS MANUAL FOR FUTURE REFERENCE
SAFETY & PRODUCT CARE
1.
To retain the best quality finish, clean product with a soft cloth and a mild soap solution.
2.
DO NOT
use abrasive or chemical cleaners as they may damage the surface of the toilet seat or hinges.
3.
Spray any cleaning liquids onto the cloth and not directly onto the product.
4.
DO NOT
force the seat down as this can cause damage to the product and its function.
5.
Take care when cleaning the toilet pan with chemical cleaners. Avoid contact of the chemical cleaners
with the toilet seat or hinges. Immediately rinse off any splashes to avoid damage or discolouration to the
surface of the toilet seat and hinge parts.
ALL PRODUCT DIMENSIONS DETAILED IN
THIS INSTALLATION AND MAINTENANCE
MANUAL ARE APPROXIMATE
ALL ILLUSTRATIONS OF THE PRODUCT ARE
FOR REFERENCE ONLY. COMPONENTS
SUPPLIED WITH INDIVIDUAL PRODUCTS MAY
DIFFER
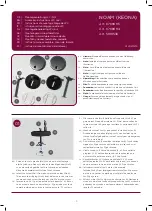
A
B
C
D
E
F
x2
x2
x2
x2
x2
x2
G x2
H
J x2
I
TS 073 R03
K
CHROME CAP
SUPPORT COVER
NUT KEY
BOLT
FLEXI FIT BRACKET
HEX KEY
CONICAL
WASHER
WASHER
NUT
SPACER
RUBBER PLUG
I