DO
GUIDE
TST-902
8.7" Wireless Touch Screen
DO
Install the Battery Pack
NOTE:
The Crestron
®
TST-902 wireless touch screen contains electrostatic discharge (ESD) sensitive
devices. To avoid damaging the unit, perform the following procedure while wearing a grounding strap
that is properly grounded or while working on a grounded workstation.
NOTE:
To prevent damage to the multipin connector and wiring, use care when handling the battery
pack.
NOTE:
The battery pack is enclosed in a black plastic overwrap that is meant to stay on the battery
permanently. It must not be removed.
Perform the following procedure to install the battery pack in a TST-902:
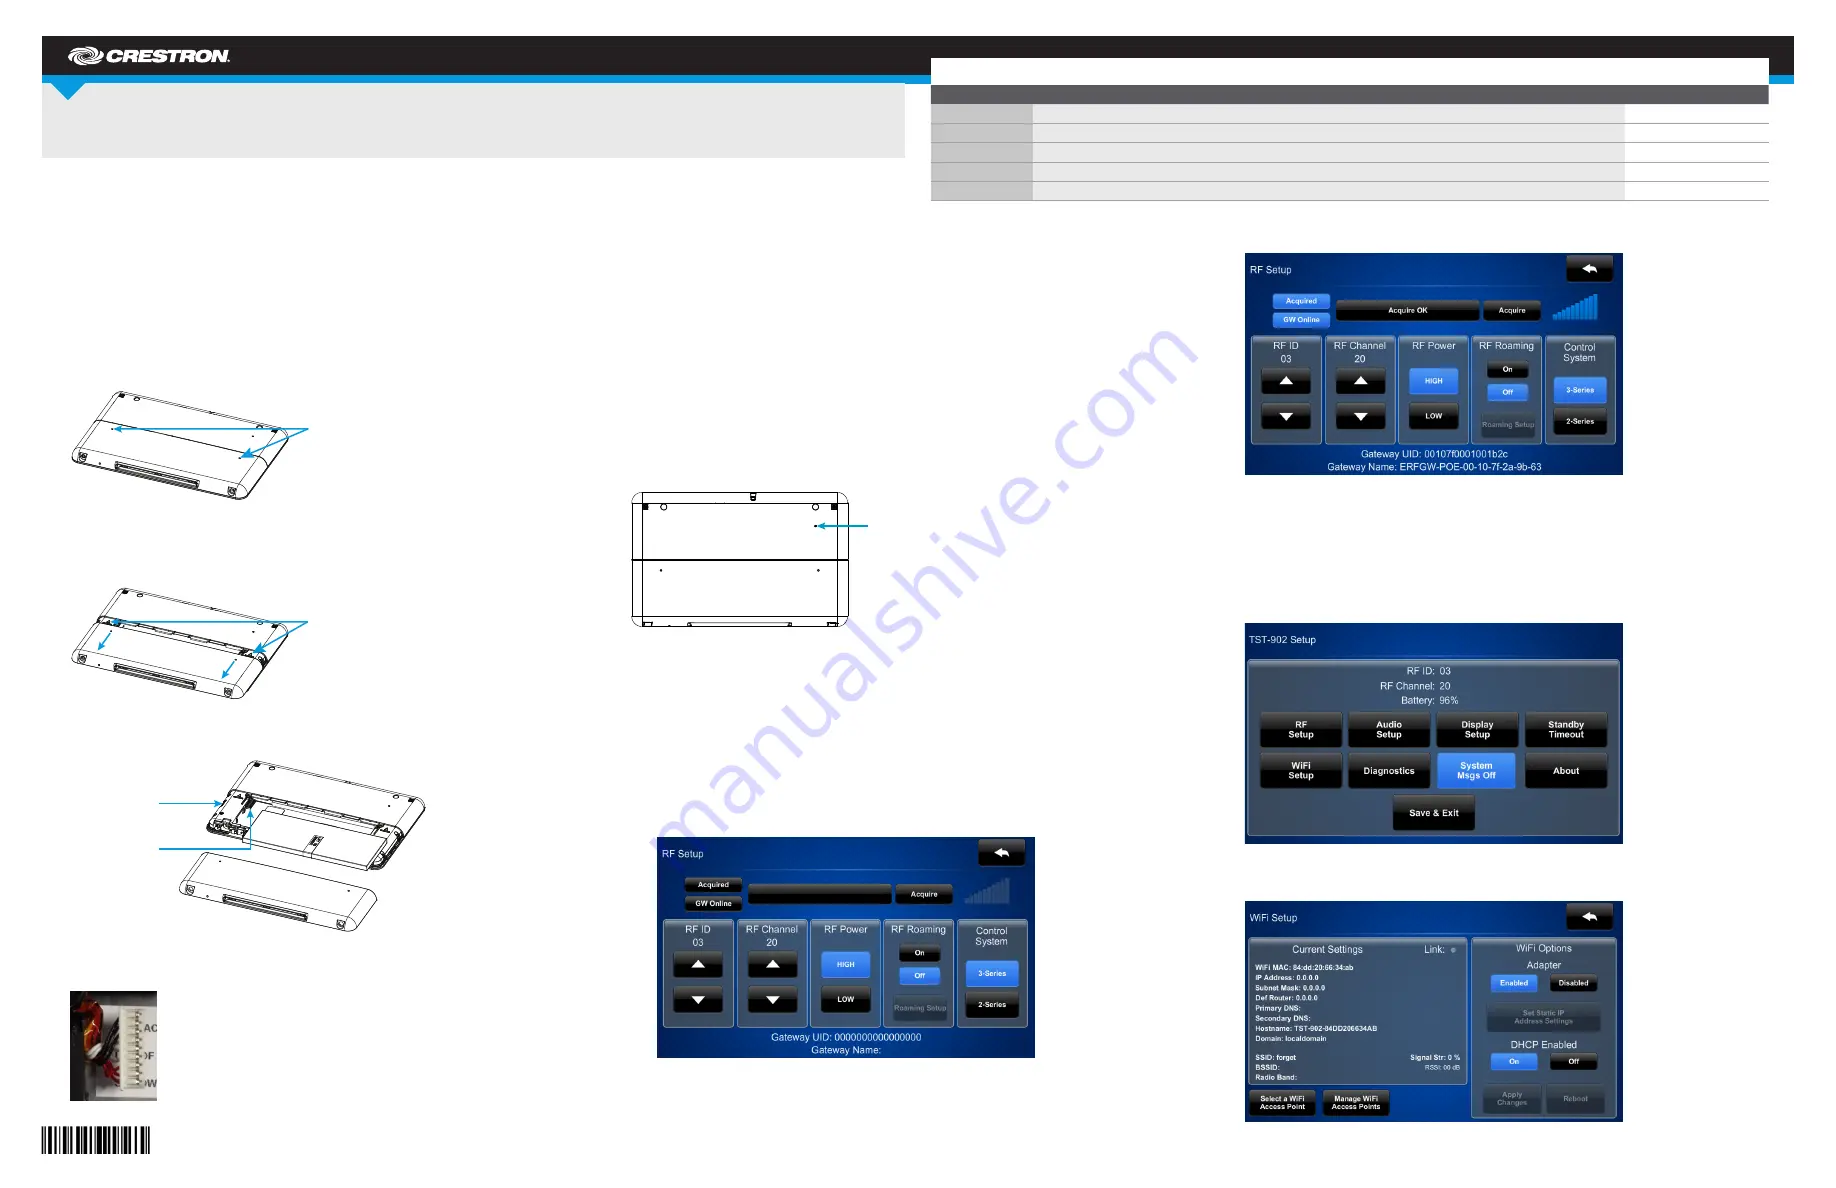
1. Insert the included pin tool into one of the two tab release holes on the back of the unit, and then
slide the bottom cover downward to release the tab on that side.
2. Insert the pin tool into the other tab release hole, and then slide the bottom cover downward to
release the tab on that side.
3. Slide the bottom cover downward about 3/4" (19 mm) to expose the cover markings, and then lift the
cover to remove it.
4. Orient the battery pack so the “Lift to Remove” tag is visible and the multipin connector is
positioned on the left.
5. Ensure that the pin side of the multipin connector on the unit is facing upward, and then connect it
to the battery pack.
3. When the screen displays an “Acquire OK” message, press
ACQUIRE
on the gateway to exit
Acquire mode. The LED turns off.
DO
Set Up a Wi-Fi Connection
NOTE:
In the absence of a Wi-Fi
®
network connection, the USB port behind the battery cover can
be used for project loads, configuration, and firmware updates. (To locate the USB port, refer to the
illustration in step 4 of “DO Install the Battery Pack.”)
Perform the following procedure to set up a Wi-Fi connection for the TST-902:
1. From the main screen, tap
WiFi Setup
to display the
WiFi Setup
screen.
2. If using a static IP address, tap
Set Static IP Address Settings
to display the
WiFi Setup - Static
IPs
screen. If using DHCP, skip to step 5 to connect to a Wi-Fi access point.
DO
Check the Box
QUANTITY
PRODUCT
PART NUMBER
1
Battery Pack, Rechargeable, TST-902-BTP
4513771
1
Docking Station, TST-902-DS
4517187
1
Power Cord, 6' 7" (2 m)
2001134
1
Power Pack, 24 Vdc 0.75 A, 100-240 Vac
2048337
1
Tool, T-Pin
2020478
6. Gently place the battery pack in the battery compartment of the touch screen.
7. Reattach the battery compartment cover to the device by placing it on the back of the touch screen
below the cover markings, and then slide it up into place.
To charge the battery pack, mount the touch screen on its included docking station, and then connect
the docking station to ac power.
NOTE:
If the touch screen is in use while charging, the battery pack may take up to 6 hours to charge.
NOTE:
Upon the initial installation of the battery, allow the touch screen to charge completely overnight
before removing it from the dock.
NOTE:
The battery pack should be replaced every 18 to 24 months under normal use.
DO
Access the Setup Screens
The setup screens enable basic configuration prior to regular operation of the TST-902. If no project is
loaded, tap the screen to access the setup screens. If a project is loaded, access the setup screens by
using the included pin tool to press the reset button four times within a 5-second period.
DO
Set Up a Basic Wireless Connection
Before a TST-902 can be used with a Crestron control system, it must be acquired by a Crestron
extended range (ER) wireless gateway (sold separately). To acquire a TST-902, perform the following
procedure:
1. Use a stylus or other thin-tipped object to press
ACQUIRE
on the gateway to enter Acquire mode.
The accompanying LED illuminates, indicating the unit is ready to link with the touch screen.
2. Tap
RF Setup
on the TST-902 main Setup screen to display the
RF Setup
screen. Then, place the
TST-902 into Acquire mode by tapping
Acquire
on the
RF Setup
screen. The screen displays an
“Acquire in progress” message, and the TST-902 is automatically acquired by the gateway within 2
minutes.
Reset button
Tab release holes
Multipin connector
USB port
Cover markings